School Admin Guide
You are the School Admin (role Admin). You can see every menu and you set the school up for everyone else.
First-time setup checklist
Do these in order when your school is new. Each step links to its instructions.
- Set up the school profile – name, logo, address.
- Create an academic session.
- Set up the school calendar.
- Add classes and class groups (arms).
- Add subjects and allocate them to classes.
- Add staff and give them access and roles.
- Assign teachers to classes.
- Create fee names and set fee amounts.
- Register students.
- Set up assessment and grading, the report card design and signatures.
- Buy SMS units and register your SMS sender name.
- Choose how online payments reach the school.
Start of every term
- Check the school calendar dates.
- Check fee amounts and renew discounts.
- Set up assessment and grading for the term.
- At the start of a new session: promote students, then update teaching assignments.
School setup
Sign up a new school
Purpose: Apply to bring a new school onto EasySchoolApp.
Who can use it: The school owner or proprietor (before they have an account).
Where: Sign-in page › Onboarding / Sign up
Steps
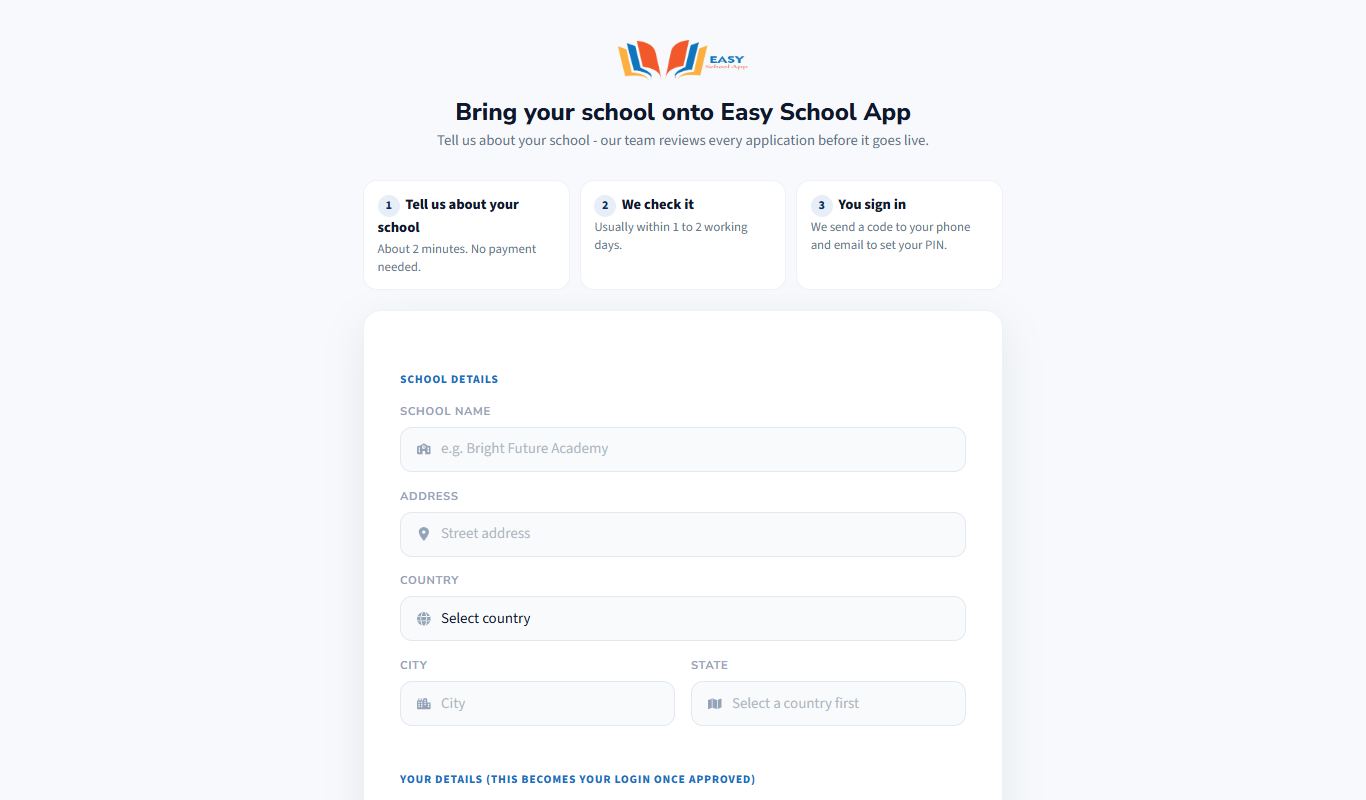
- Open the EasySchoolApp sign-in page and click Onboarding / Sign up (next to "New school?").
- Fill in the school's details: School name, Address, Country, City, State and Website (if any).
- Fill in your details: First name, Last name, Email address and Phone number. Add a Referral code if someone referred you.
- Click Submit application. You see Application received.
- EasySchoolApp reviews the application. When it is approved, you get your login details.
- The first time you sign in, answer the short welcome questions (expected number of students, what you use now, when you plan to start, and who decides).
Common errors and fixes
| Problem | Fix |
|---|---|
| The email or phone is "already in use" | That email or phone already has an EasySchoolApp account. Use another, or contact support. |
Set up the school profile
Purpose: Save your school's name, logo, address and contacts. They appear on report cards, receipts, ID cards and messages to parents.
Who can use it: School Admin, Principal, Bursar.
Where: Settings › School profile
Steps
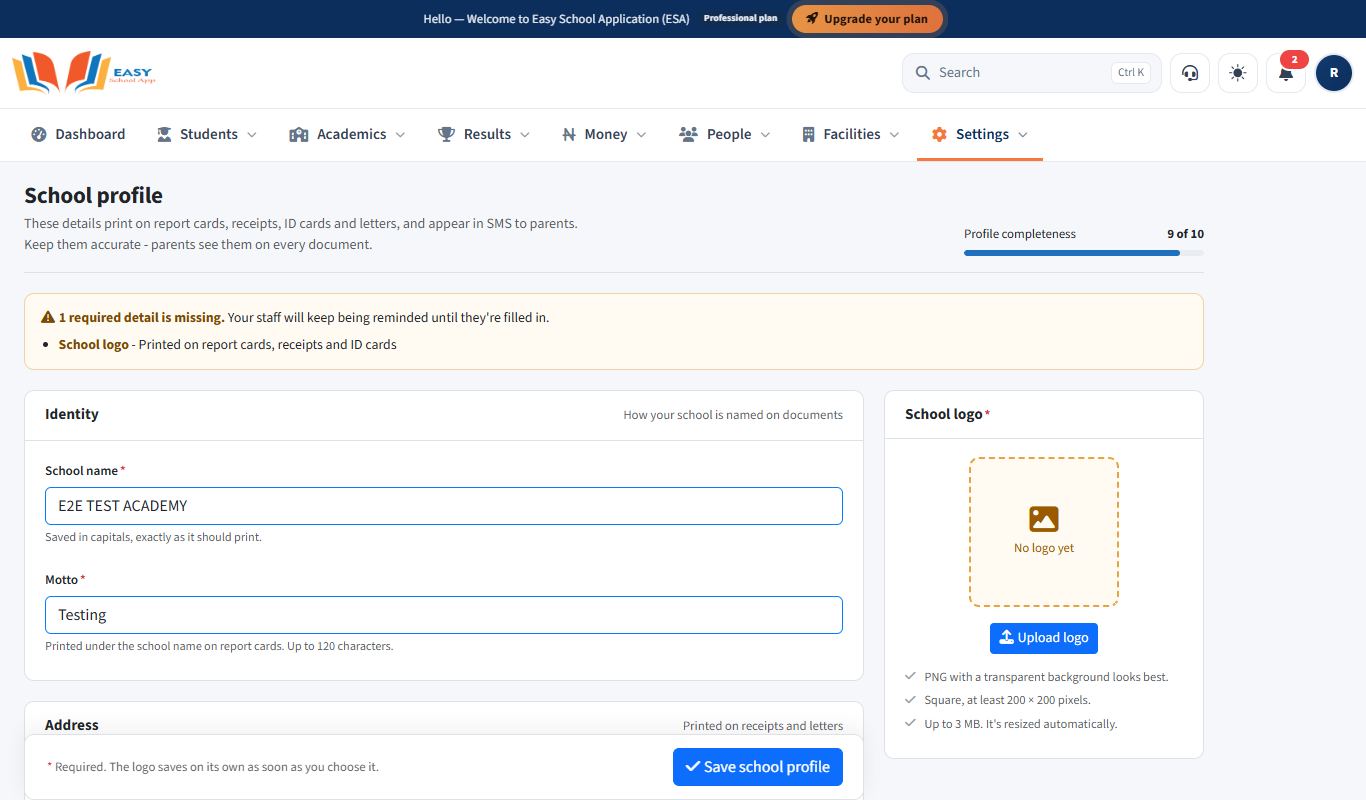
- Open Settings › School profile.
- Under Identity, type the School name and Motto. Click Replace logo to upload your logo (a square PNG or JPG works best).
- Under Address, fill in Street address, City / town, State and Country.
- Under Contact, fill in Office phone, Mobile number, School email and, if you have one, Website (optional).
- Under Student ID card design, choose Modern (colour header, landscape) or Classic (traditional, portrait). Pick a Main colour and Accent colour. Tick QR code on the card or Barcode on the card if you want them.
- Click Save school profile.
Common errors and fixes
| Problem | Fix |
|---|---|
| Save school profile does nothing | A required field is empty. Scroll up and look for the field marked in red. |
| The logo looks blurred on report cards | Upload a larger, clear image (at least 300 × 300 pixels). |
Create an academic session
Purpose: An academic session is a school year (for example 2026-2027). Scores, fees, attendance and promotions are all saved against a session and a term.
Who can use it: School Admin, Principal.
Where: Academics › Sessions & term dates (one page for sessions and term dates)
Steps
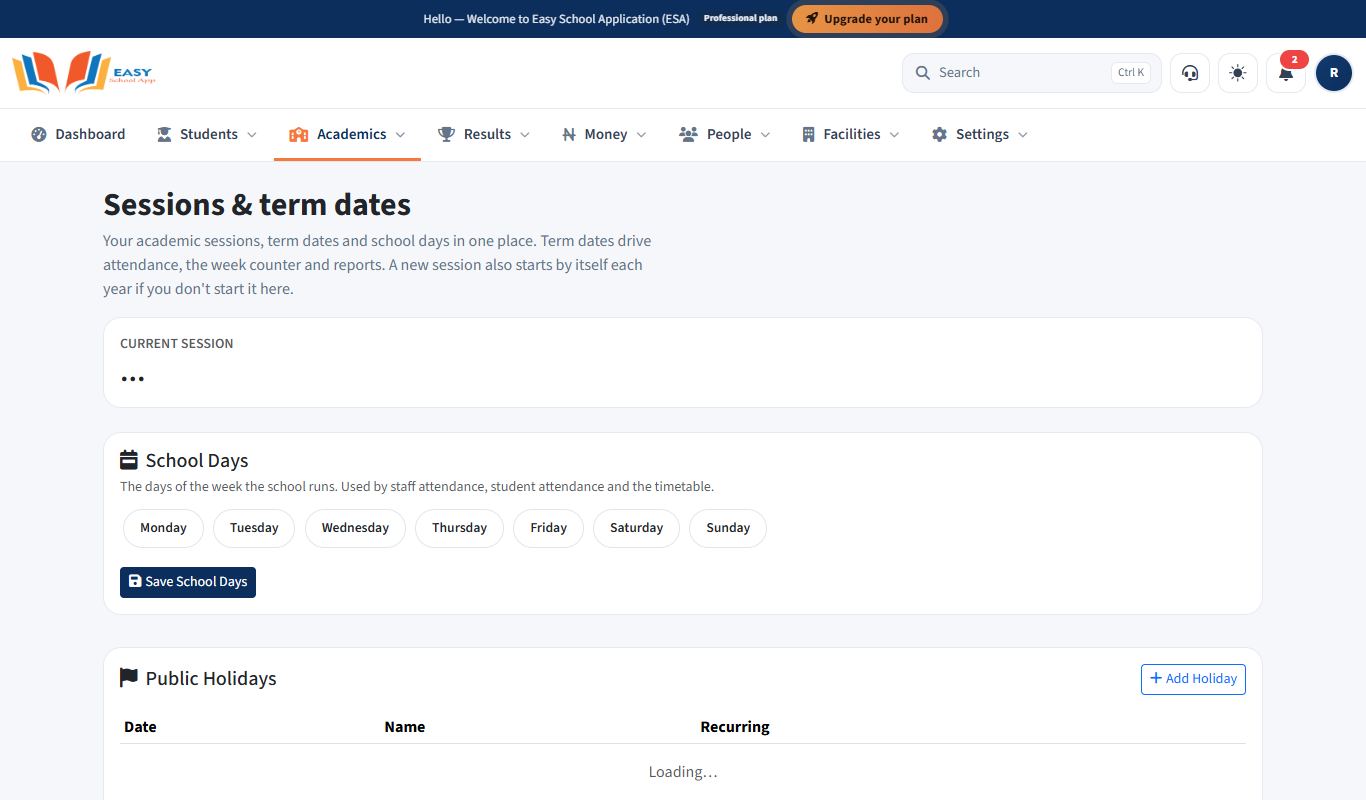
- Open Academics › Sessions & term dates. The top shows the Current session and your earlier sessions.
- When the new school year begins, click Start 2027-2028 (the next session is filled in for you) and confirm.
- A school's very first session: click Start a session and type it, for example
2026-2027.
Common errors and fixes
| Problem | Fix |
|---|---|
| "… hasn't been completed yet" | The current session is still running. Wait until its 3rd term closes, or promote students at the end of the year. |
| The Start button looks faded | Same reason: the current session hasn't ended. Hover over it to see why. |
Set up the school calendar (terms, school days and holidays)
Purpose: Tell the app when each term starts and ends, which days are school days, and which days are holidays. Attendance, scores, fees, salaries and the parent and student apps all follow these dates.
Who can use it: School Admin, Principal.
Where: Academics › Sessions & term dates
Steps
- Open Academics › Sessions & term dates.
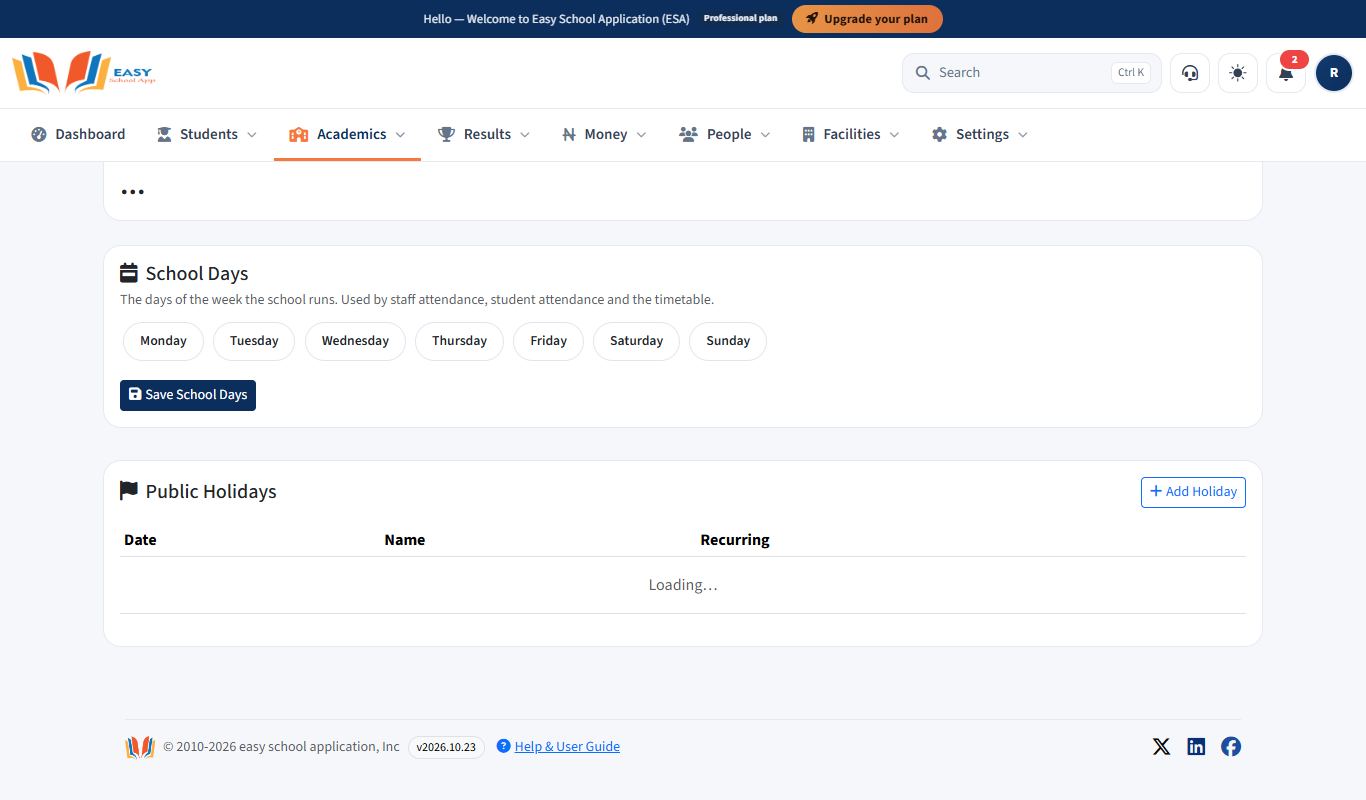
- Under School Days, tick the days your school opens (usually Monday to Friday). Click Save School Days.
- To start quickly with the standard Nigerian calendar, use Default calendar and click Accept the default calendar. Nothing changes until you accept.
- To set your own dates, fill each term: Resumption Date, Mid-Term Break, Closing Date and Holiday Period (after closing). Click Save 1st Term, Save 2nd Term and Save 3rd Term.
- Under Public Holidays, click Add Holiday for a day the school will be closed. Tick Repeats every year for holidays on the same date every year.
Common errors and fixes
| Problem | Fix |
|---|---|
| Term will not save | The Closing Date must be after the Resumption Date, and terms must not overlap. |
| "Clock-in is closed today." / "Attendance is closed today." | Today is a weekend, holiday or outside term dates. Check the dates here. |
Add classes and class groups (arms)
Purpose: Switch on the classes your school runs (for example JSS 1, Primary 4) and create the arms (groups) inside them (for example A, B, Gold).
Who can use it: School Admin, Principal.
Where: Academics › Classes and Academics › Arms (groups)
Steps – classes
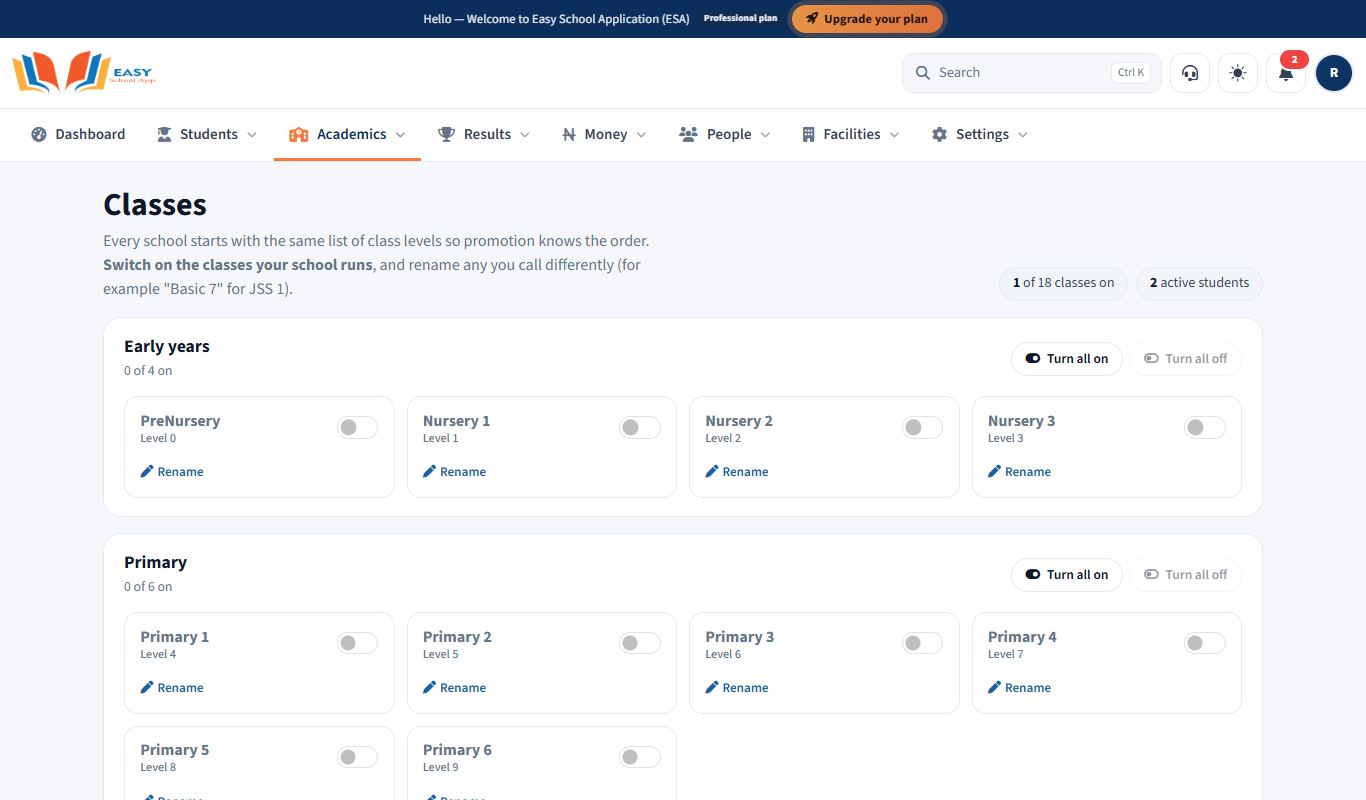
- Open Academics › Classes. Classes are grouped into Early years, Primary, Junior and Senior secondary.
- Turn each class your school runs on or off, or a whole level at once.
- To use your school's own name, click Rename (for example "Basic 7" instead of "JSS 1").
Steps – arms (groups)
- Open Academics › Arms (groups).
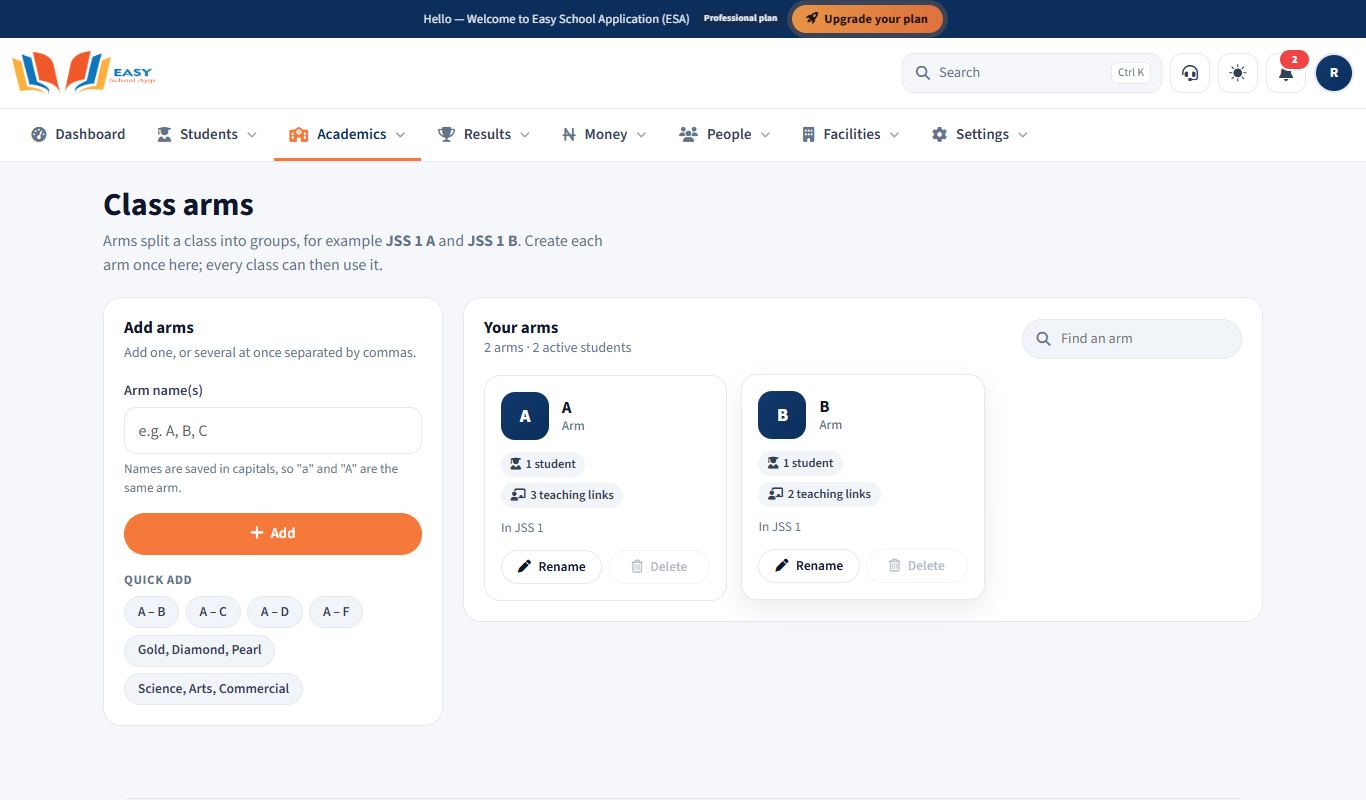
- Type one or several names at once, for example
A, B, C, and add them. - Each arm shows how many students are in it.
Common errors and fixes
| Problem | Fix |
|---|---|
| A class can't be switched off | It still has students. The page tells you which classes. Move the students first. |
| An arm can't be deleted | It still has students in it. |
Add subjects and allocate them to classes
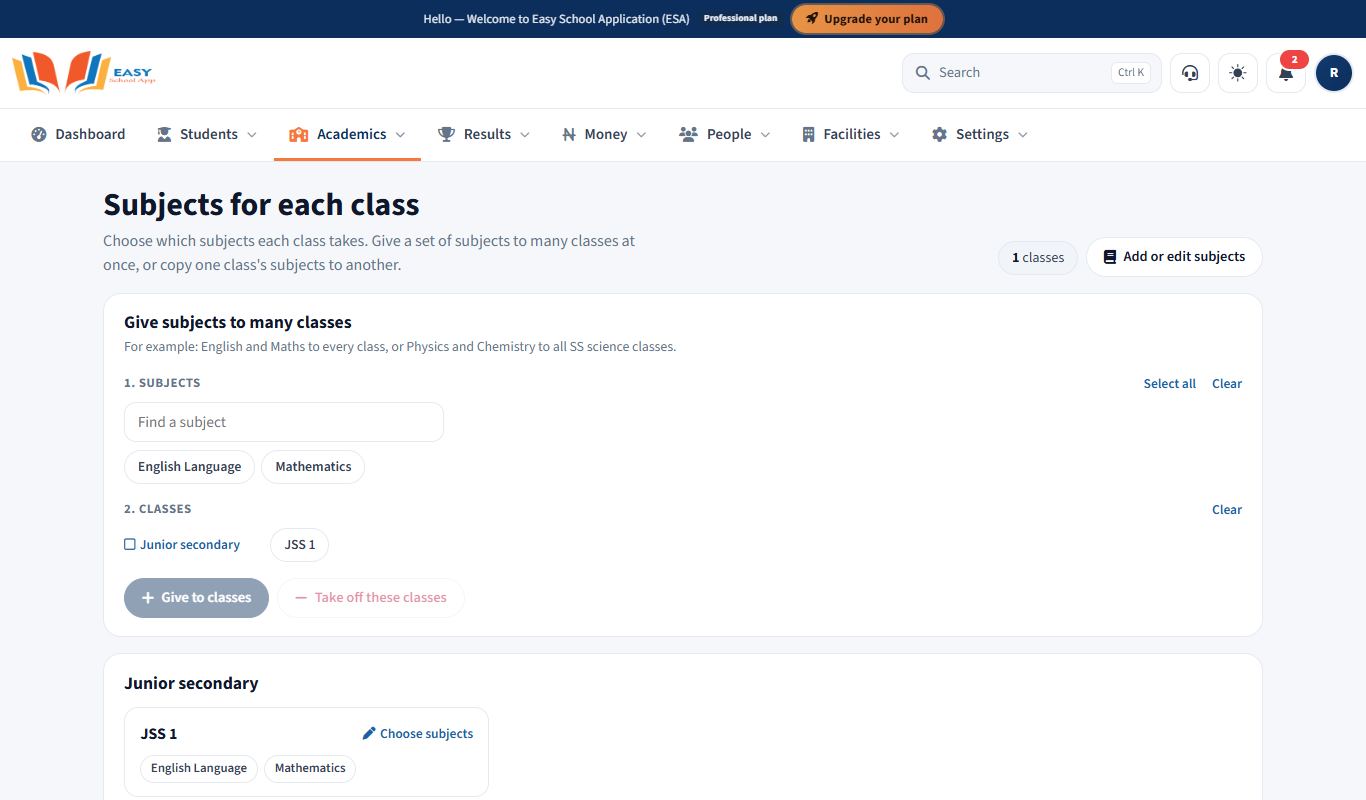
Purpose: Choose the subjects your school teaches, then which subjects each class offers. Score sheets and report cards only show the subjects given to a class.
Who can use it: School Admin, Principal.
Where: Academics › Subjects and Academics › Subjects for each class
Steps – add subjects
- Open Academics › Subjects.
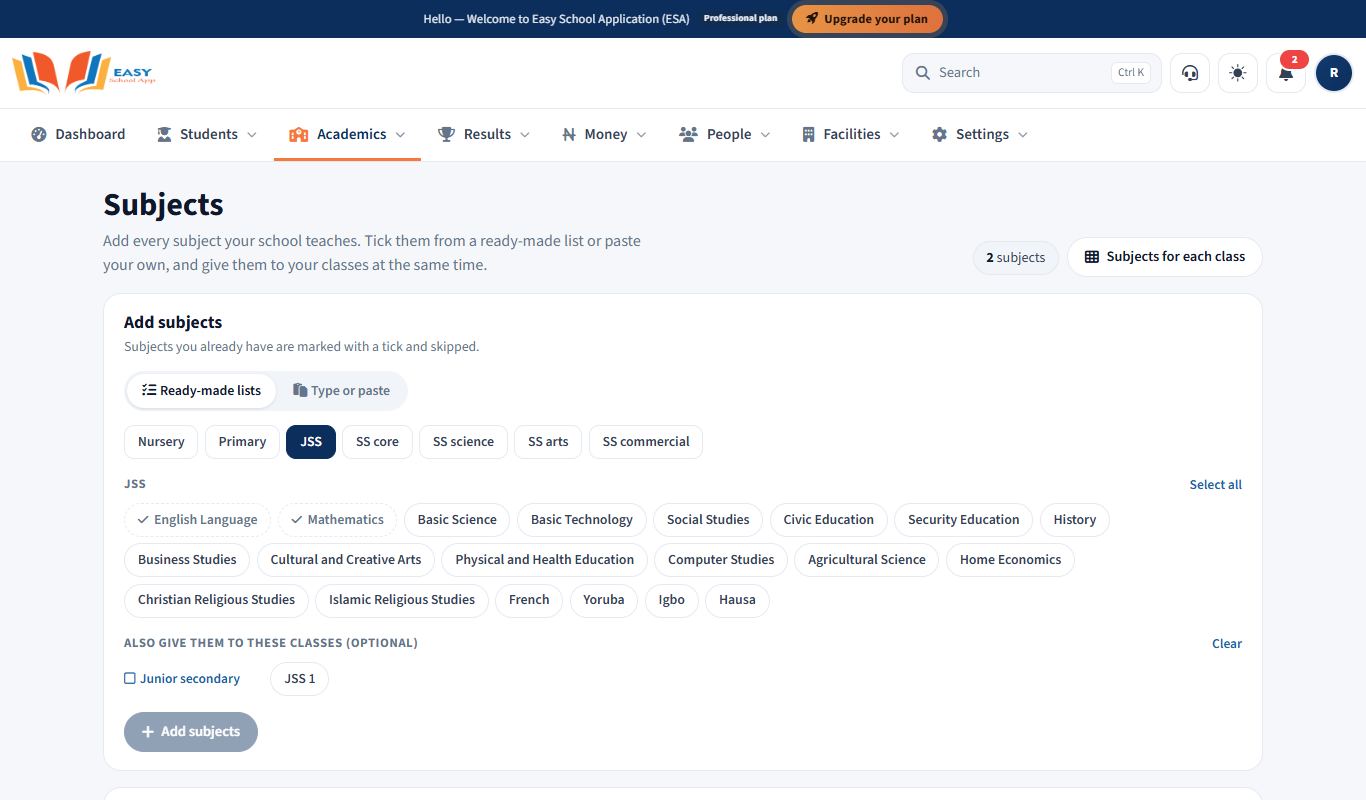
- Pick from the ready-made lists (Nursery, Primary, JSS, SS core, SS science, SS arts, SS commercial) and tick what your school offers, or paste your own list. Subjects you already have are skipped.
- You can give the new subjects to classes in the same step. Choosing the JSS list selects JSS 1–3 for you.
Steps – subjects for each class
- Open Academics › Subjects for each class.
- Choose subjects and classes once and click Give to classes, or open a class and tick its subjects.
- To save time, copy one class's subjects to another.
Common errors and fixes
| Problem | Fix |
|---|---|
| No classes to choose | Switch your classes on first. See Add classes and class groups (arms). |
| A subject is missing on the score sheet | Give the subject to that class, then reload the score sheet. |
Create the class timetable
Purpose: Build a weekly timetable for every class automatically, then print it for classes and teachers.
Who can use it: School Admin, Principal. Teachers and the Bursar can view it.
Where: Academics › Timetable
Steps
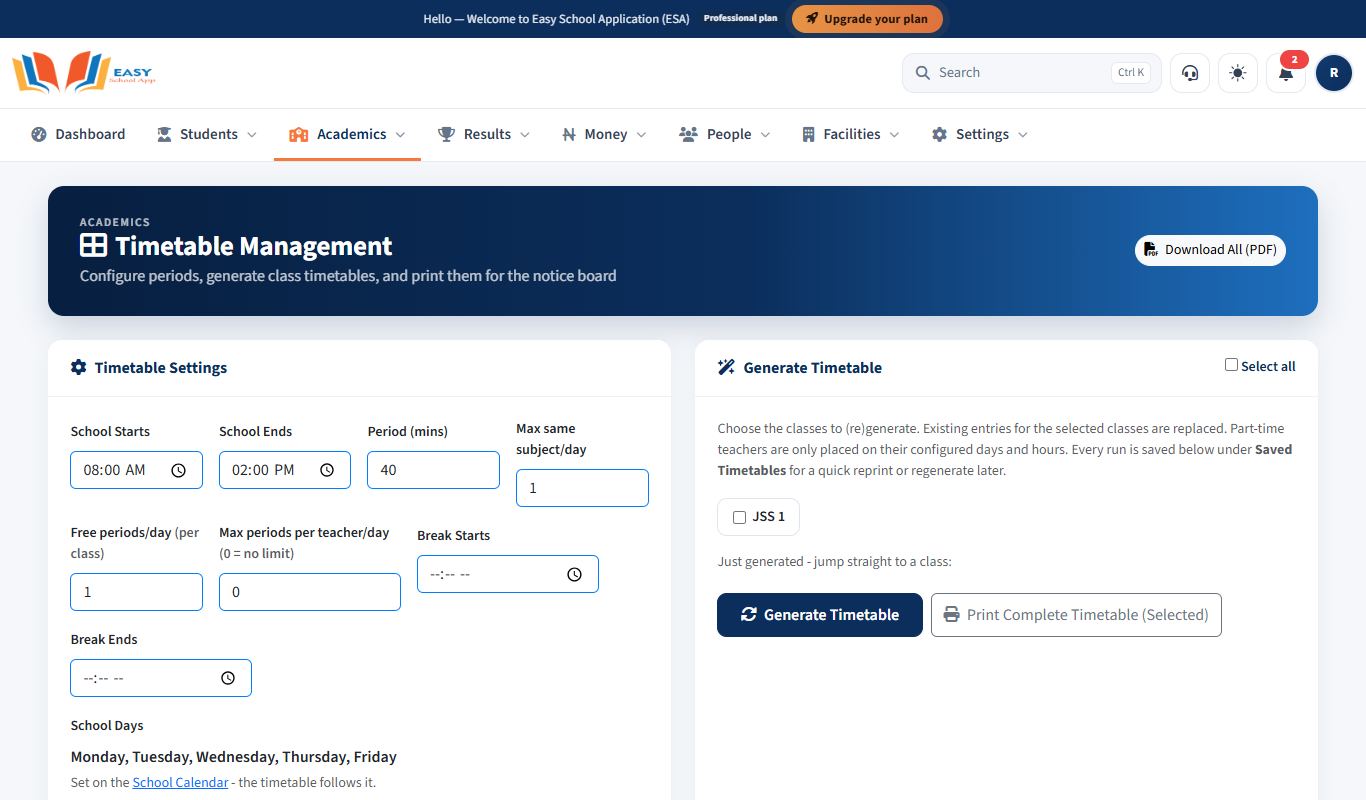
- Open Academics › Timetable.
- Fill in the settings: School Starts, School Ends, Period (mins), Break Starts, Break Ends and School Days.
- Set the limits: Max same subject/day, Free periods/day (per class) and Max periods per teacher/day (0 = no limit).
- Click Save Settings.
- Optional: click Add Activity for fixed events such as assembly or sports. Give an Activity Name, Day, Starts, Ends and the classes. Click Save Activity.
- Optional: click Combine Classes when one teacher teaches two or more classes together. Pick the Teacher, Subject and the classes, then Save Combined Session.
- Tick the classes and click Generate Timetable.
- Check the Class Timetable and Teacher Timetable tabs. Click View or PDF for one class, or Download All (PDF).
Common errors and fixes
| Problem | Fix |
|---|---|
| Some periods are empty | Not enough teacher hours for that class. Lower Max same subject/day or add teaching assignments. |
| A teacher is in two places at once | Use Combine Classes for joint lessons, then regenerate. |
Staff
Add a staff member
Purpose: Create a record for anyone who works at the school, teaching or non-teaching. The record is used for attendance, payroll, ID cards and app access.
Who can use it: School Admin, Principal.
Where: People › Staff list (or People › Add staff)
Steps
- Open People › Staff list. The Staff page shows everyone with All staff, Active, Suspended and Missing photo counts.
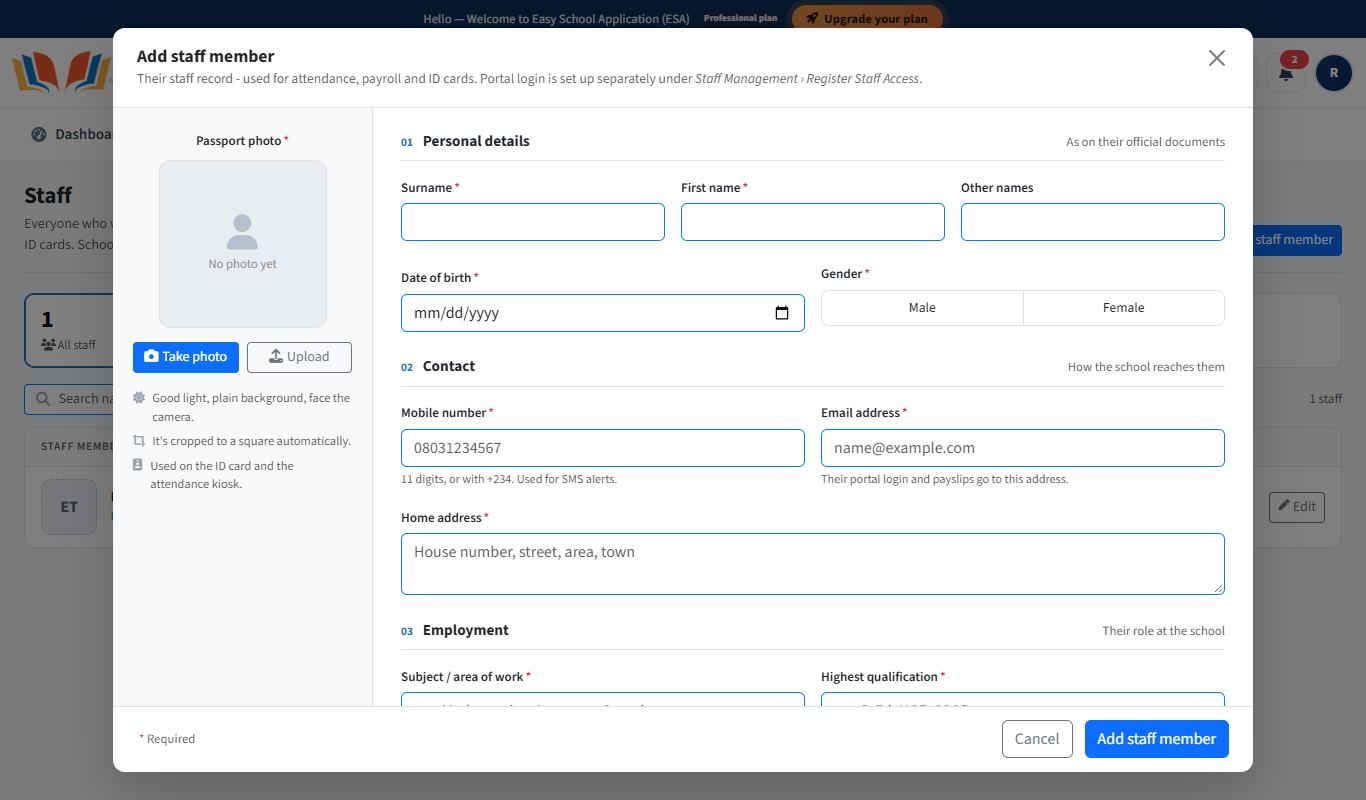
- Click Add staff member.
- Add a photo: click Take photo to use the camera, or Upload to choose a picture.
- Fill in the personal details: Surname, First name, Other names, Date of birth, and Male or Female.
- Fill in the contact details: Mobile number, Email address and Home address.
- Fill in the employment details: Subject / area of work, Highest qualification, Date joined and Years of experience. Previous employer is optional.
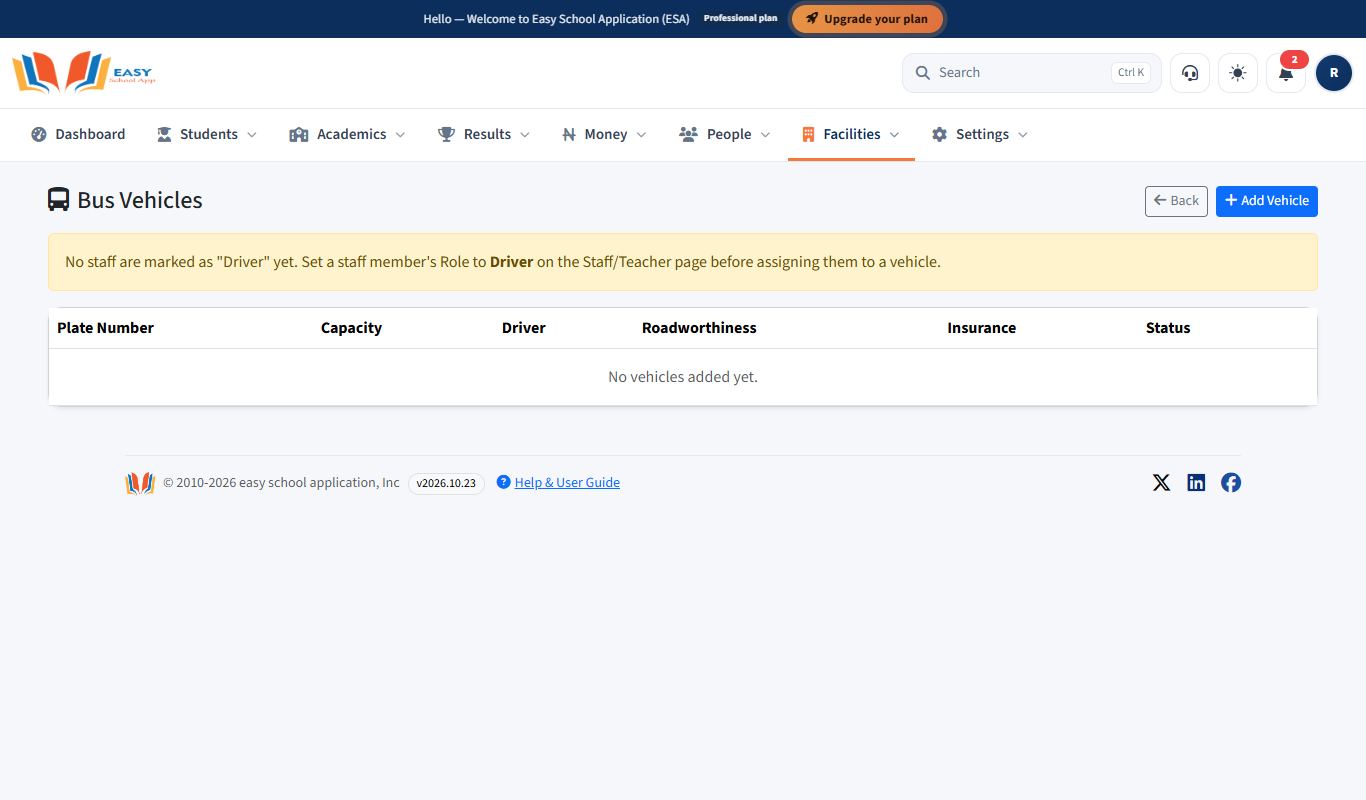
- Tick Bus driver if this person drives a school bus. You can then assign them to a vehicle under Bus › Vehicles.
- Click Add staff member.
To change a staff record: click Edit on their row, change the details, and click Save changes.
Common errors and fixes
| Problem | Fix |
|---|---|
| The form will not save | A required field (marked *) is empty or the email is not valid. Check the fields marked in red. |
| The camera does not open | Allow camera access when the browser asks, or use Upload instead. |
| Duplicate email or phone | Another staff member already uses it. Each person needs their own email and phone number. |
Give staff access and roles
Purpose: Let a staff member sign in, and choose what they can see and do (their roles).
Who can use it: School Admin.
Where: Settings › Staff access & roles
Roles you can give
| Role in the app | What it is for |
|---|---|
| Admin | Full control of the school account (School Admin). |
| Principal | Academics, results, staff records and the timetable. (It was called "User" before.) |
| Head Mistress | Supervises assigned classes: lesson plans, exam timetable, chat moderation. |
| Teacher | Class register, scores, lesson plans, assignments, tests, exams and parent chat. |
| Account | Bursar or accountant: fees, payroll, income and expenses. |
| Driver | Runs school bus trips and shares live location. |
| Chief Security | Watches the school buses live. |
Steps – give access to a new staff member
- Add the person first (see Add a staff member).
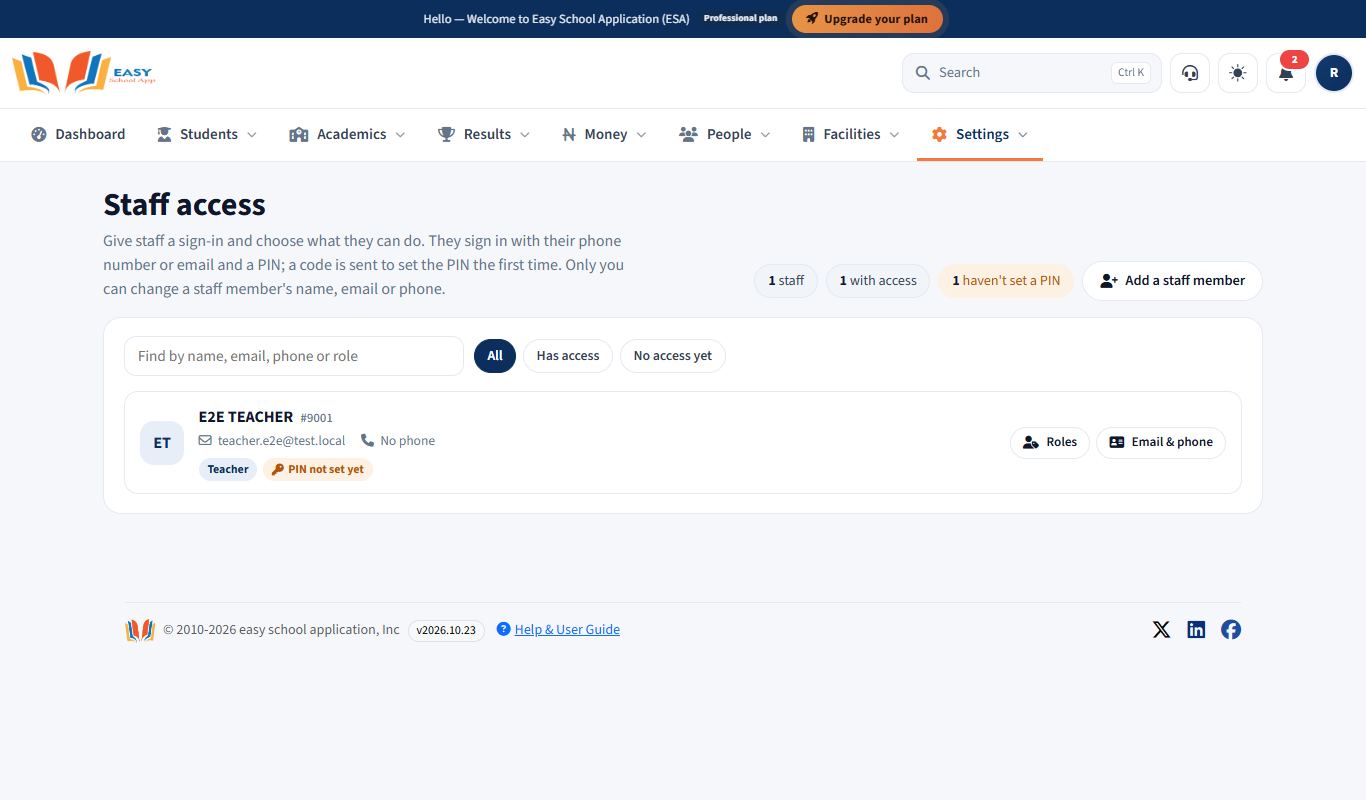
- Open Settings › Staff access & roles. There is one card per staff member, with their email, phone, roles and whether they have set a PIN yet.
- Find the person. Search by name, email, phone or role, or filter Has access / No access yet.
- Click Give access. The person receives a message with how to sign in and set their PIN.
Steps – change someone's roles
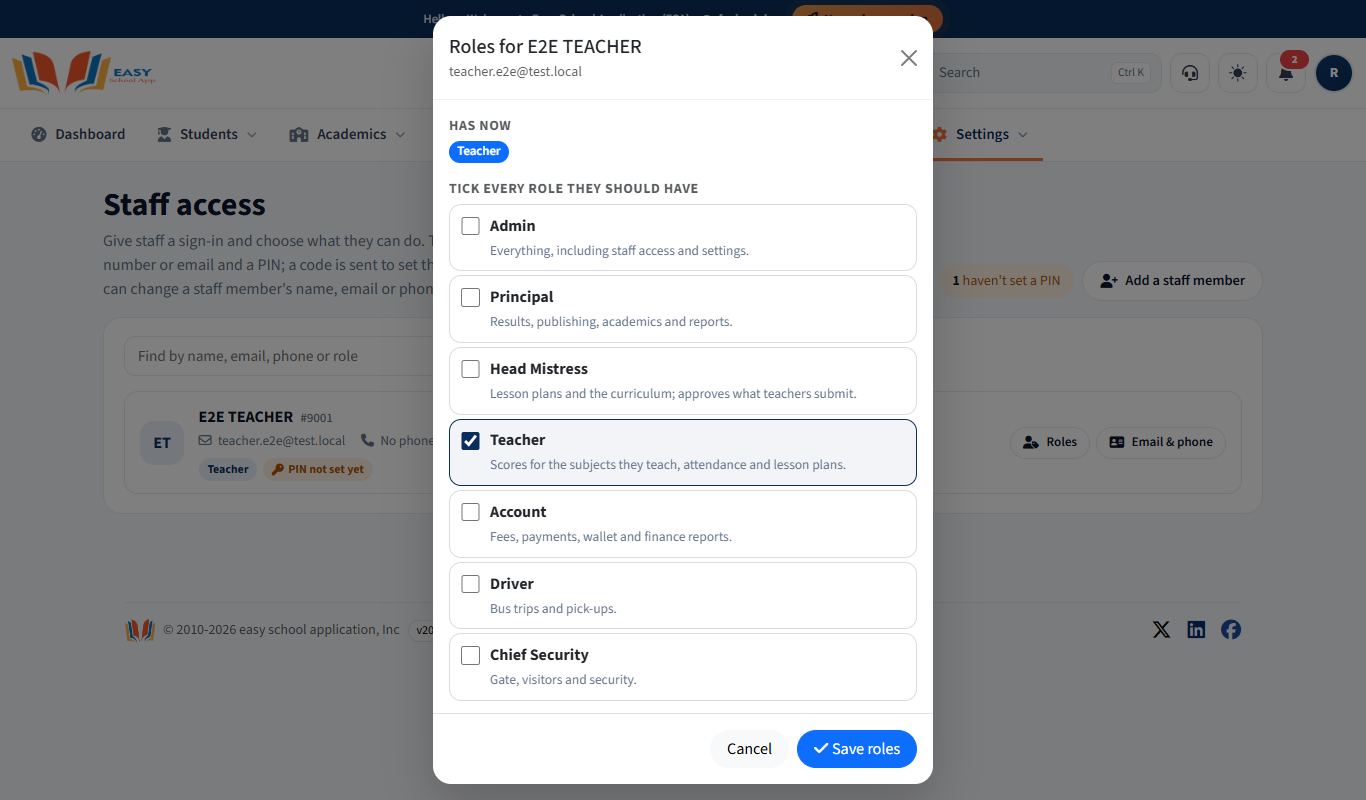
- On the person's card, click Roles. You see their name and current roles, then a tick list of every role with a line explaining what it allows.
- Tick as many roles as they need (for example Teacher and Head Mistress) and save.
Steps – correct an email or phone
- On the person's card, click Email & phone.
- Type the correct email or phone number and save. Staff can't change these themselves.
Common errors and fixes
| Problem | Fix |
|---|---|
| "A user with this email is already registered." | The email is used by another account. Use a different email, or correct the old account with Email & phone. |
| The staff member can't see a menu | Their roles don't include it. Check Roles at a glance and add the right role. |
| Changes don't show for the staff member | Ask them to Logout and sign in again. |
Assign teachers to classes
Purpose: Link each teacher to the classes and sections they teach. Teachers only see their own classes in the register, scores and My Students.
Who can use it: School Admin, Principal.
Where: Academics › Teaching assignments
Steps
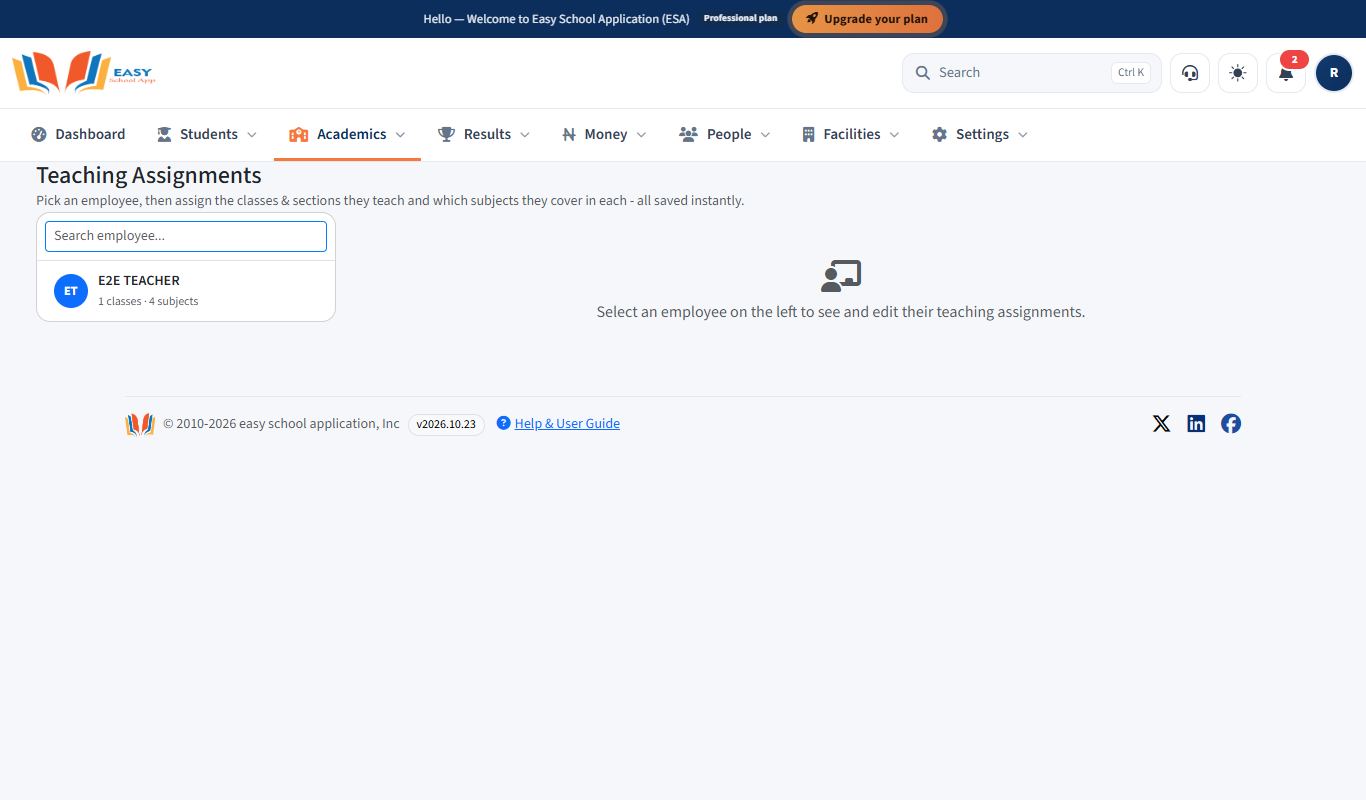
- Open Academics › Teaching assignments.
- On the left, find the teacher (use Search employee...). Click their name.
- Click to add a class. The Assign a Class & Section box opens.
- Choose the Class and the Section.
- Click Assign.
- Repeat for every class the teacher takes.
Assign a Head Mistress to classes
Purpose: Put a Head Mistress (section head) in charge of certain classes. She then supervises those classes' teachers, lesson plans and parent chats.
Who can use it: School Admin, Principal.
Where: Academics › Head Mistress assignments
Steps
- Make sure the staff member has the Head Mistress role (see Give staff access and roles).
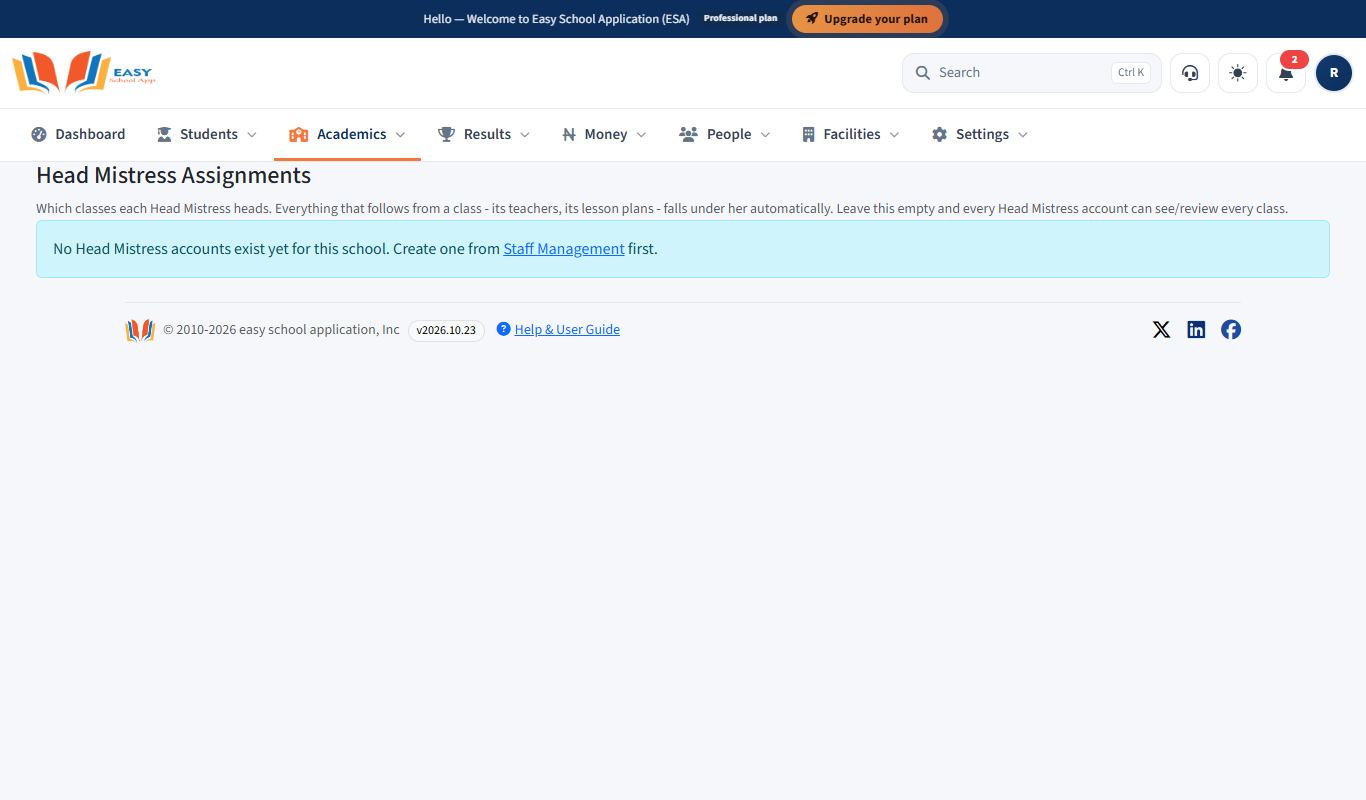
- Open Academics › Head Mistress assignments.
- Under Assign a Class, choose the Head Mistress and the Class.
- Click Assign.
- Below, Teachers on this class lists the teachers she now supervises.
Track staff attendance
Purpose: See who has arrived today, approve kiosk and manual entries, handle leave, and set the late-coming rules.
Who can use it: School Admin, Principal, Bursar.
Where: People › Staff attendance & leave
Click How it works at the top of the page for a short explanation.
The tabs
| Tab | What it does |
|---|---|
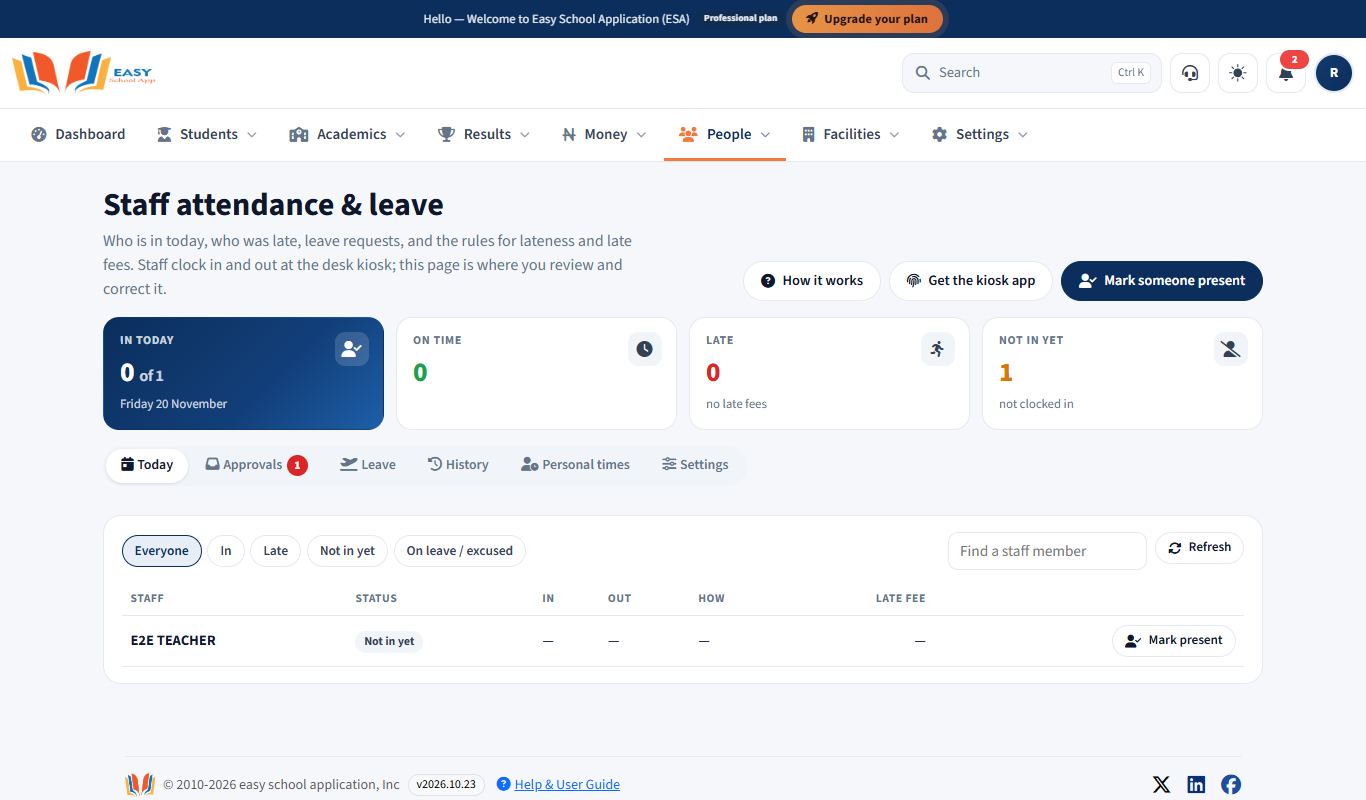
| Today | Every staff member: arrived, late, on leave or not in yet, with clock-in and clock-out times. |
| Approvals | Entries from the kiosk that need a decision, and leave waiting for approval. A badge shows how many. |
| Leave | Leave requests and approved absences. |
| History | Past days and a summary for a week, month or term. |
| Personal times | Different arrival or leaving times for one person (for example a part-time teacher). |
| Settings | Late threshold, late fee, closing time and fingerprint rules (School Admin). |
Steps – mark someone present by hand
- Open People › Staff attendance & leave.
- On Today, find the person and choose the manual option.
- Pick the day (today or an earlier day, never a future day), type a reason and save.
Steps – set the rules
- Click Settings.
- Set the Late threshold (arrival after this time is late) and the Late fee. Tick Auto-apply to charge it automatically.
- Set School closing time. Tick Count a missed clock-out as a half day if you want that.
- Save.
Common errors and fixes
| Problem | Fix |
|---|---|
| "Clock-in is closed today." | Today is not a school day in Academics › Sessions & term dates. |
| The fingerprint reader is not found | Open the kiosk program, check the reader's cable and restart the program. See Troubleshooting on Download our app. |
Pay staff salaries
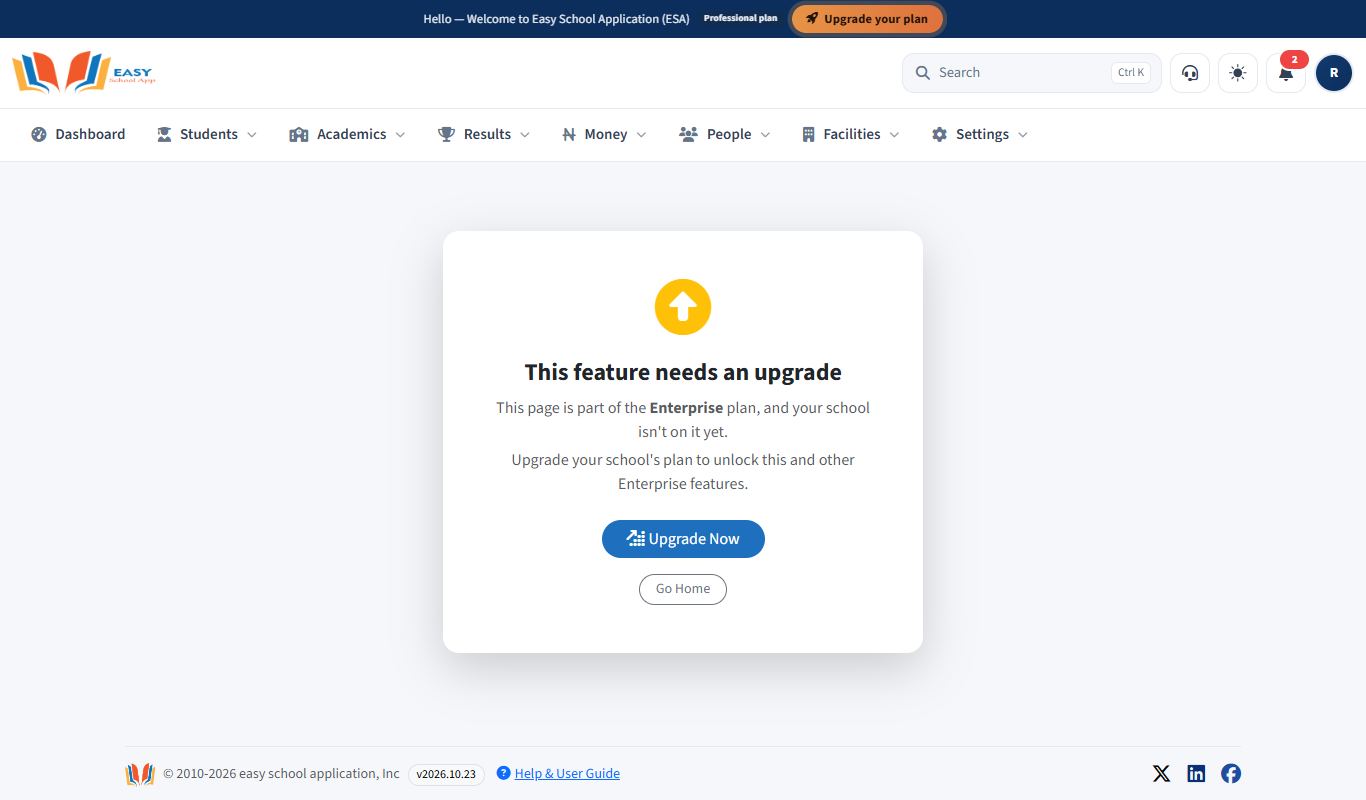
Purpose: Set each staff member's pay, work out the month's salary with PAYE tax, pension and NHF, pay it, and manage salary advances.
Who can use it: School Admin, Bursar. Some settings are for the School Admin only.
Where: People › Salary
Click How it works at the top of the page for the five steps in short.
Steps – set a person's pay
- Open People › Salary. The Pay structure tab opens.
- Choose the staff member.
- Choose the Payment type (Fixed Monthly, Daily Rate or Weekly Rate) and type the amount.
- Type any Housing, Transport, Medical and Other allowances.
- Under Statutory deductions, set the Pension rate (%), whether they take part in NHF and the NHF rate (%), and the NSITF rate (%) the school pays. Use 0 for anything that doesn't apply to this person: nothing is then taken off or added for it (the school's 10% pension is only added for staff on pension).
- Click Save structure.
Steps – pay a month
- Click the Pay salaries tab.
- Check the switch Work out pay from staff attendance (School Admin only can change it):
- On: days absent reduce pay, a missed clock-out counts as half a day and late fees are taken off. Approved leave is paid.
- Off: everyone gets their full pay for the period, whatever their attendance.
- Choose the staff member, the Period Start and Period End (the period must have ended) and the Payment Mode.
- Click Calculate Salary. Read the breakdown: earnings, PAYE tax, pension and NHF at their real rates, late fees, advance repayments, net salary and the cost to the school.
- Click Process Payment. To pay straight to their bank, use the wallet option (the money comes from the school wallet).
Steps – salary advances
- Advance requests lists requests from staff. Approve or reject each one. A red badge on the tab shows how many are waiting.
- Give an advance gives one straight away (School Admin only).
- Advances are repaid from later salaries in the instalments you agree.
Common errors and fixes
| Problem | Fix |
|---|---|
| "Salary period has not ended yet." | Choose a period that has finished. |
| Salary is lower than expected | Check the attendance figures in the breakdown, and Advance requests for repayments. If your school doesn't pay by attendance, turn the switch off. |
| "No school calendar term covers this payroll period." | Add the term dates in Academics › Sessions & term dates, or turn off paying from attendance. |
View a staff member's financial record
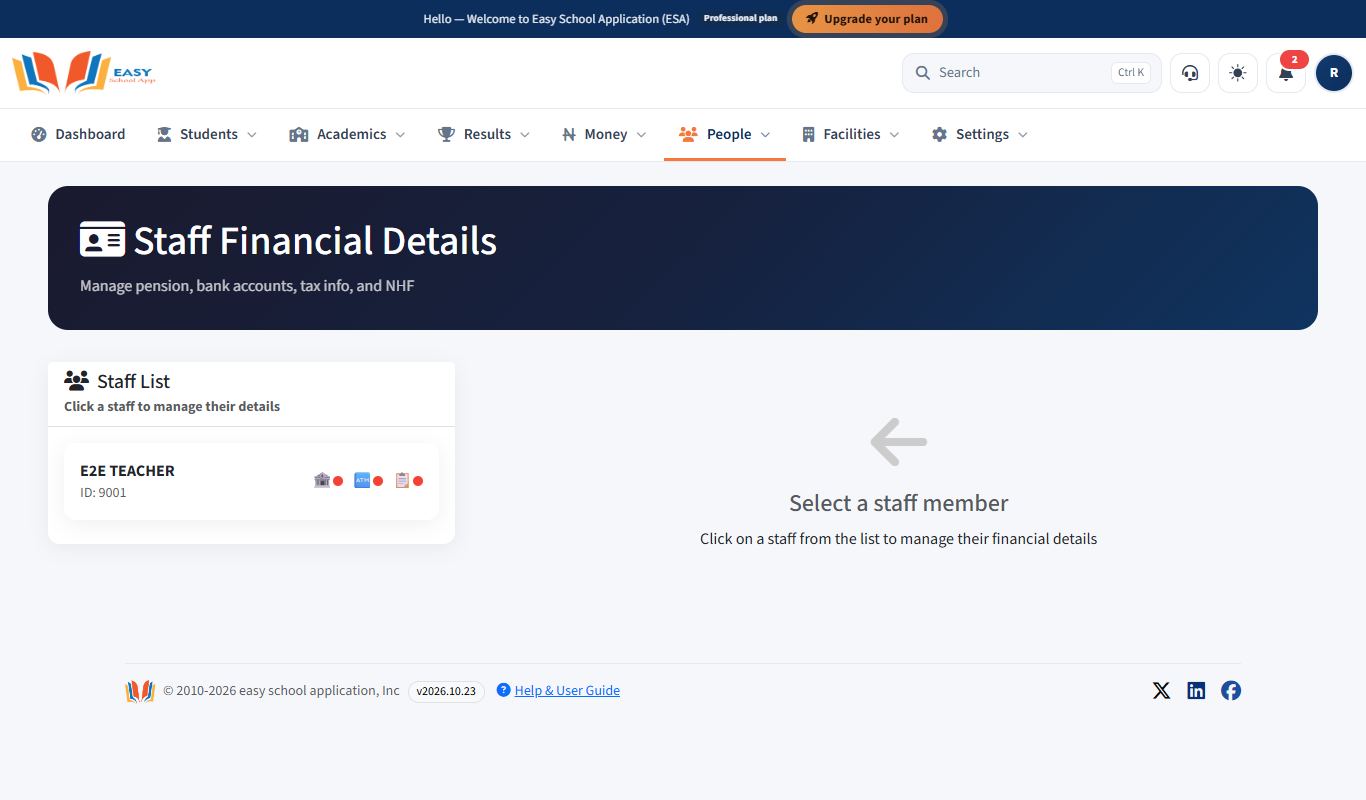
Purpose: See one staff member's bank details, salary, advances and payments in one place.
Who can use it: School Admin, Bursar.
Where: People › Financial records
Steps
- Open People › Financial records.
- In the Staff List, click a staff member.
- Read or update their financial details. Staff can also request changes from My Portal; you see them under People › Salary › Bank detail changes.
Students
Register a new student
Purpose: Add a new student to the school. The app gives them an admission number, adds them to a class, prepares their first fee bill, and sends the admission number to the parent by SMS.
Who can use it: School Admin, Principal, Bursar.
Where: Students › Register a student (or Students › Register a student)
Steps
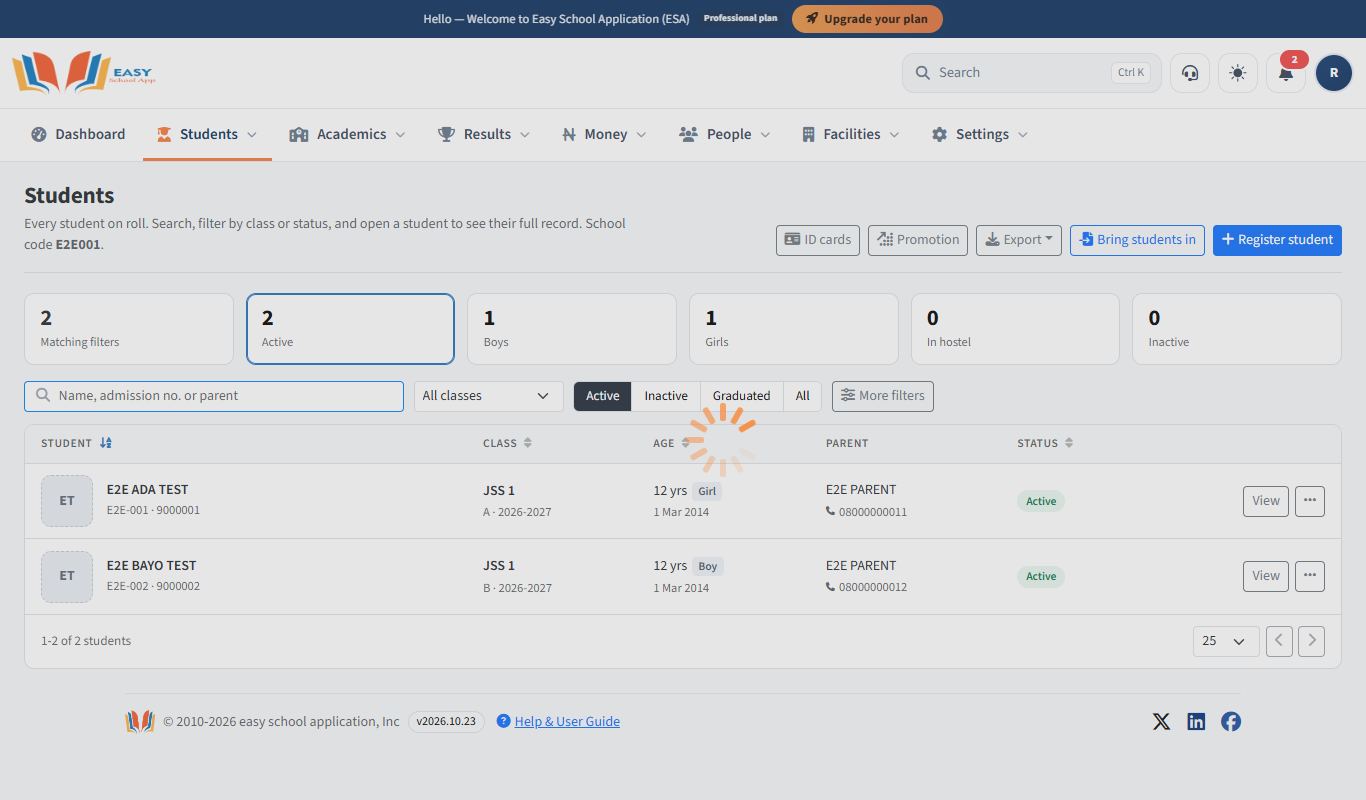
- Open Students › Student list and click Register student. The Register a new student form opens. It has six steps.
- Step 1 – Class & photo
- Click Take photo to use the camera, or Upload to choose a picture. Good light and a plain background work best.
- Choose the Academic session, Class group (arm), Current class and Admitted into (usually the same as the current class).
- Click Next.
- Step 2 – Student: fill in Surname, First name, Other names, Date of birth, Male or Female, Religion, Nationality, State of origin, Local government area and Home address. Click Next.
- Step 3 – Health: choose the Blood group, whether the student lives in the hostel (No, day student or Yes), and add any Medical conditions or allergies. Click Next.
- Step 4 – Parent: fill in the parent or guardian's Full name, Mobile number, Email, Occupation / workplace, Means of identification and ID number. Click Next.
- Step 5 – Previous school (optional): add the School name, Admission no. there, Year left, Last position, Total mark and Average mark, or skip. Click Next.
- Step 6 – Fees & review: choose New or Returning student and check the first bill. Add any Unpaid balance from earlier terms. Check everything once more.
- Click Register student. The new admission number appears straight away.
Common errors and fixes
| Problem | Fix |
|---|---|
| The app says the student is already registered | A student with the same name and date of birth exists. Search the Student List before registering again. |
| Class group (arm) is empty | No groups exist yet. Create them in Academics › Arms (groups). |
| The first bill shows ₦0 | Fee amounts are not set for that class. See Set fee amounts for classes. |
| The parent did not get an SMS | Check the parent's number, and check the SMS balance on the Dashboard (SMS Wallet). |
Find, view and update students
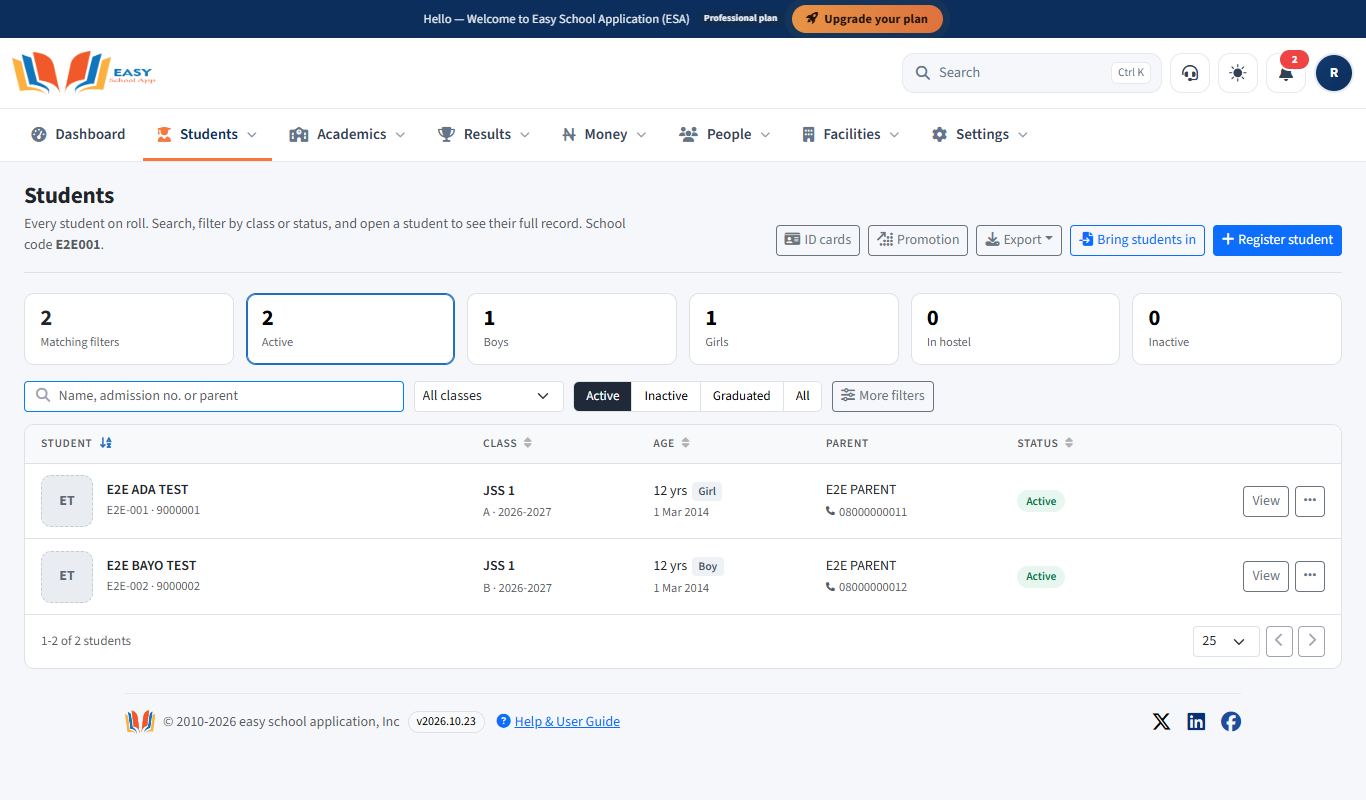
Purpose: Search the list of students, open a full record, edit details, change a photo, print records and ID cards, and export the list.
Who can use it: School Admin, Principal, Bursar.
Where: Students › Student list
Steps – find a student
- Open Students › Student list.
- Type a name, admission number or parent's name in the search box.
- Use the status buttons: Active, Inactive, Graduated or All. Choose a class. Click More filters for more.
- Click the counters (Boys, Girls, In hostel, Inactive) to filter by them.
Steps – open and change a record
- Click View on the student's row to see the full record (school, personal, health and parent details).
- Click the … button on the row to see more actions: Edit, Change photo, Print record, ID card, Set login PIN and Deactivate.
Steps – ID cards and export
- Click ID cards at the top to print ID cards for a class.
- Click Export to download the list as a spreadsheet.
Common errors and fixes
| Problem | Fix |
|---|---|
| A student does not appear | Check the status filter. Inactive and graduated students are hidden when Active is selected. |
| The ID card has no photo | Use Change photo on the … menu, then print again. |
Set a student's login PIN
Purpose: Give a student access to the Student Portal, or give them a new PIN if they forgot it.
Who can use it: School Admin, Principal, Bursar.
Where: Students › Student list
Steps
- Open Students › Student list and find the student.
- Click the … button on their row.
- Click Set login PIN.
- Type a 4-digit PIN in the box.
- Click Save PIN.
- Tell the student their PIN. They sign in on the Student tab with their Admission Number and this PIN.
Common errors and fixes
| Problem | Fix |
|---|---|
| "PIN must be exactly 4 digits." | Type exactly four numbers. |
| "Set an Admission No for this student first, then try again." | Edit the student and add an admission number. |
| "This Admission No is already used for another student's login…" | Two students share an admission number. Give this student a unique one first. |
Accept online admission applications
Purpose: Let parents apply for admission online from your website, optionally paying an admission fee, and approve them into a class.
Who can use it: School Admin, Principal, Bursar.
Where: Students › Admission
Steps – set up
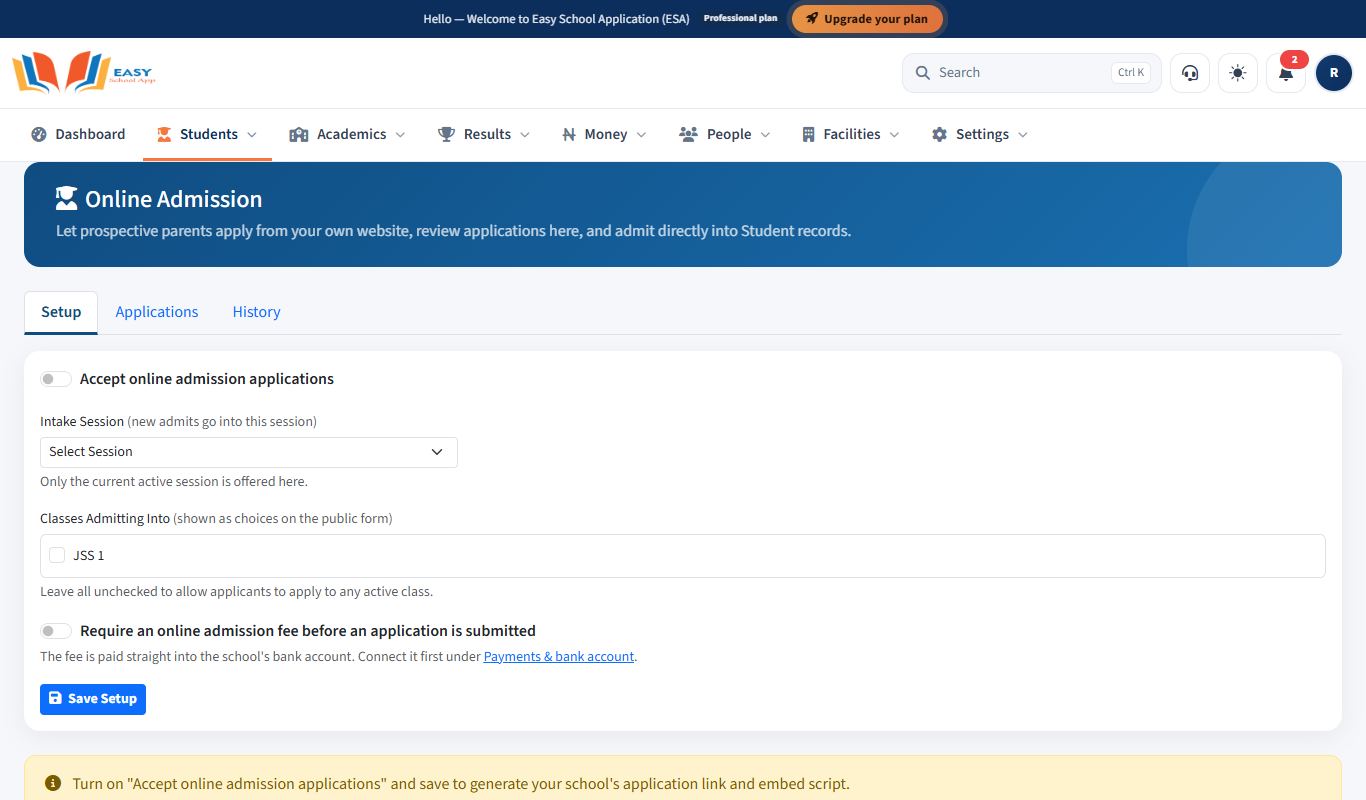
- Open Students › Admission. The Setup tab opens.
- Tick Accept online admission applications.
- Choose the Intake Session. New admits go into this session.
- Under Classes Admitting Into, tick the classes you are admitting into. Leave all unticked to allow any active class.
- To charge a fee, tick Require an online admission fee before an application is submitted. Type the Admission Fee (₦) and a Fee Description (for example "Non-refundable admission processing fee").
- Click Save Setup.
- Copy the link under Add this to your school website. Use Option 1 – Plain link to share it on WhatsApp or social media, or Option 2 – Embeddable "Apply for Admission" button for your website.
Steps – review applications
- Click the Applications tab. Each row shows the Applicant, Class Applied For, Guardian, Payment and Submitted date.
- Open an application and choose to approve or reject it.
- When you approve, the Confirm placement box opens. Choose the Session, Current Class, Admitted Class and Section, and confirm. The applicant becomes a student.
- History lists all decided applications.
Mark the class register (student attendance)
Purpose: Record which students are present, absent, late, excused or on half day. Parents can see attendance, and the school sees trends in Attendance Analytics.
Who can use it: Teacher (own classes), School Admin, Principal.
Where: Teachers: avatar › My Portal › Mark Class Register. School Admin and Principal: Students › Student register. Everyone: Mark Attendance on the Dashboard.
Steps
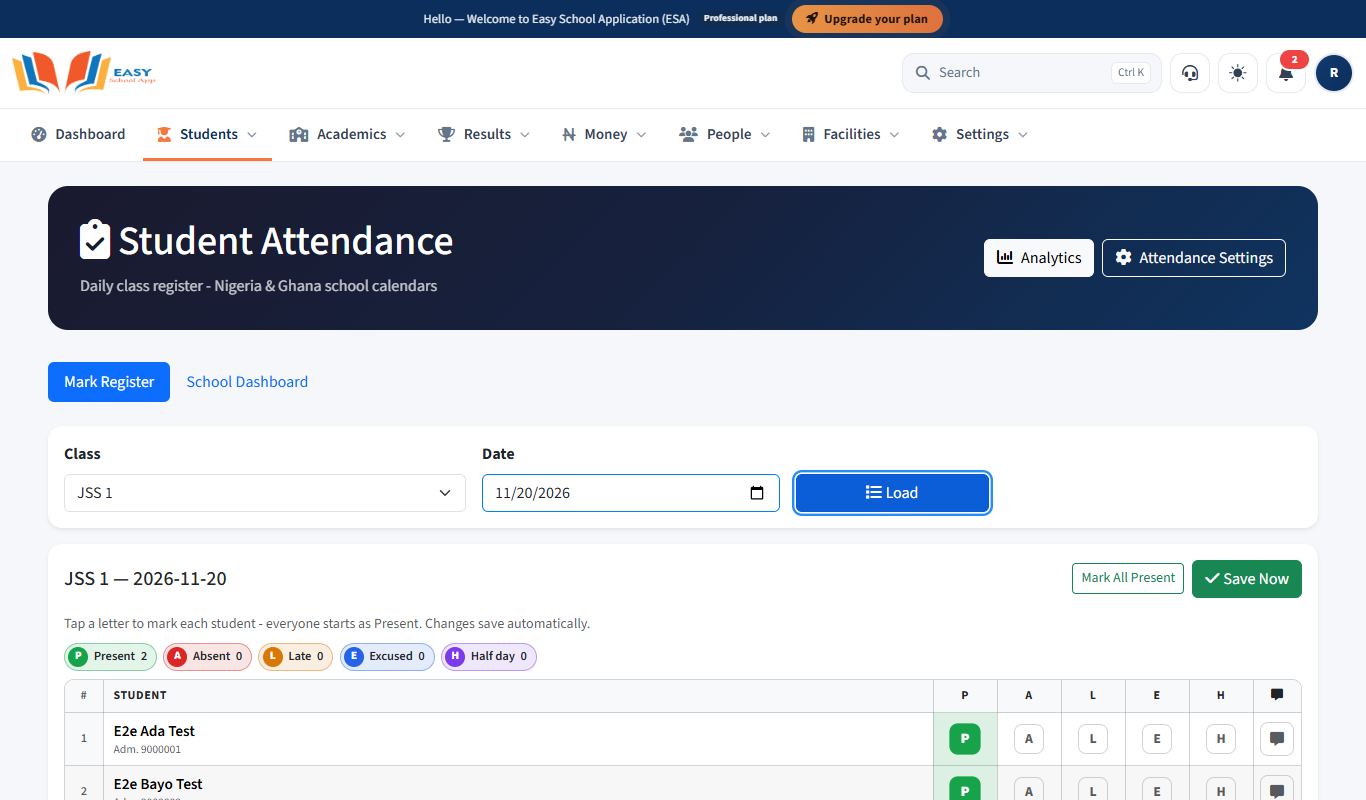
- Open the register. The Mark Register tab opens.
- Choose the Class and Date (today is filled in). If your school marks twice a day, choose Morning (AM) or Afternoon (PM).
- Click Load. Your students appear. Everyone starts as Present.
- Tap a letter for each student who is not present:
- P – Present
- A – Absent
- L – Late
- E – Excused
- H – Half day
- Optional: click the remark icon to add a note (for example "Went home sick").
- Changes save automatically. Click Save Now if you want to save at once.
For School Admin and Principal
- The School Dashboard tab shows each class's status today (Marked / Not marked).
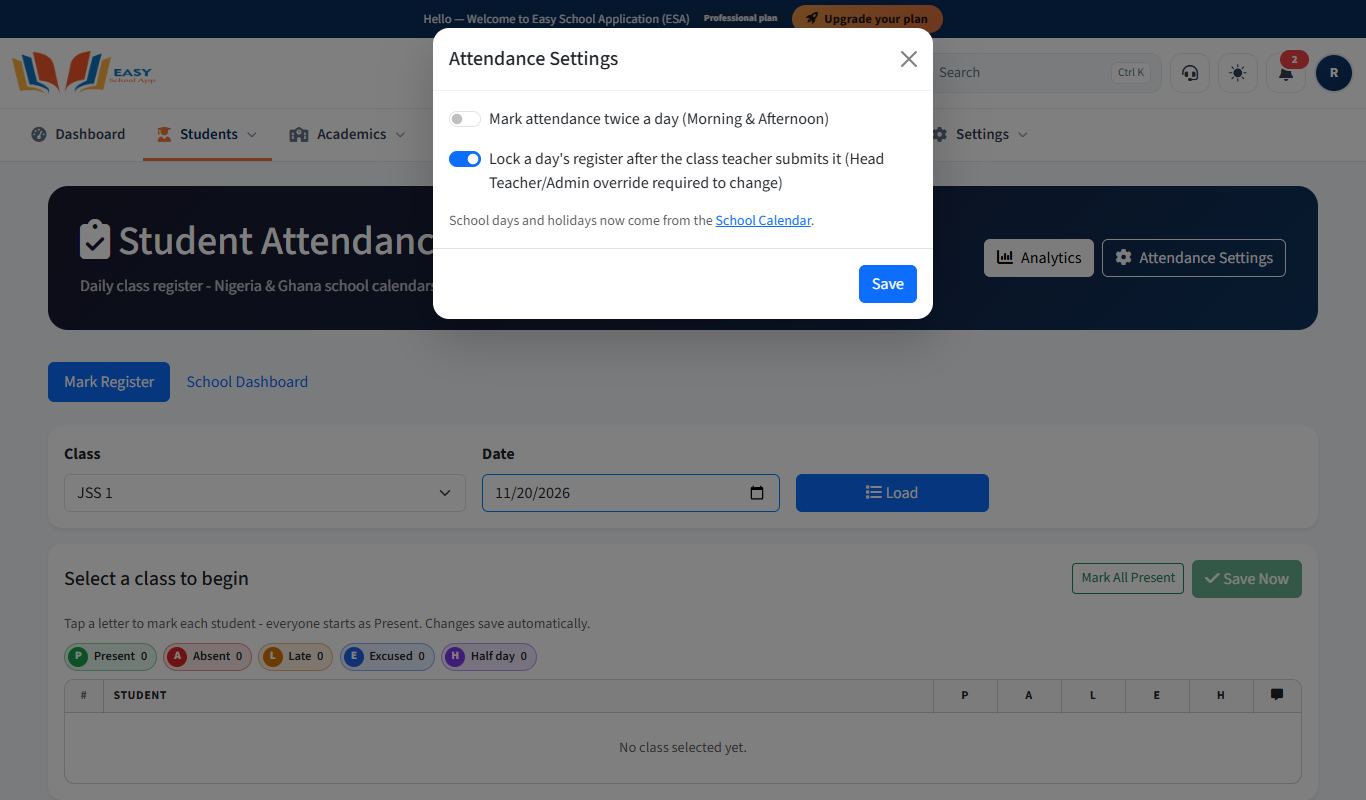
- Attendance Settings lets you mark twice a day, and lock a day's register after the class teacher submits it. A locked day can only be changed by a Head Teacher or Admin; the change is recorded as an override.
- Term Closure totals the days opened at the end of a term. Choose the class, Term and session, click View to check, then Close Term.
Common errors and fixes
| Problem | Fix |
|---|---|
| "No class assigned" | The teacher has no teaching assignment. Ask the School Admin to add one in Teaching Assignments. |
| "Attendance is closed today." | Today is a weekend or holiday in the Sessions & term dates. |
| "Attendance is closed." for a past day | The day is locked. Contact your Head Teacher or Admin if a correction is needed. |
| "No students in this class." | No students are placed in that class and section. Check the Student List. |
Review attendance analytics
Purpose: See attendance rates for the school, each class and each student, and find students at risk of poor attendance.
Who can use it: School Admin, Principal, Teacher (own classes, shown as My Classes' Analytics).
Where: Students › Attendance analytics
Steps
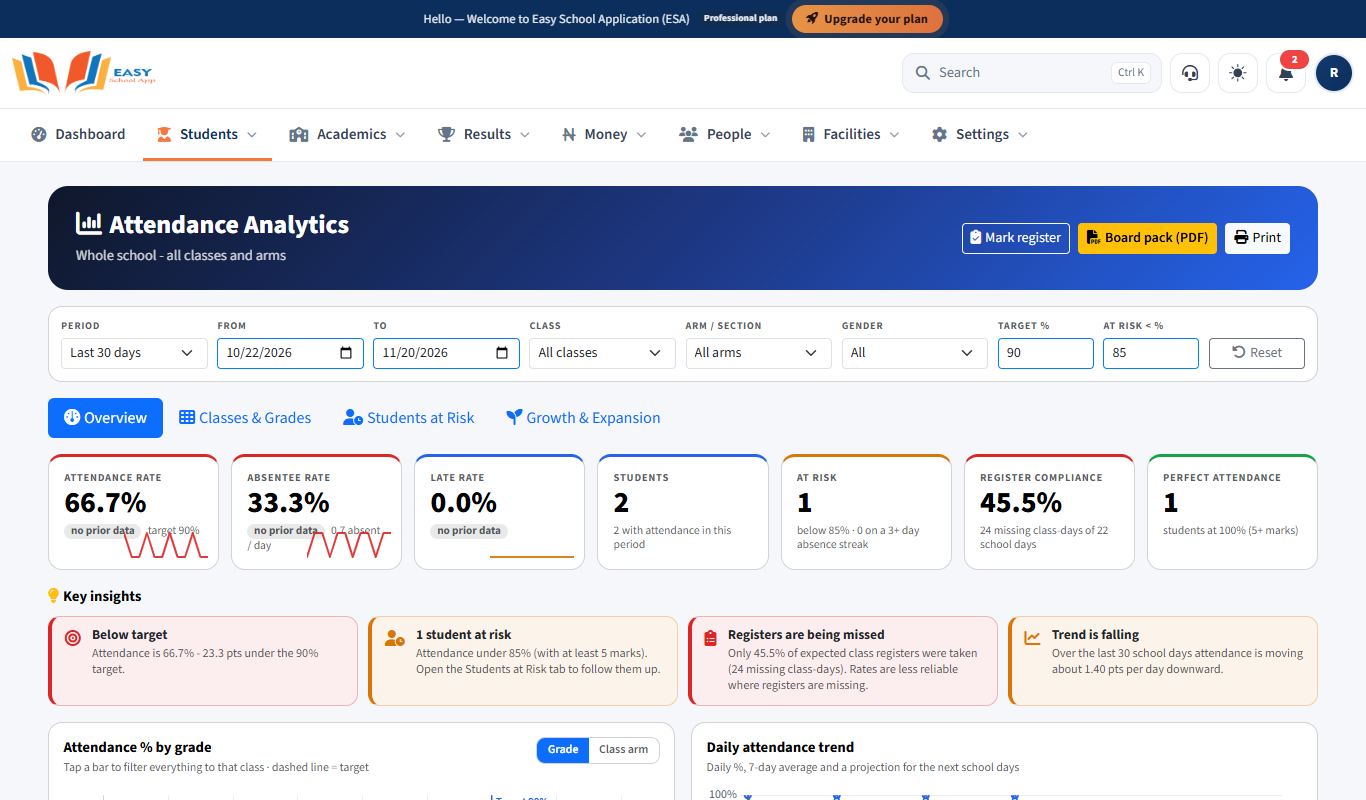
- Open Students › Attendance analytics.
- Choose the Period (or From and To dates). Optionally choose a Class, Arm / section and Gender.
- Set the Target % and the At risk < % level.
- Read the tabs:
- Overview – overall rate and trend.
- Classes & Grades – rates by class.
- Students at Risk – students below your at-risk level.
- Growth & Expansion – enrolment and attendance over time.
- Click Board pack (PDF) for a printable summary, or Print. Click Reset to clear the filters.
Promote students to the next class
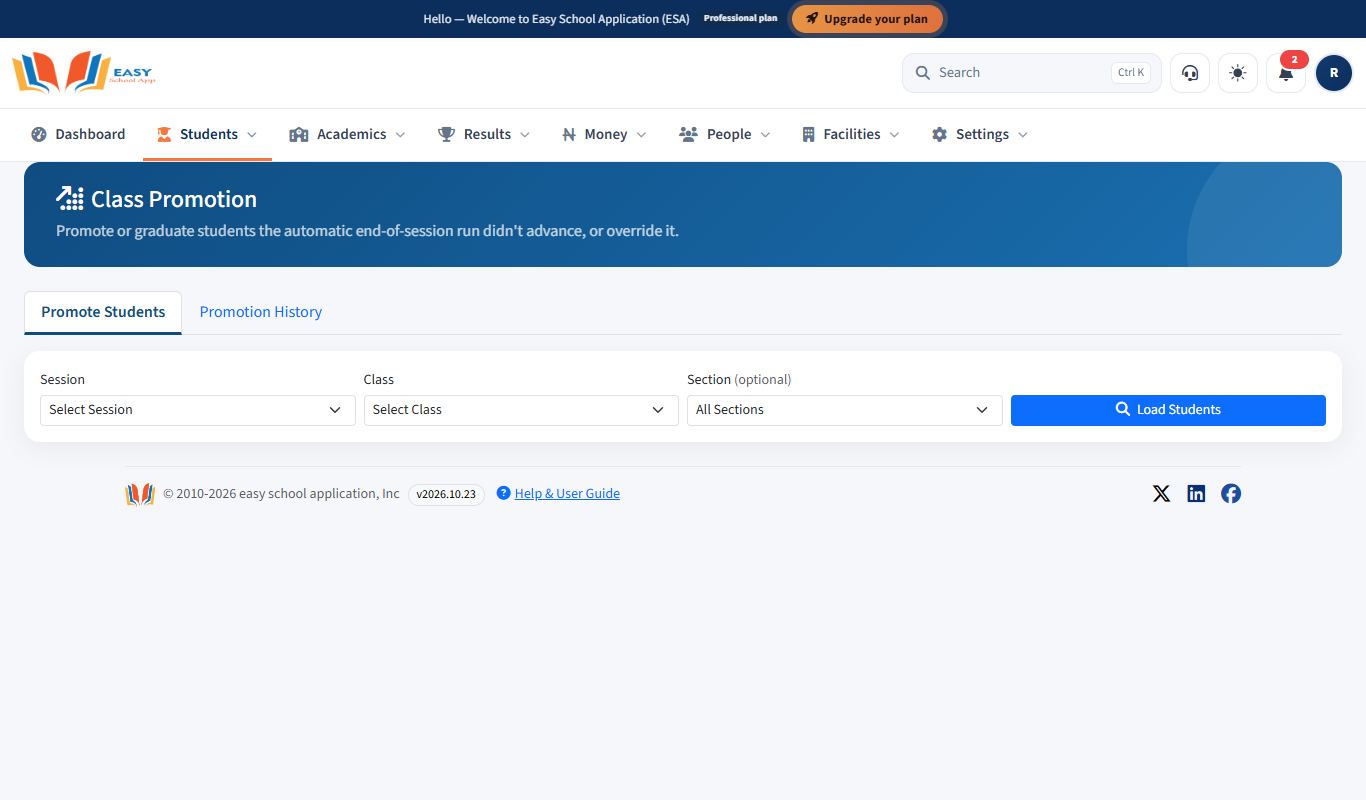
Purpose: Move students up to the next class at the end of the session, or graduate them. The app promotes automatically at the end of the session; use this page for students it did not move, or to change its decision.
Who can use it: School Admin, Principal, Bursar.
Where: Students › Promotion
Steps
- Open Students › Promotion. The Promote Students tab opens.
- Choose the Session, the Class, and (optional) the Section.
- Click Load Students. Each row shows the student's Result (for example Pass, Fail, No Result) and Promotion Status.
- Tick the students to move. Use Select all for the whole class.
- Choose the destination in Promote to... and click Promote.
- To check what happened, click Promotion History. Filter by Session and Type (Automatic only, Manual only or both).
Common errors and fixes
| Problem | Fix |
|---|---|
| "No students found for this session/class/section." | Check the session. Promotion uses the session that is ending, not the new one. |
| Result shows No Result | Scores for third term are missing. Compute results first. |
Issue graduation testimonials
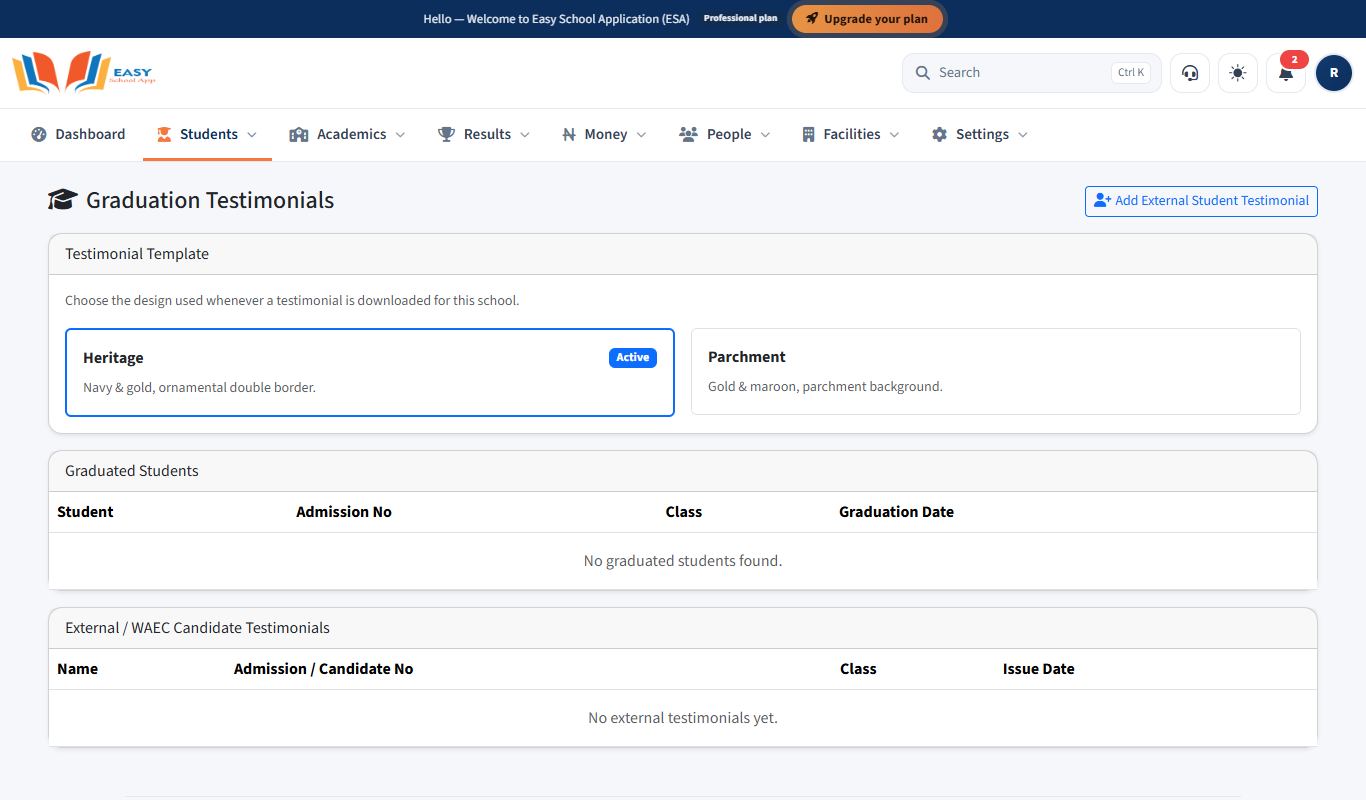
Purpose: Print a testimonial (school leaving letter) for a graduating or former student.
Who can use it: School Admin, Principal, Bursar.
Where: Students › Testimonials
Steps
- Open Students › Testimonials. Graduated students are listed.
- Open a student's testimonial, or click Add External Student Testimonial for someone not in the app.
- Check or fill in Full Name, Admission / Candidate No, Class / Level, Date of Birth, Gender, Reference Number, Issue Date, Session Admitted and Session Graduating.
- Write the Character & Academic Report and Commendation. The Insert buttons add ready-made text (Strong Academic, Well-Rounded / Leadership, Good Conduct) that you can edit.
- Type the Head Teacher Name and Principal Name.
- Click Save, then Download PDF to print.
Results and report cards
How results work (the big picture)
Results follow three steps. Every page in the Results menu shows them at the top, with how far each class has got:
- Enter scores – teachers type each student's CA, test and exam scores (Enter scores for a subject). Class teachers also rate behaviour and skills.
- Compute results – works out every student's total, average and position in class (Compute results).
- Publish & print – makes results visible to parents and students, locks the scores, and prints report cards (Publish, lock and unlock results).
Before publishing, check the class in Results › Class results (Check results before publishing). Set the score limits and grades once in Results › Assessment & grading setup, and how the report card looks in Results › Report card design.
Set up assessment and grading
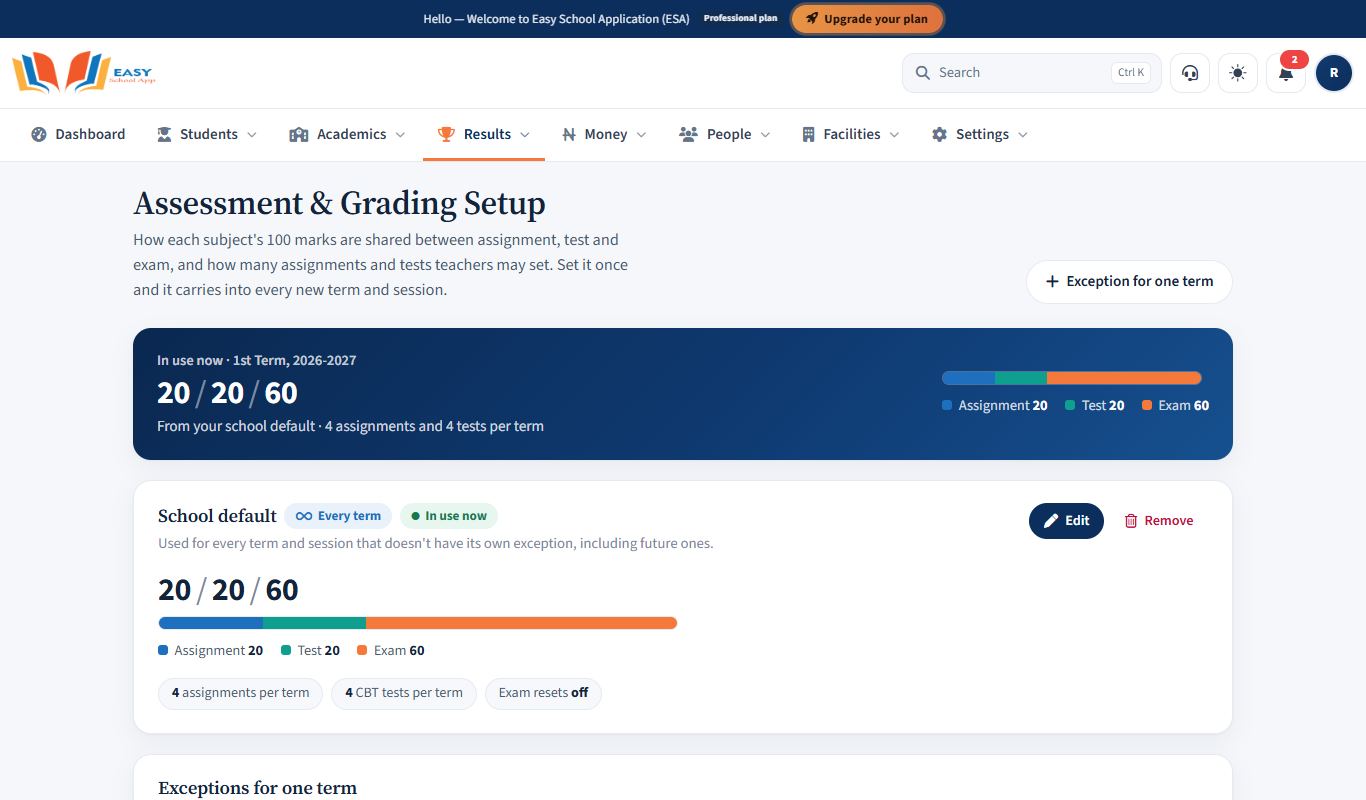
Purpose: Decide how many assignments and tests teachers can give, the maximum marks for assignments, tests (CA) and exams, and the grading scale (A, B, C…).
Who can use it: School Admin, Principal.
Where: Results › Assessment & grading setup
Steps
- Open Results › Assessment & grading setup.
- Click New Configuration.
- Choose the Term and Session.
- Under Assessment Limits, set Max Assignments, Max Tests, Assignment Score Cap, Test Score Cap and Exam Score Cap.
- Check the Grading Scale section. Assignment + Test + Exam caps together must add up to 100 or less.
- Tick Allow a student's exam attempt to be reset if teachers may restart a student's CBT exam after a technical problem.
- Click Save Configuration.
Common errors and fixes
| Problem | Fix |
|---|---|
| "Assignment + Test + Exam max scores add up to …, which is more than 100." | Lower one or more caps so the total is 100 or less. |
| Teachers can enter scores above the cap | The configuration is for a different term or session. Check Term and Session. |
Enter scores for a subject
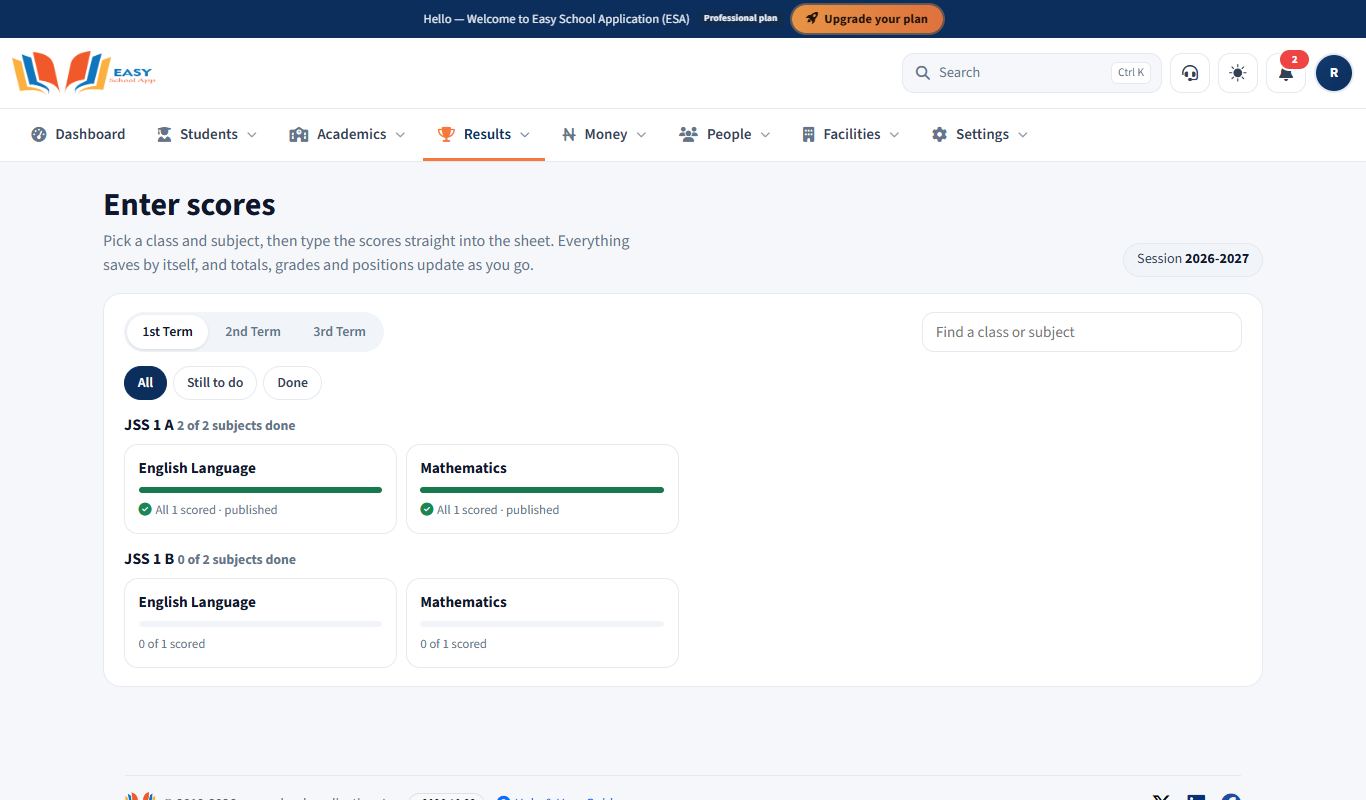
Purpose: Type each student's CA, test and exam scores for one subject in one class.
Who can use it: Teachers (only the subjects they teach), School Admin, Principal.
Where: Results › Enter scores
Steps
- Open Results › Enter scores. You see a card for every class and subject you teach, with progress like "18 of 25 scored".
- Click a card. Every student in the class is listed, ready to type into. The column headings show your school's limits, for example Exam /60.
- Type a score, then press Enter (or the down arrow) to go to the next student. Tab moves to the next column.
- It saves by itself. Watch the corner: Saving…, then All changes saved.
- Click Next sheet to go straight to your next subject.
Common errors and fixes
| Problem | Fix |
|---|---|
| A box turns red, for example "Exam can't be more than 60" | The score is over the limit. Fix it and the row saves. |
| I can't see a subject I used to see | You only see subjects you teach. Ask the School Admin to assign it to you in Academics › Teaching assignments. |
| I can't click 2nd or 3rd term | That term hasn't started by your school's term dates. |
| The sheet shows a lock | The class is published. Only an admin can unlock it for a correction. |
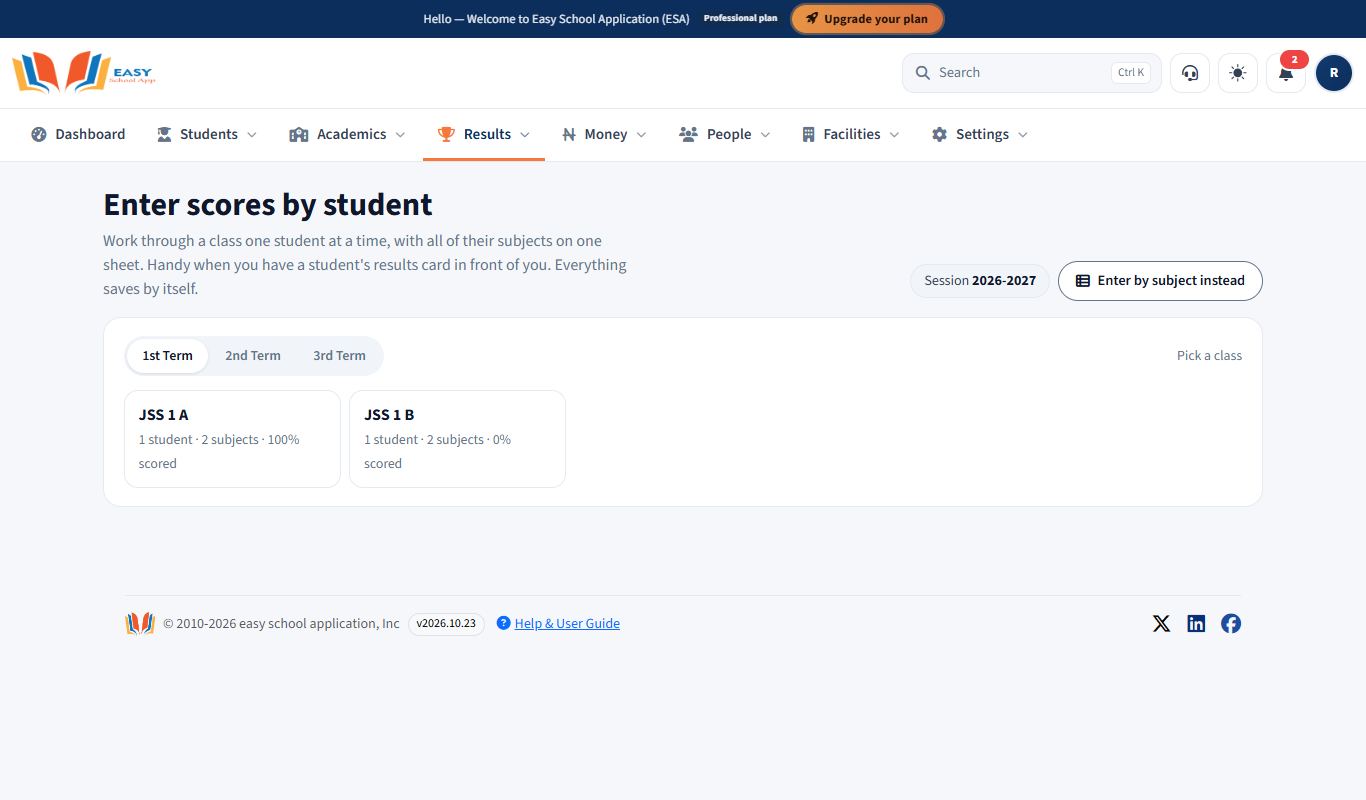
Enter all subjects for one student
Purpose: Type one student's scores for every subject at once, for example when copying from a results card.
Who can use it: School Admin, Principal, Teachers (their own subjects).
Where: Results › Enter scores by student
Steps
- Open Results › Enter scores by student and pick a class.
- Work down the list of students on the left (on a phone, choose from the drop-down).
- Type each subject's scores. It saves by itself, the same way as Enter scores for a subject.
Rate behaviour and skills
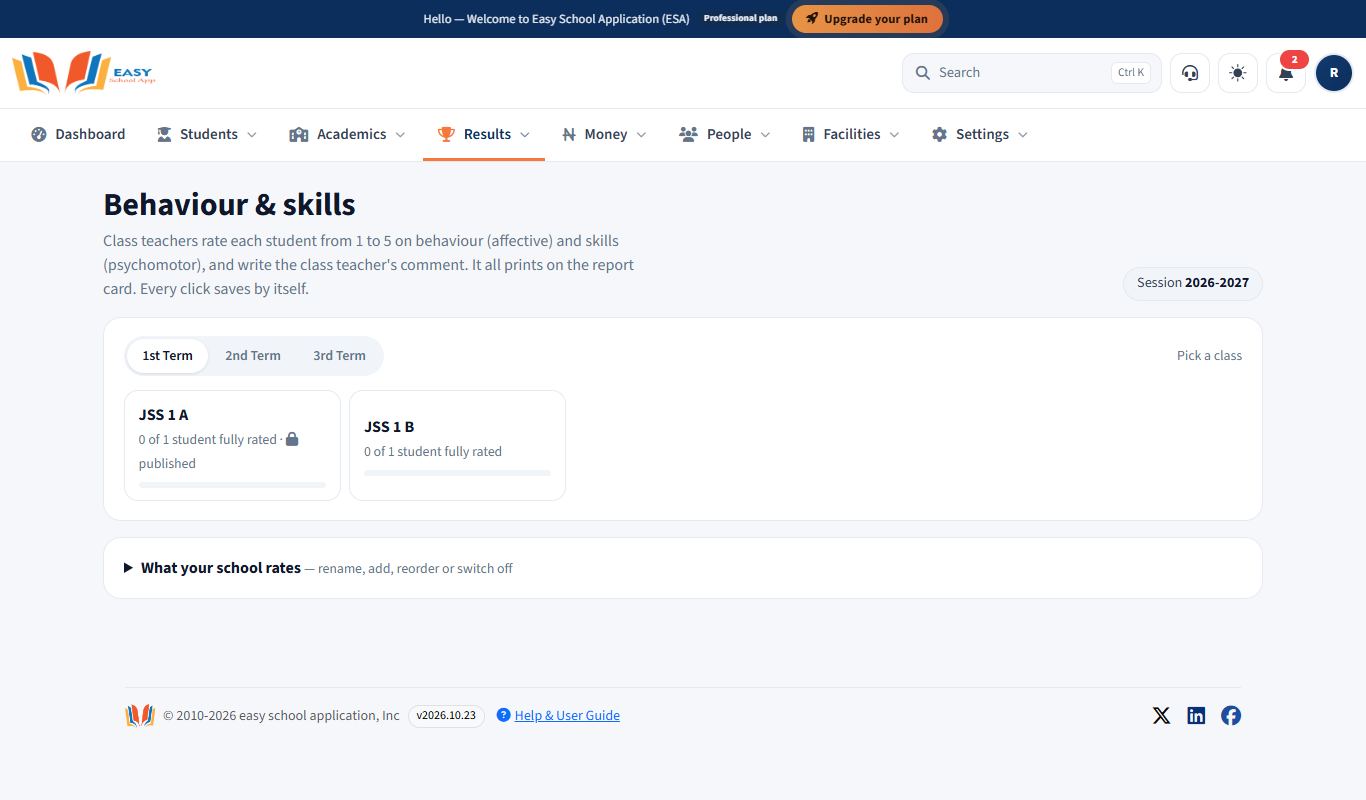
Purpose: Rate each student's behaviour (affective) and skills (psychomotor) from 1 to 5, and write the class teacher's comment for the report card.
Who can use it: Class teachers (for their own class), School Admin, Principal.
Where: Results › Behaviour & skills
Steps
- Open Results › Behaviour & skills and click your class.
- For each student, click a number next to each trait: 5 Excellent, 4 Very good, 3 Good, 2 Fair, 1 Poor. It saves straight away. Click the same number again to clear it.
- Type your comment in the box underneath. Leave it empty to keep the automatic remark.
- Shortcuts: Same rating for every trait (one student), Give everyone this (one trait, or every trait, for the whole class) and Copy last term's ratings.
Compute results (totals, averages and positions)
Purpose: Work out each student's total, average and position in class. These are what go on the report card.
Who can use it: School Admin, Principal, Bursar.
Where: Results › Compute results
Steps
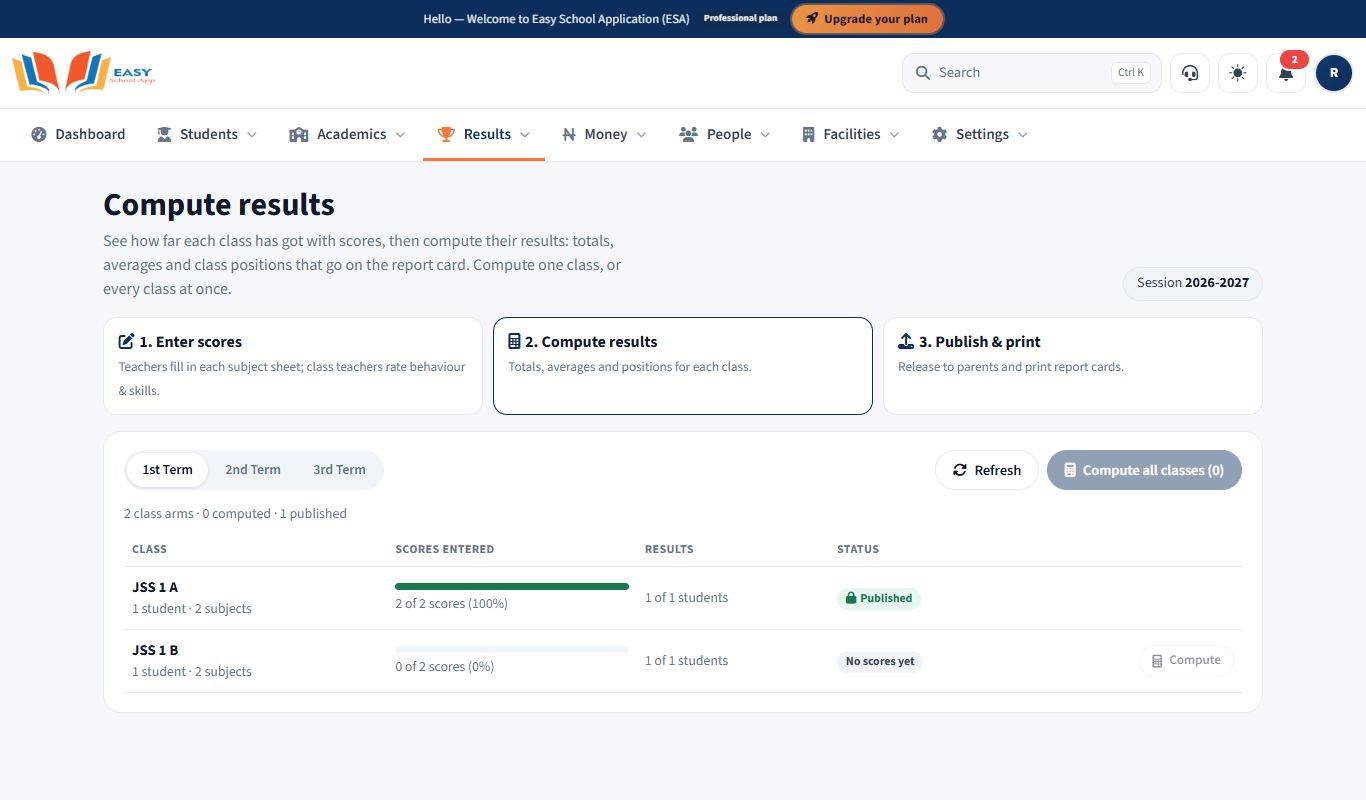
- Open Results › Compute results. Every class arm is listed with a progress bar for scores entered and a status: No scores yet, Not computed yet, Computed, Scores changed, compute again or Published.
- Click Compute on a row to do one class, or Compute all classes to do every class one after another, with progress.
- When a class shows Computed, check it in Results › Class results, then publish it.
Common errors and fixes
| Problem | Fix |
|---|---|
| No scores yet | No scores have been entered for that class. See Enter scores for a subject. |
| The Publish button is missing on Publish & print | The class hasn't been computed since its last score change. Compute it again. |
Check results before publishing
Purpose: Review a class's results by student and by subject, and print a broadsheet.
Who can use it: School Admin, Principal, Teachers (the subjects they teach).
Where: Results › Class results
Steps
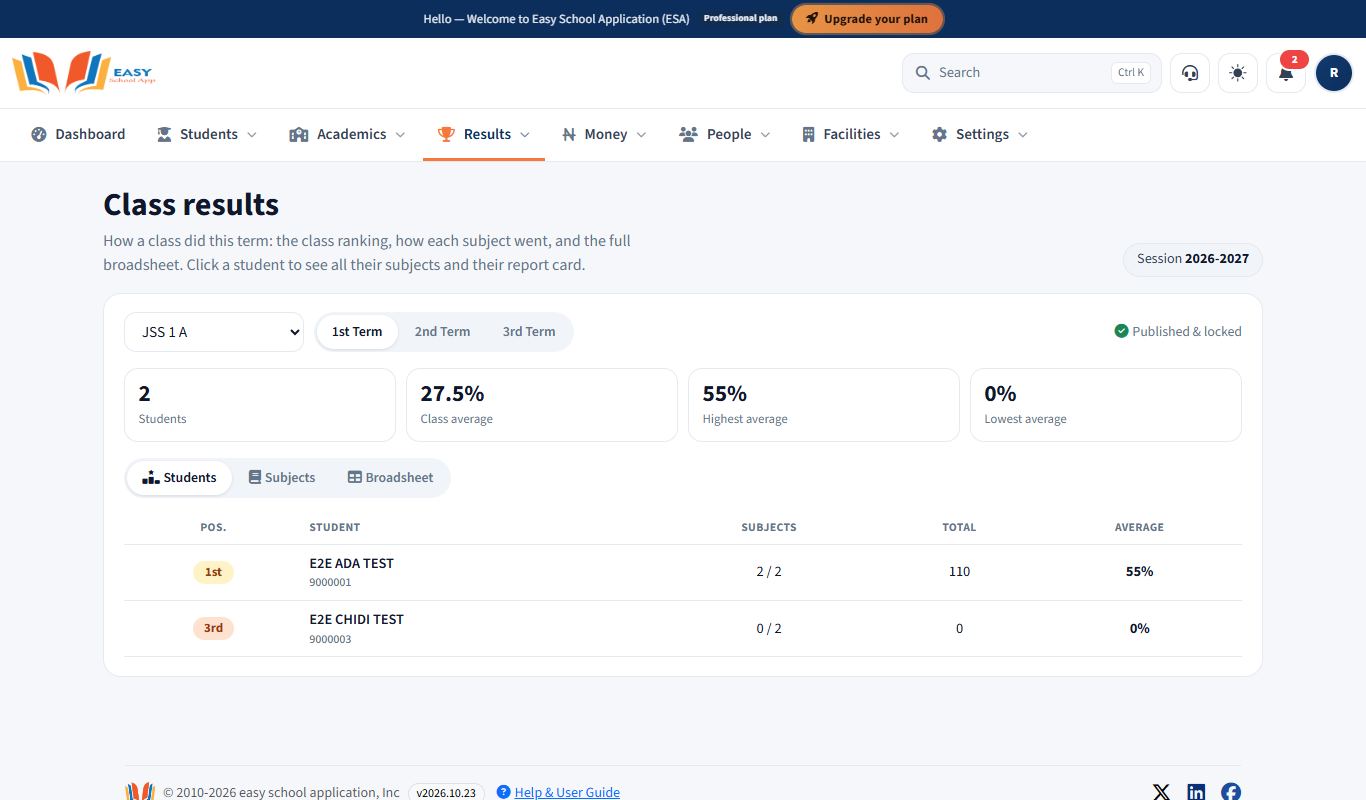
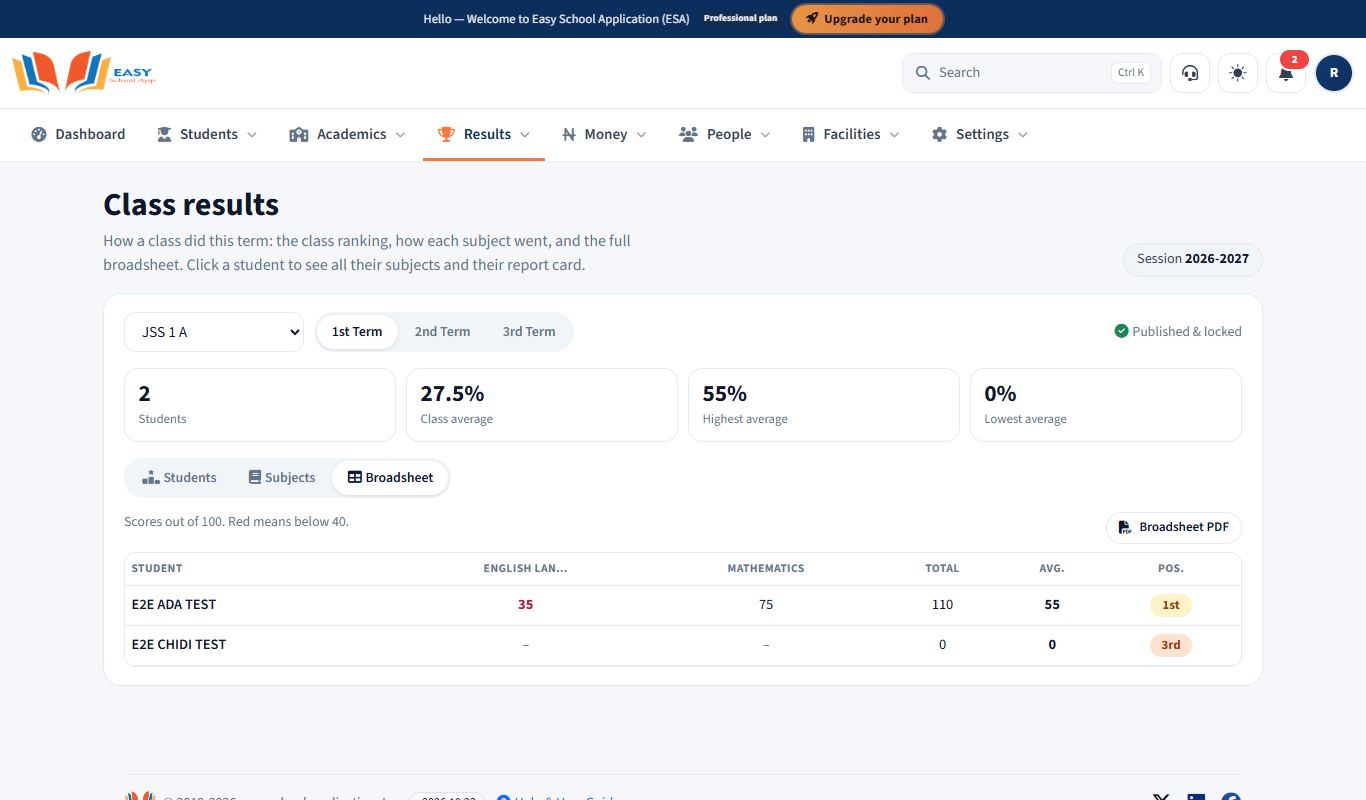
- Open Results › Class results. Pick a class and term.
- Use the tabs:
- Students – the class ranking with positions, totals and averages.
- Subjects – each subject's average, highest and lowest score, pass rate and best student. Click a subject to see every student's position in it.
- Broadsheet – every student and every subject on one screen (scores below 40 in red). Click Broadsheet PDF to print it.
- Click any student to see all their subjects, their report card and the Full student report: their position, how they compare with the class in each subject, their strongest and weakest subject, and their average each term.
Publish, lock and unlock results
Purpose: Make a class's results visible to parents and students, lock the scores, and print report cards and the broadsheet.
Who can use it: School Admin, Principal.
Where: Results › Publish & print
Steps
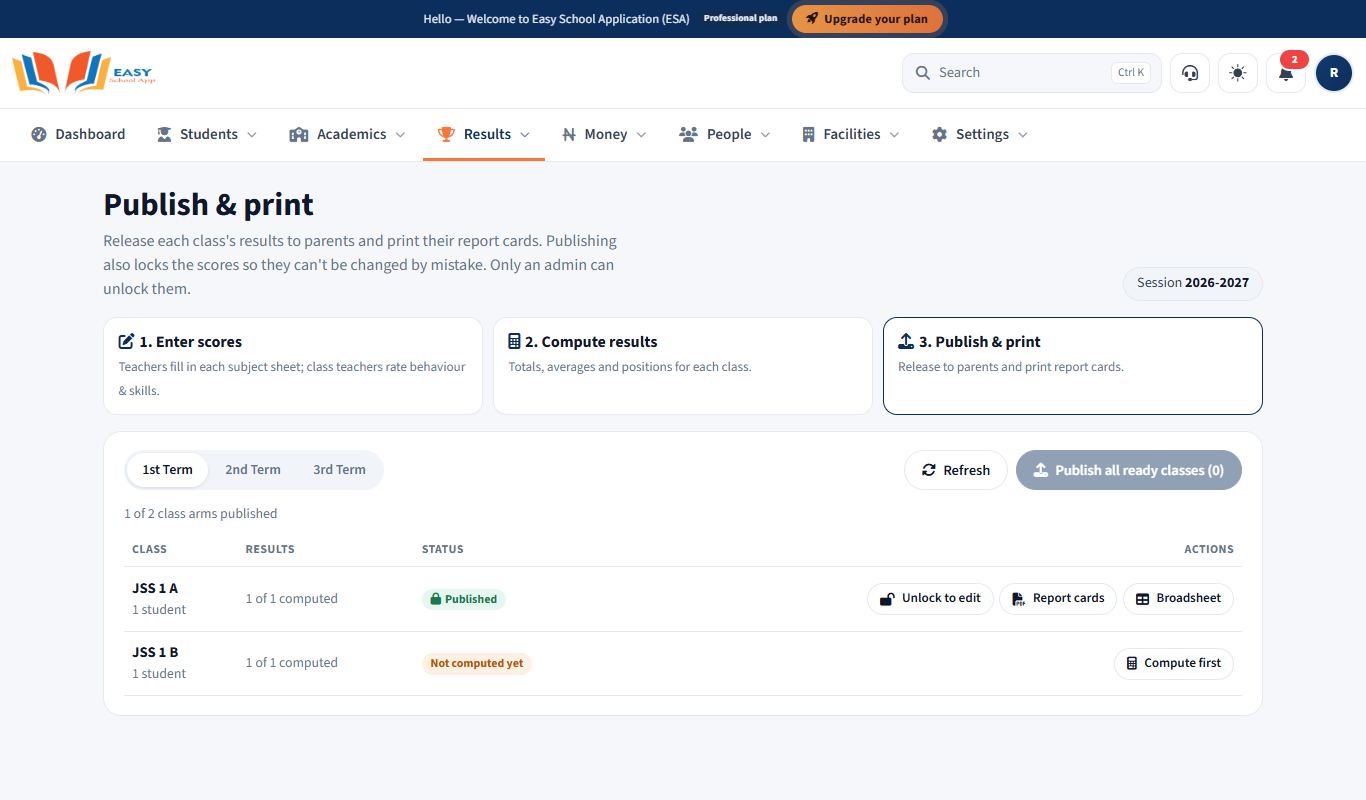
- Open Results › Publish & print. There is one row per class.
- Click Publish on a computed class. You are asked whether to Also send an SMS to parents. Tick it only if you want it (it uses SMS credit).
- Or click Publish all ready classes to publish every computed class in one click (without SMS).
- Once published, Report cards opens one PDF with every student's card, straight away, and Broadsheet opens the class broadsheet.
- Publishing also locks the scores. To correct something, an admin clicks Unlock, fixes the scores, computes again and clicks Lock (or publishes again).
Common errors and fixes
| Problem | Fix |
|---|---|
| The Publish button is missing | The class hasn't been computed since its last score change. Go to Results › Compute results. |
| The Report cards button is missing | Report cards appear once the class is published. |
| Parents didn't get an SMS | The SMS is only sent if you ticked the option. Check People › SMS history. |
Choose the report card design
Purpose: Pick how your report cards look, or design your own, and choose whether scores are colour-coded.
Who can use it: School Admin, Principal. Colour-coded scores: School Admin and the school owner.
Where: Results › Report card design
Every design shows the student's average and grade, position out of the class size, total, the class average, each subject with your school's own mark split and how the class did, behaviour and skills, attendance, term dates with "Next term begins", comments with signature lines, and a grading key, on one A4 page.
Steps – pick one of our designs
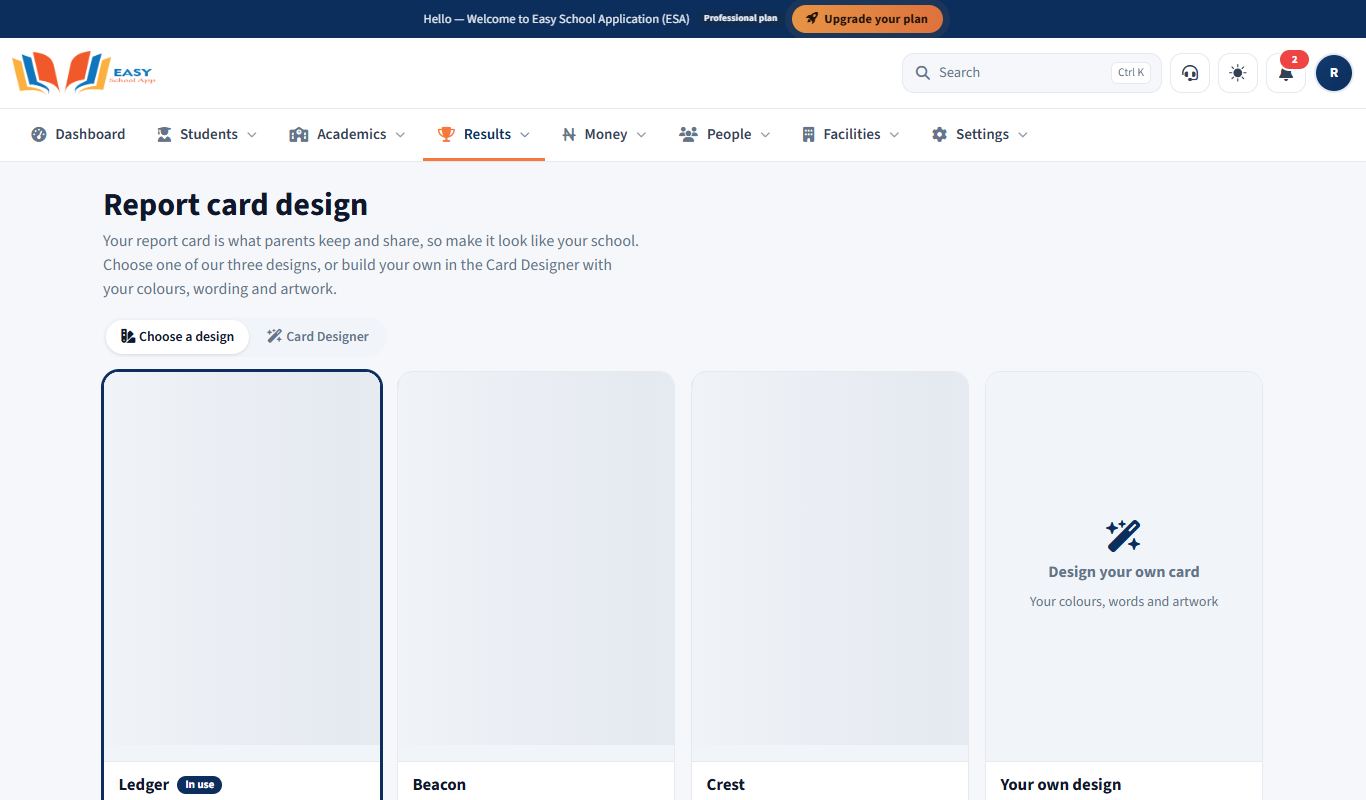
- Open Results › Report card design. The Choose tab shows each design as a sample card with your own school name and logo:
- Ledger – classic academic: serif headings, navy and gold rules, framed sections.
- Beacon – modern international: a colour header, summary tiles, coloured grade badges and a bar for each subject.
- Crest – prestige: framed cream paper, an elegant serif, a ribbon title and a school seal.
- Click Sample PDF to see one full size.
- Click Use this design.
Steps – design your own (Card Designer)
- Click the Card Designer tab.
- Optionally upload a photo or PDF of the report card you use now. It stays beside you while you design, and you can take its colours with one click.
- Pick a base layout, your colours (From your logo uses your logo's colours) and a heading font.
- Tick the sections to print and put them in your order. Change the wording too, for example "Form Tutor" instead of "Class Teacher".
- Choose a watermark (your logo, your words or none) and, if you like, upload full-page artwork such as your own border.
- Watch the preview on the right, then press Save & use for report cards.
Colour-coded scores
Turn on Colour-code the scores to print CA, test, exam and total scores in red when low, blue when fair and green when good, with a small key under the table. Leave it off for plain black.
Add signatures for report cards
Purpose: Save the Head Teacher's and Principal's signatures so they print on report cards and testimonials.
Who can use it: School Admin.
Where: Settings › Signature
Steps
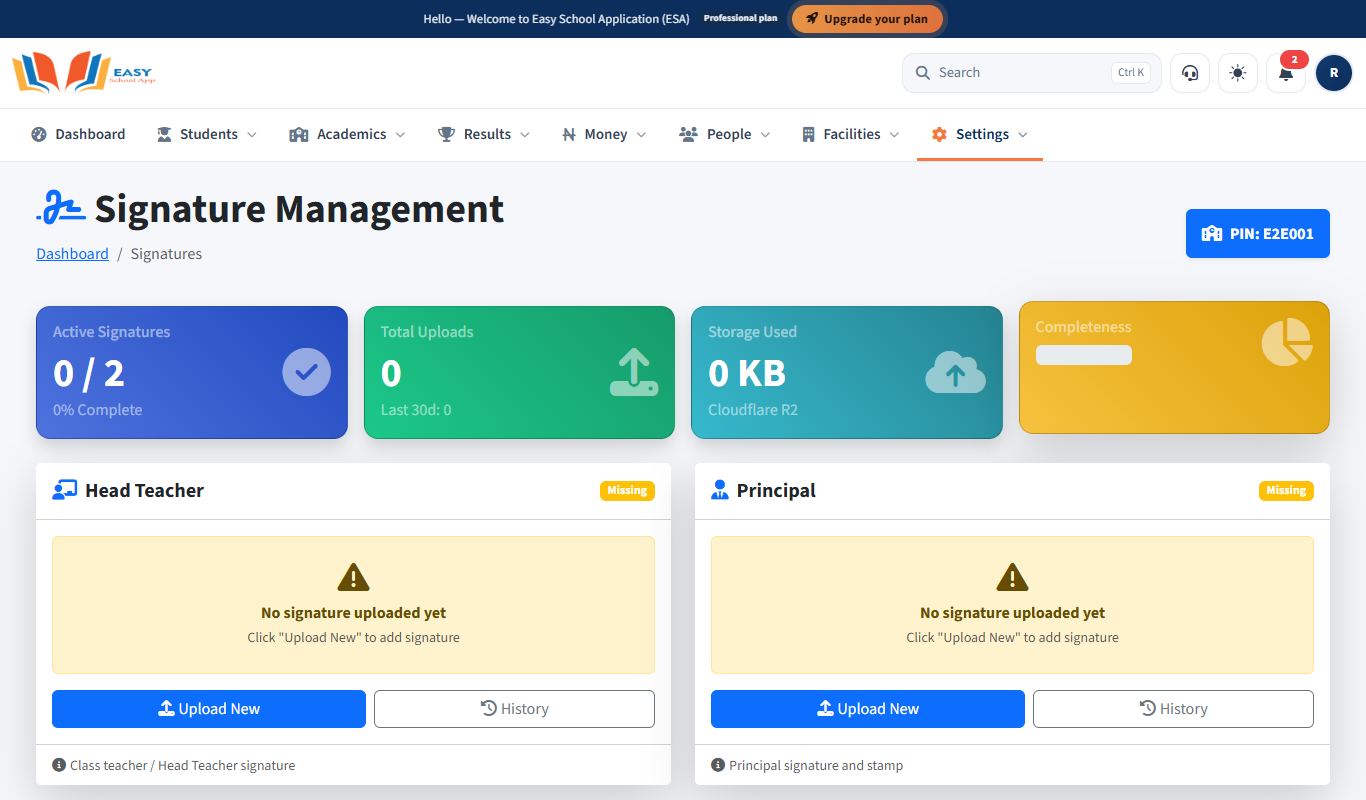
- Open Settings › Signature. You will see a card for Head Teacher and one for Principal.
- Click Upload New on the card you want.
- Draw the signature with a mouse or finger. Use Undo, Clear or Redraw to fix it.
- Click Upload Signature.
- The card shows the signature as active. Completeness shows how many of the 2 signatures are set.
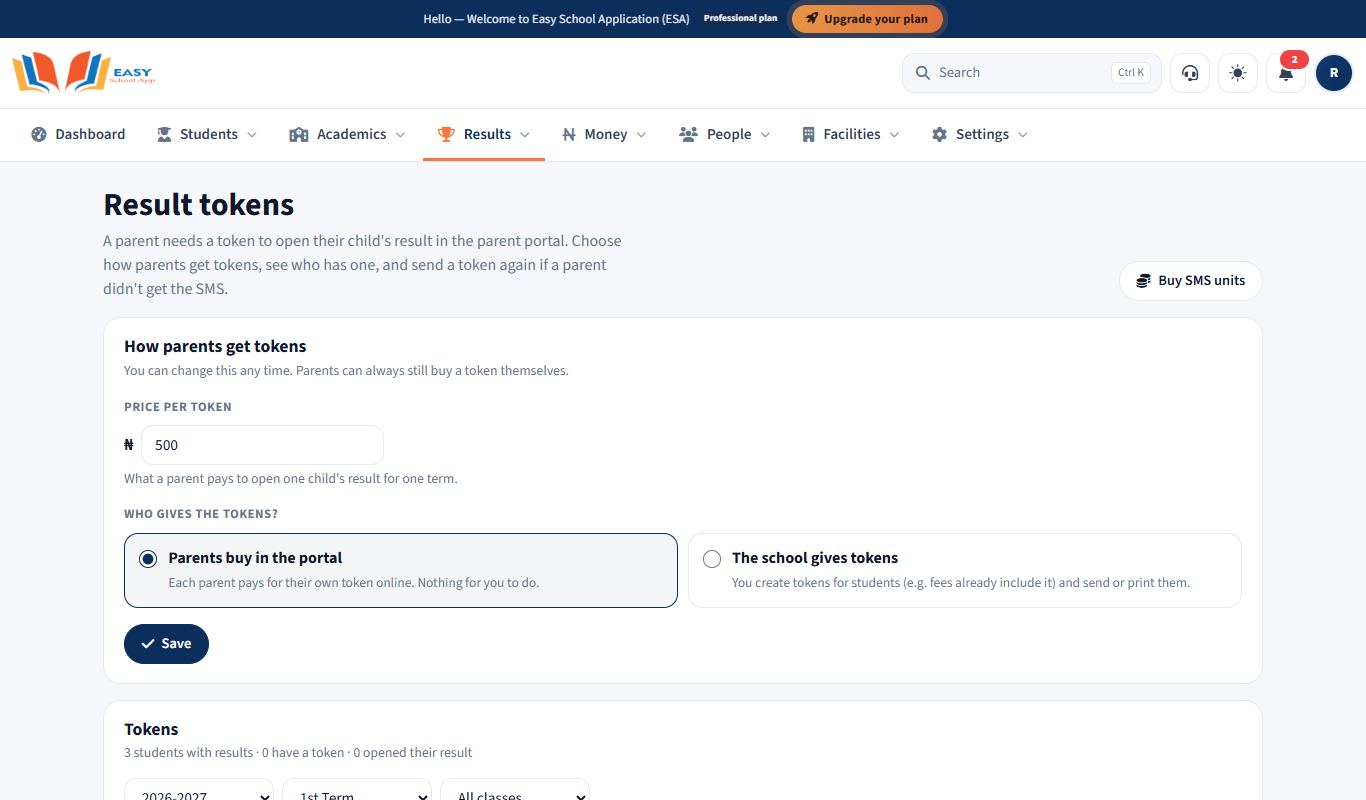
Set up result tokens
Purpose: Decide how parents get the token that unlocks their child's result, set the price, and see who has a token.
Who can use it: School Admin, Principal.
Where: Results › Result tokens
Steps – the settings
- Open Results › Result tokens.
- Choose how tokens are given: Parents buy in the portal, or The school gives tokens (by SMS or printed cards).
- Type the price and save.
Steps – see who has a token
- Pick a term and class, or search for a name.
- Every student shows No token, Bought by parent or Given by school, and whether they have opened their result.
- Resend SMS sends the token to the parent's number again. Other number sends it to a new number. Show reveals the code so you can read it out, and Card prints it. Tick several students to resend or print for all of them.
Generate and print report cards
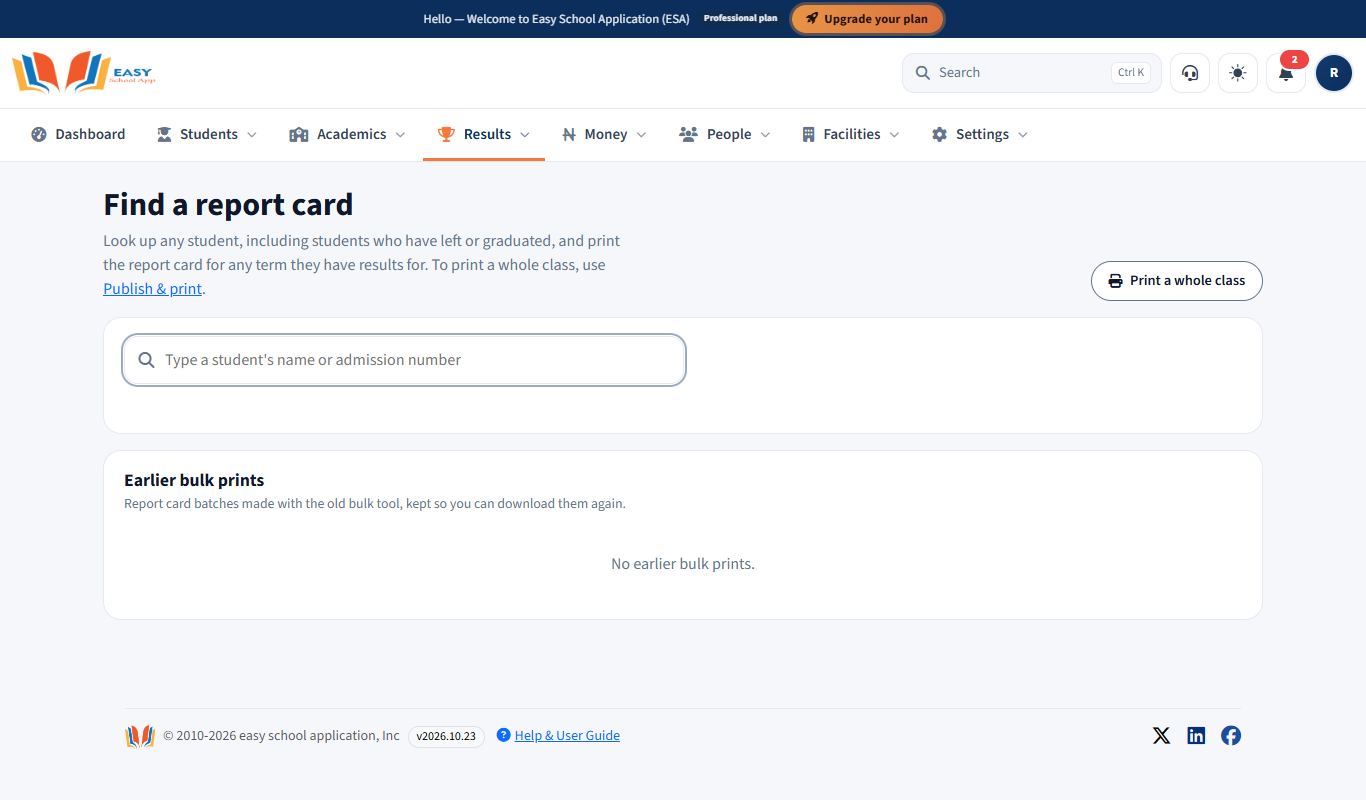
Purpose: Print report cards for a whole class, or reprint one student's card.
Who can use it: School Admin, Principal.
Where: Results › Publish & print (a whole class) and Results › Find a report card (one student)
Steps – a whole class
- Publish the class first (see Publish, lock and unlock results).
- On Results › Publish & print, click Report cards on the class's row. One PDF opens with every student's card, ready to print.
Steps – one student
- Open Results › Find a report card.
- Type the student's name or admission number. Students who have left or graduated are included.
- Pick the term and click Report card.
Common errors and fixes
| Problem | Fix |
|---|---|
| The Report cards button is missing | The class isn't published yet. |
| The report card shows no position | Show class position on the report card is off in Report card design, or results were not computed. |
| Signatures are missing | Upload them in Settings › Signature. |
Teaching and learning
Review teachers' lesson plans
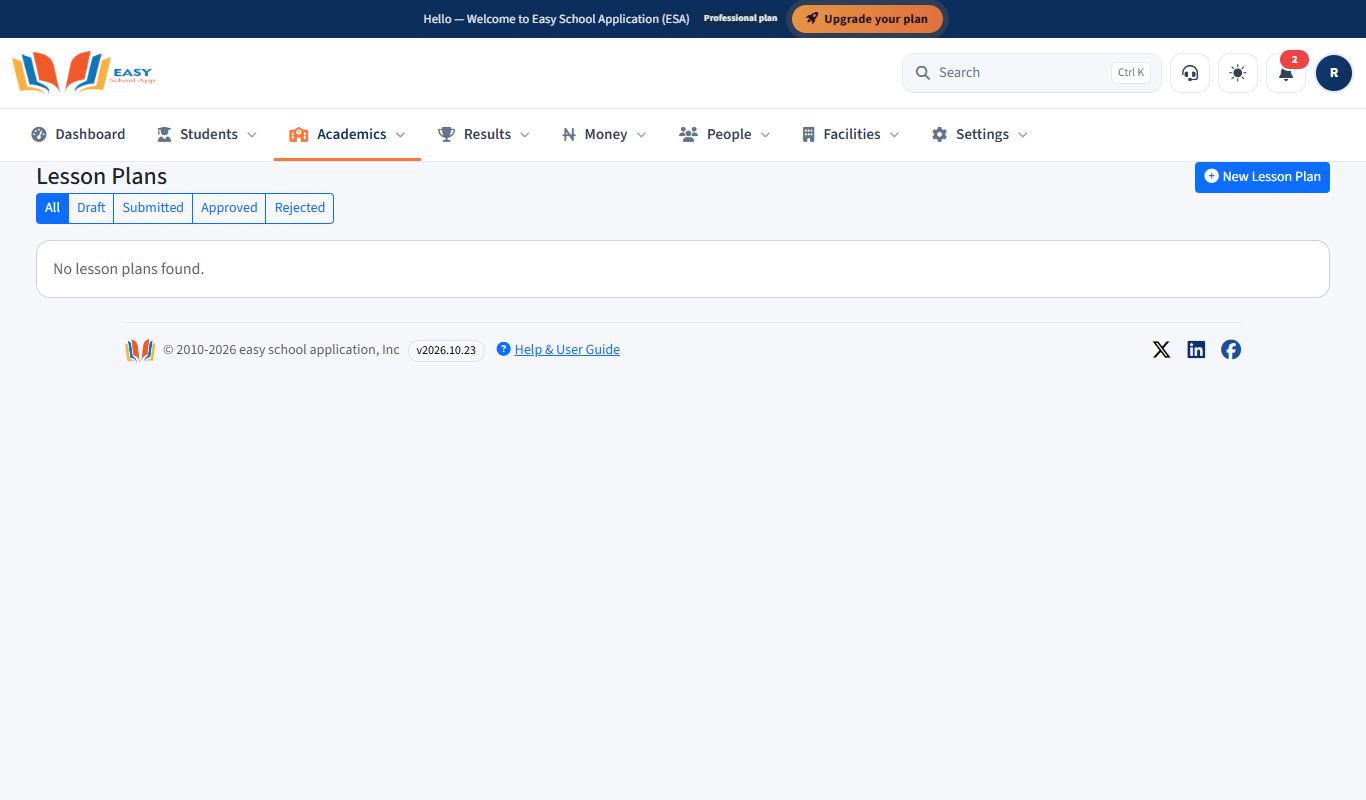
Purpose: Check lesson plans that teachers submit, approve good ones, and send back plans that need changes.
Who can use it: Head Mistress (her assigned classes), Principal, School Admin.
Where: Academics › Lesson plans
Steps
- Open Academics › Lesson plans.
- Click Submitted to see plans waiting for review.
- Open a plan. Read the Learning Objectives, Teaching / Learning Activities, Instructional Materials and Assessment Method.
- If it is good, click Approve.
- If it needs changes, write a Note for the teacher (optional) and click Send Back. The teacher sees it as Rejected with your note.
- The Taught? column shows whether the teacher has marked the lesson as taught.
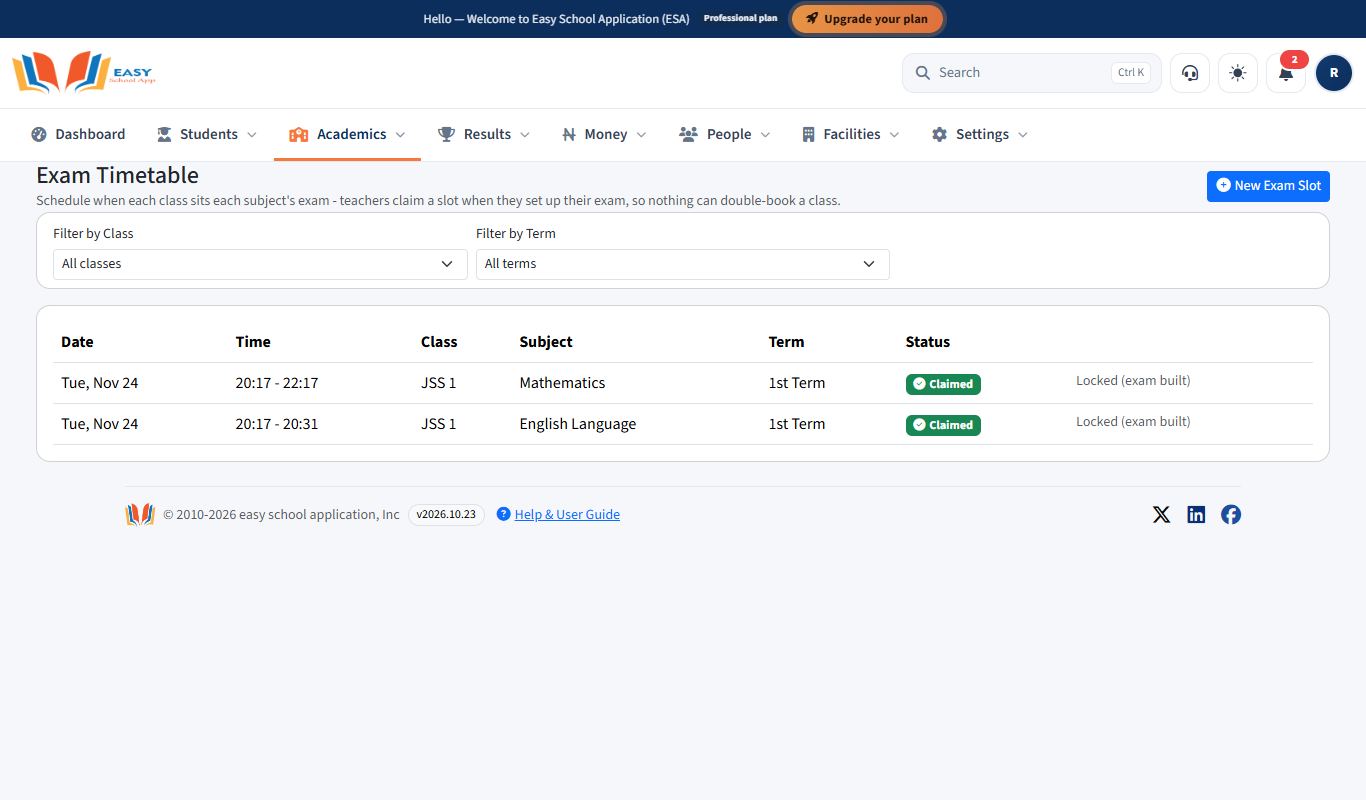
Set up the exam timetable
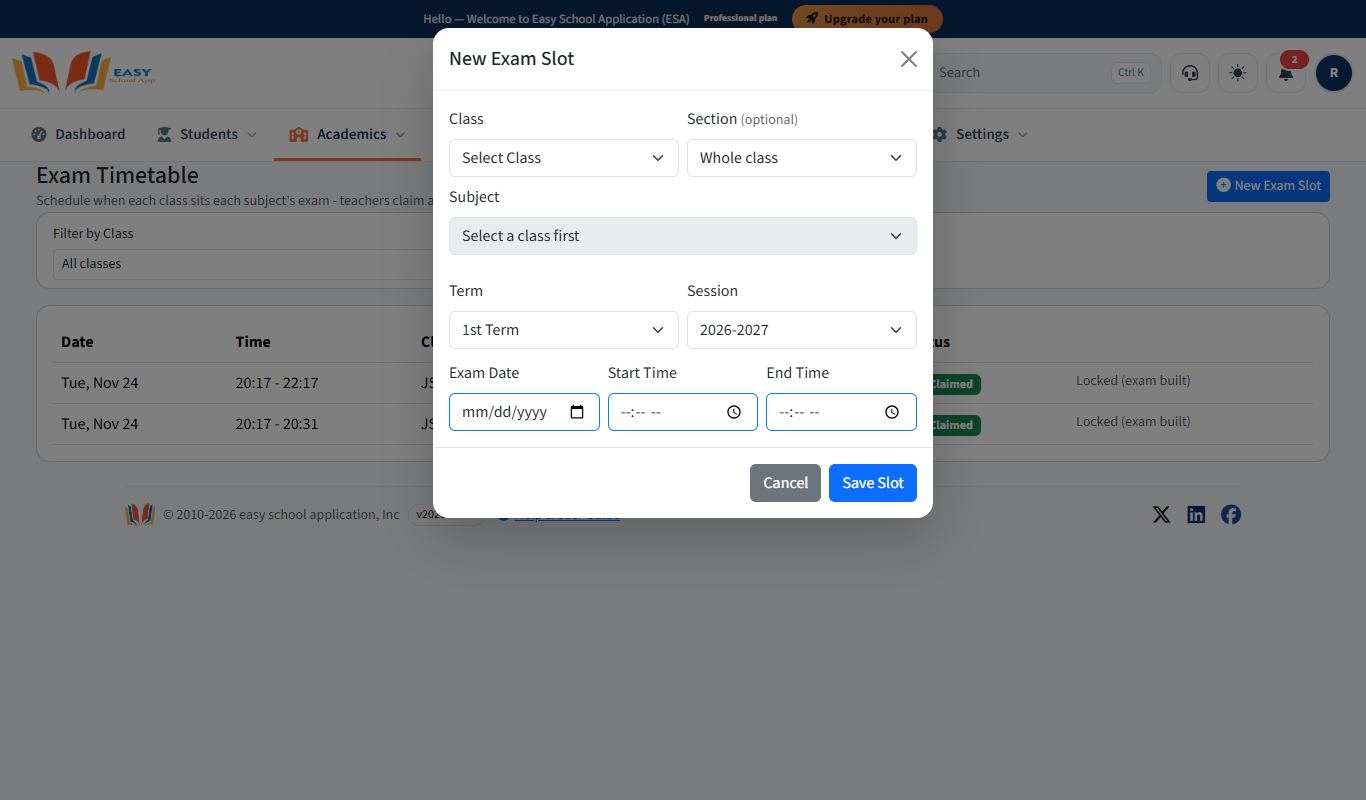
Purpose: Schedule each exam paper by class, subject, date and time. Parents and students see the timetable, and teachers build CBT exams on these slots.
Who can use it: School Admin, Principal, Head Mistress, Teacher.
Where: Academics › Exam timetable
Steps
- Open Academics › Exam timetable.
- Click New Exam Slot.
- Choose the Class, Section (optional), Subject, Term and Session.
- Choose the Exam Date, Start Time and End Time.
- Click Save Slot.
- Use Filter by Class and Filter by Term to check the timetable.
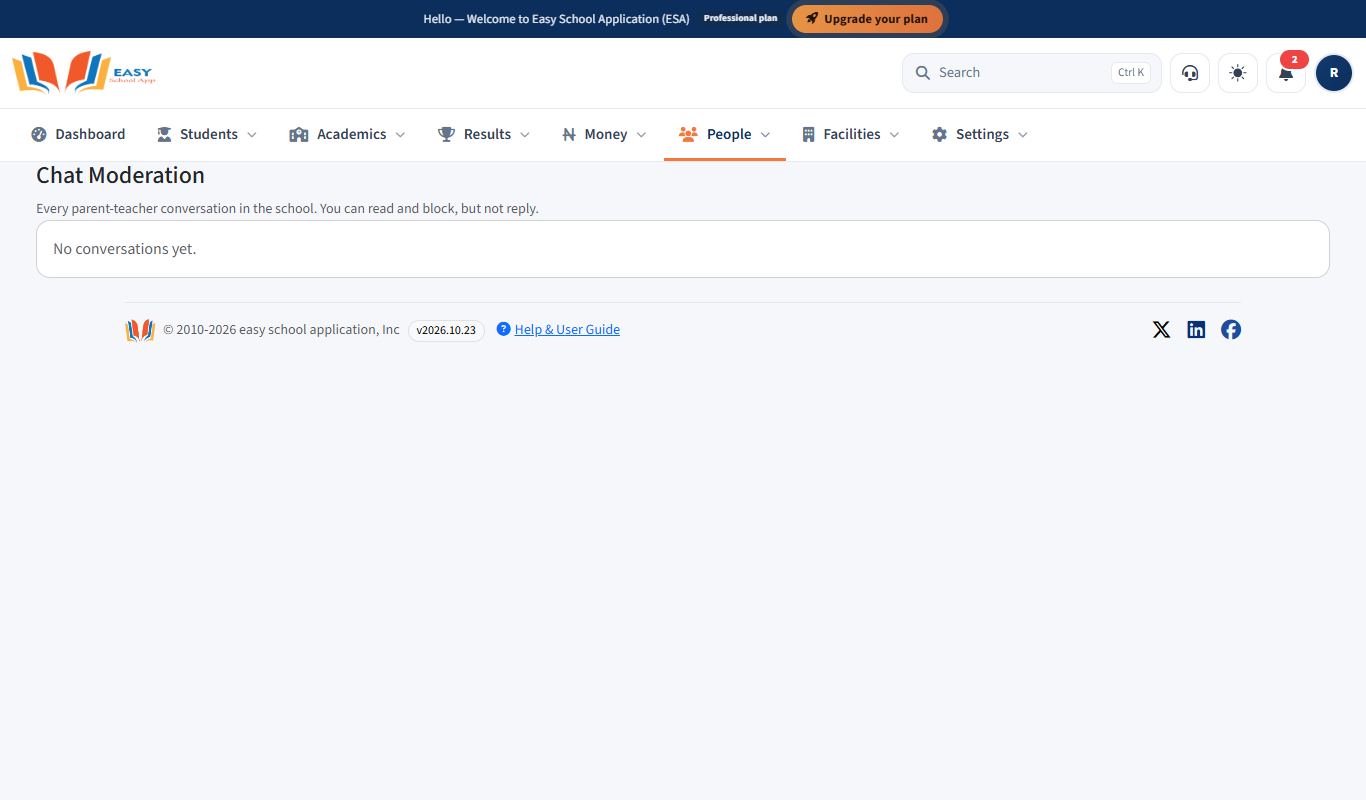
Moderate teacher–parent chats
Purpose: Keep messages between teachers and parents respectful. You can see every conversation and block one if needed.
Who can use it: School Admin, Principal, Head Mistress.
Where: People › Chat moderation
Steps
- Open People › Chat moderation. Each row shows the Student, Teacher, number of Messages, Last Activity and Status.
- Open a conversation to read it.
- To stop a conversation, click Block. Type a Reason (only you can see it) and confirm.
- To allow it again, click Unblock.
Fees and finance
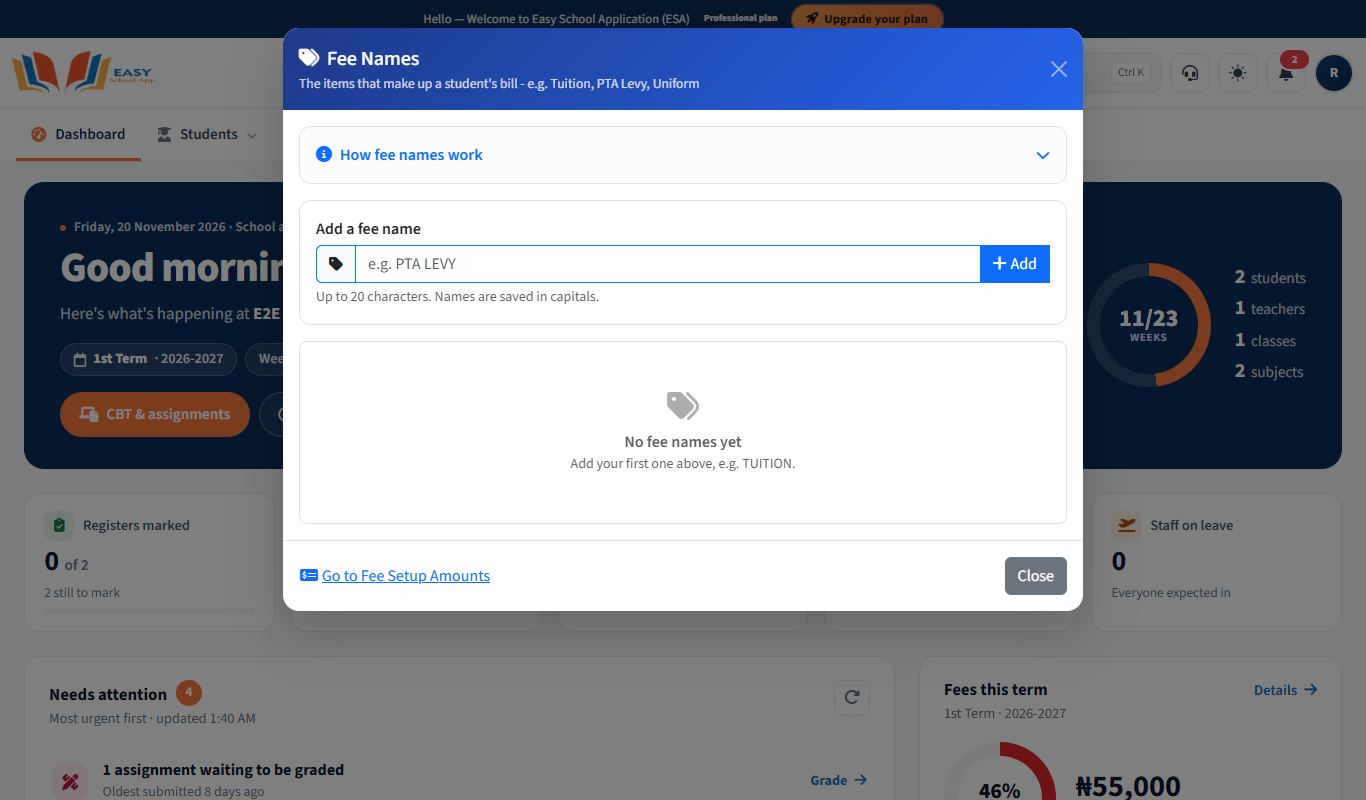
Create fee names
Purpose: List the items you charge for, such as SCHOOL FEES, PTA, Uniform or Lesson fee. Amounts are set per class afterwards.
Who can use it: School Admin, Bursar.
Where: Money › Fee names (or the Fee names button on Fee Setup Amounts)
Steps
- Open Money › Fee names. The Fee Names box opens.
- Type the name in Add a fee name and click Add.
- For each fee in the table, set:
- Optional – a parent may decline it (for example a school bus levy or an excursion).
- Charge once – charged only once in the student's time at the school (for example a registration form).
- When you finish, click Go to Fee Setup Amounts to set the amounts.
Set fee amounts for classes
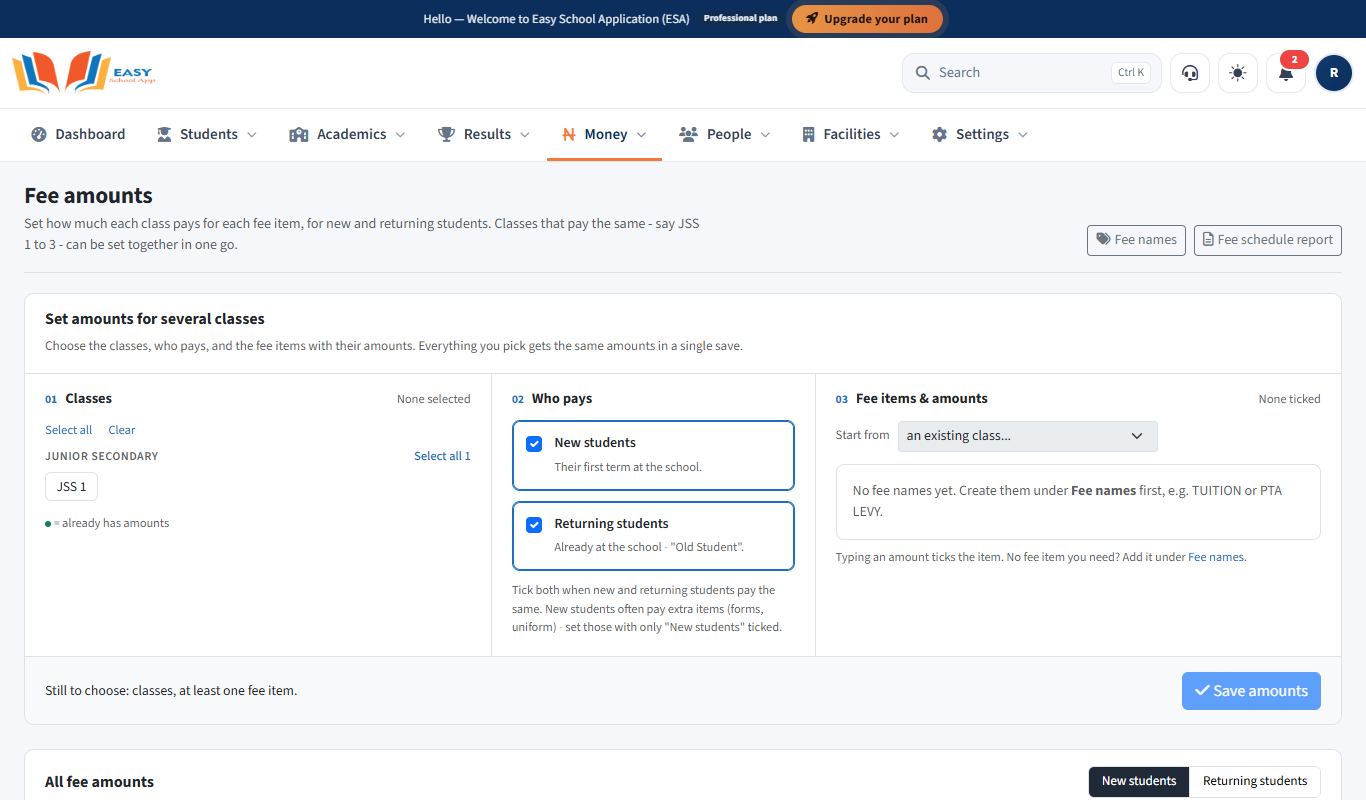
Purpose: Set how much each class pays for each fee item, for new and returning students. Classes that pay the same (for example JSS 1 to JSS 3) can be set together.
Who can use it: School Admin, Bursar.
Where: Money › Fee setup amounts
Steps
- Open Money › Fee setup amounts. The Fee amounts page opens.
- 01 Classes: click the classes that pay the same amounts. Use Select all or Clear. A green dot means the class already has amounts.
- 02 Who pays: tick New students (first term at the school), Returning students ("Old Student"), or both.
- 03 Fee items & amounts: type an amount next to each fee item. Typing an amount ticks the item. To copy another class's amounts, use Start from and choose the class.
- Check Total per student.
- Click Save amounts.
- Scroll down to All fee amounts to see every class. Switch between New students and Returning students. Click any amount to change it, then press Enter to save or Esc to cancel.
If you change an amount after bills were made
The app asks whether to Update bills to the corrected fee amounts. Click Update bills to correct students' bills, or Not now to keep the old bills.
Common errors and fixes
| Problem | Fix |
|---|---|
| Save amounts is greyed out | The bar says what is missing, for example "Still to choose: classes, at least one fee item." |
| A fee item is missing | Add it first in Fee names. |
| A student's bill shows the old amount | Use Update bills when asked, or edit the amount again and accept the update. |
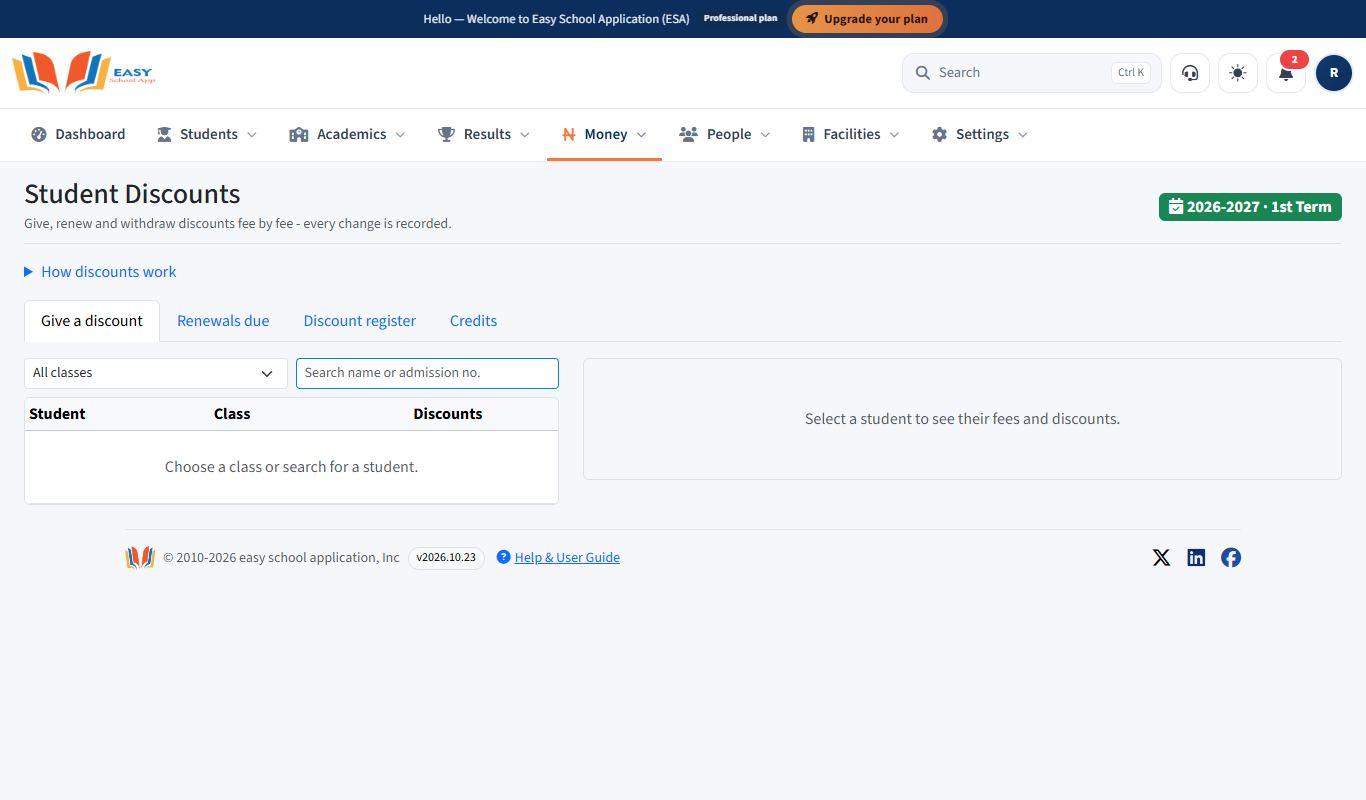
Give fee discounts and scholarships
Purpose: Reduce a student's fee (for example a staff child, scholarship or sibling discount), or remove an optional item the parent declined. Every change is recorded.
Who can use it: School Admin, Bursar.
Where: Money › Discounts
Steps – give a discount
- Open Money › Discounts. The Give a discount tab opens.
- Choose a class, or search by name or admission number. Click the student.
- Under Fees this term, find the fee item.
- Choose the Type: Percentage (%) or Fixed amount (₦), and type the amount.
- Under Applies to, choose how long the discount lasts (for example One term).
- Type the Reason (for example "Staff child").
- Click Give discount. Large discounts may show Pending approval until a senior person approves them.
Steps – remove an optional item
- Under Optional items, choose the Item the student won't take.
- Type the Reason (required) (for example "Parent declined PTA levy").
- Click Take off bill. This is not counted as a discount.
Steps – renew discounts for a new term or session
- Click Renewals due.
- Tick the discounts and click Renew for this term only, Renew for the whole session or Renew selected.
Record a fee payment and print a receipt
Purpose: Record money a parent paid at the school (cash, POS or bank transfer) and give them a receipt.
Who can use it: School Admin, Bursar.
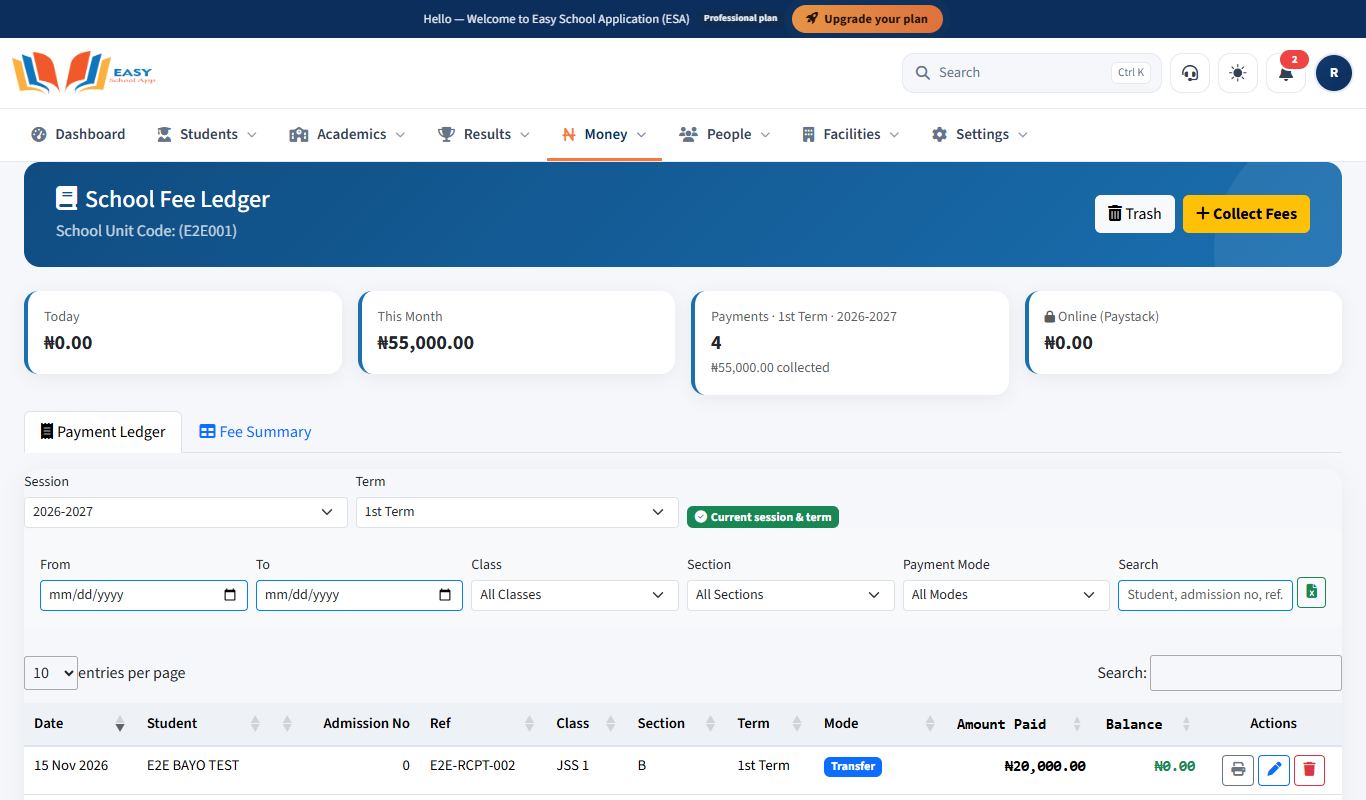
Where: Money › Fee collection (the page is titled School Fee Ledger)
Steps
- Open Money › Fee collection.
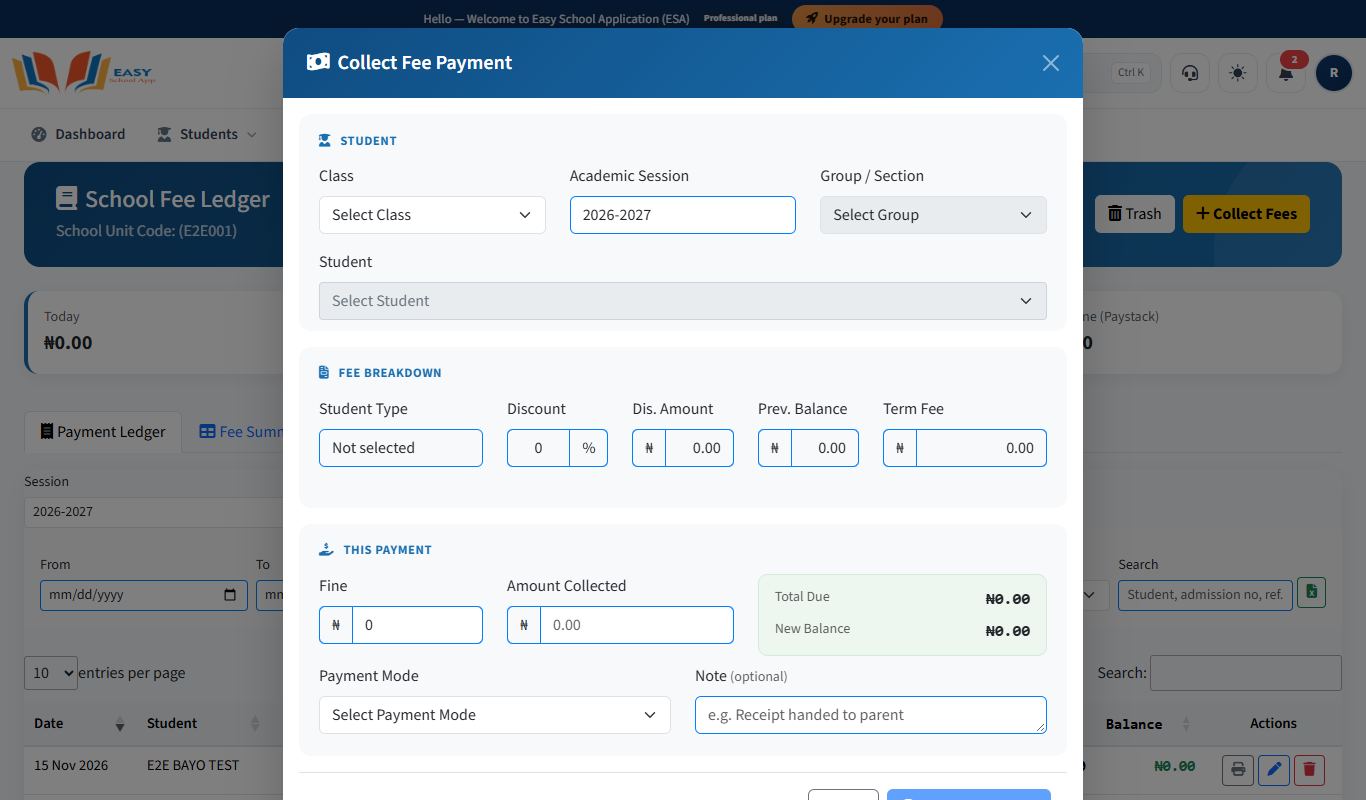
- Click Collect Fees. The Collect Fee Payment box opens.
- Under Student, choose the Class, Academic Session, Group / Section and Student.
- Check the Fee Breakdown: Student Type, Discount, Prev. Balance and Term Fee fill in by themselves.
- Under This Payment, type any Fine and the Amount Collected.
- Check Total Due and New Balance on the right.
- Choose the Payment Mode and add a Note (optional), for example "Receipt handed to parent".
- Click Submit Payment.
- In the Payment Ledger, click the print icon on the payment's row to print the receipt.
Common errors and fixes
| Problem | Fix |
|---|---|
| Term Fee shows ₦0.00 | Fee amounts are not set for the class. See Set fee amounts for classes. |
| You recorded the wrong amount | Click the edit (pencil) icon on the row, correct it in Edit Payment and click Save Changes. |
| A payment was recorded twice | Click the delete (bin) icon and give a reason. The payment moves to Trash (see Restore or remove a deleted fee payment). |
Restore or remove a deleted fee payment
Purpose: Review cash and bank payments that were deleted from Fee collection, and either put them back or remove them for good.
Who can use it: School Admin (restore), school owner (delete for good). The Bursar can see the list.
Where: Money › Fee collection › Trash
How it works
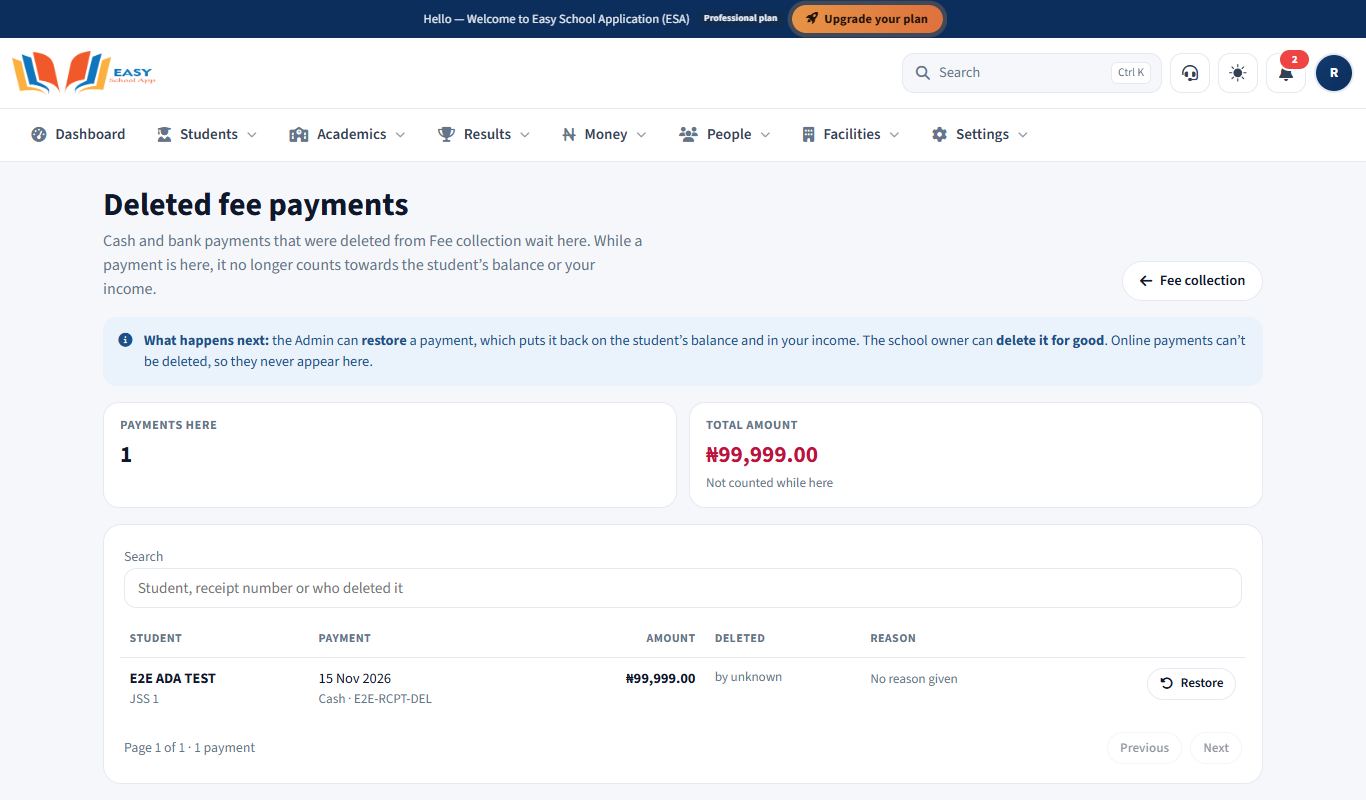
When a payment is deleted, it moves here with the reason given, who deleted it and when. While it is here it no longer counts towards the student's balance or your income. The school owner is told every time a payment is deleted.
Steps
- Open Money › Fee collection and click Trash. The top shows how many payments are waiting and their total.
- Search by student, receipt number or the person who deleted it.
- Click Restore to put a payment back. It goes back on the student's balance and into your income.
- Or, as the school owner, click Delete for good. Empty trash removes every payment in it. This can't be undone.
Common errors and fixes
| Problem | Fix |
|---|---|
| There is no Restore button | Only the School Admin can restore. Ask them. |
| "You don't have permission to do that." | Deleting for good is for the school owner only. |
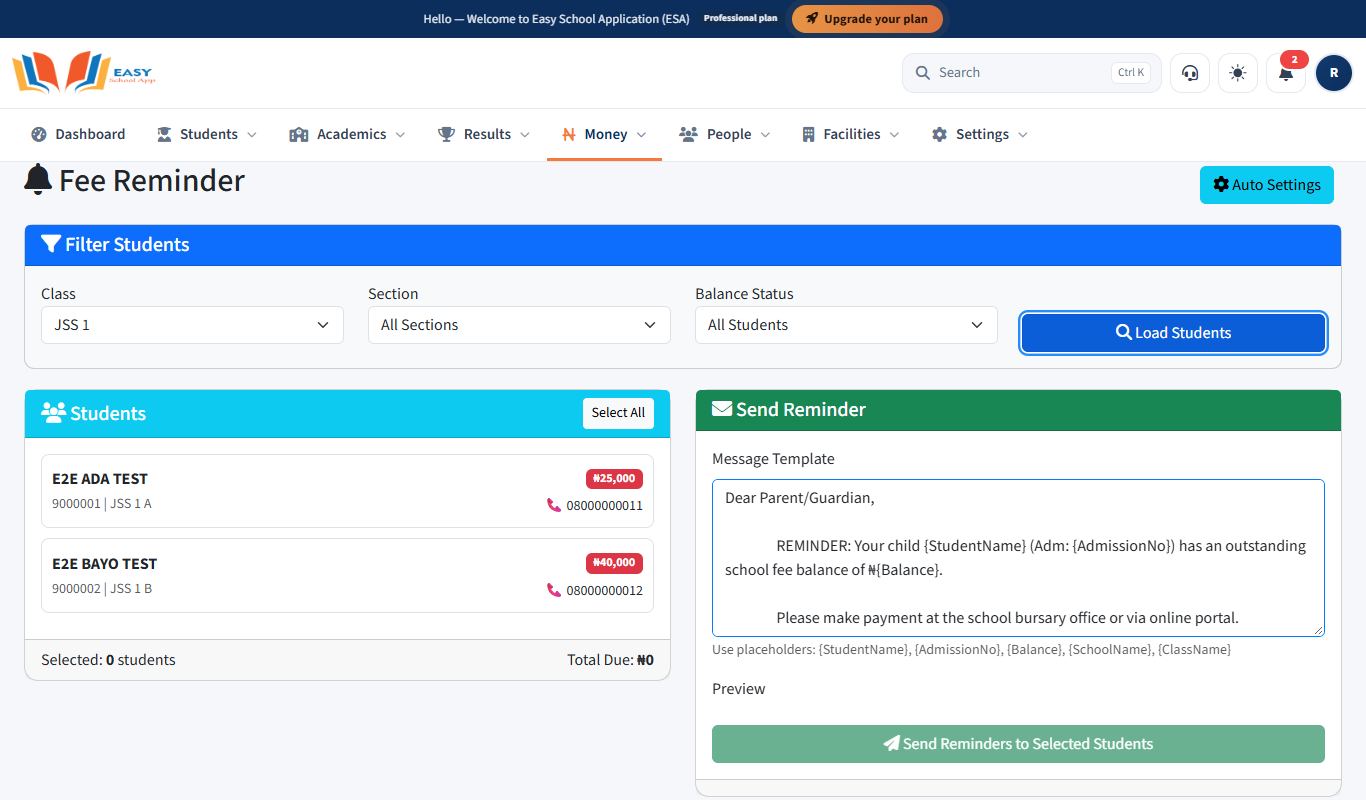
Send fee reminders to parents
Purpose: Send an SMS to parents whose children still owe fees.
Who can use it: School Admin, Bursar.
Where: Money › Fee reminders
Steps
- Open Money › Fee reminders.
- Under Filter Students, choose the Class, Section and Balance Status.
- Click Load Students. Each student shows their Balance and parent's Phone.
- Tick the students, or click Select All.
- Choose a Message Template and read the Preview.
- Click Send Reminders to Selected Students.
- Recent Reminder History shows what was sent and its Status.
Choose how online payments reach the school
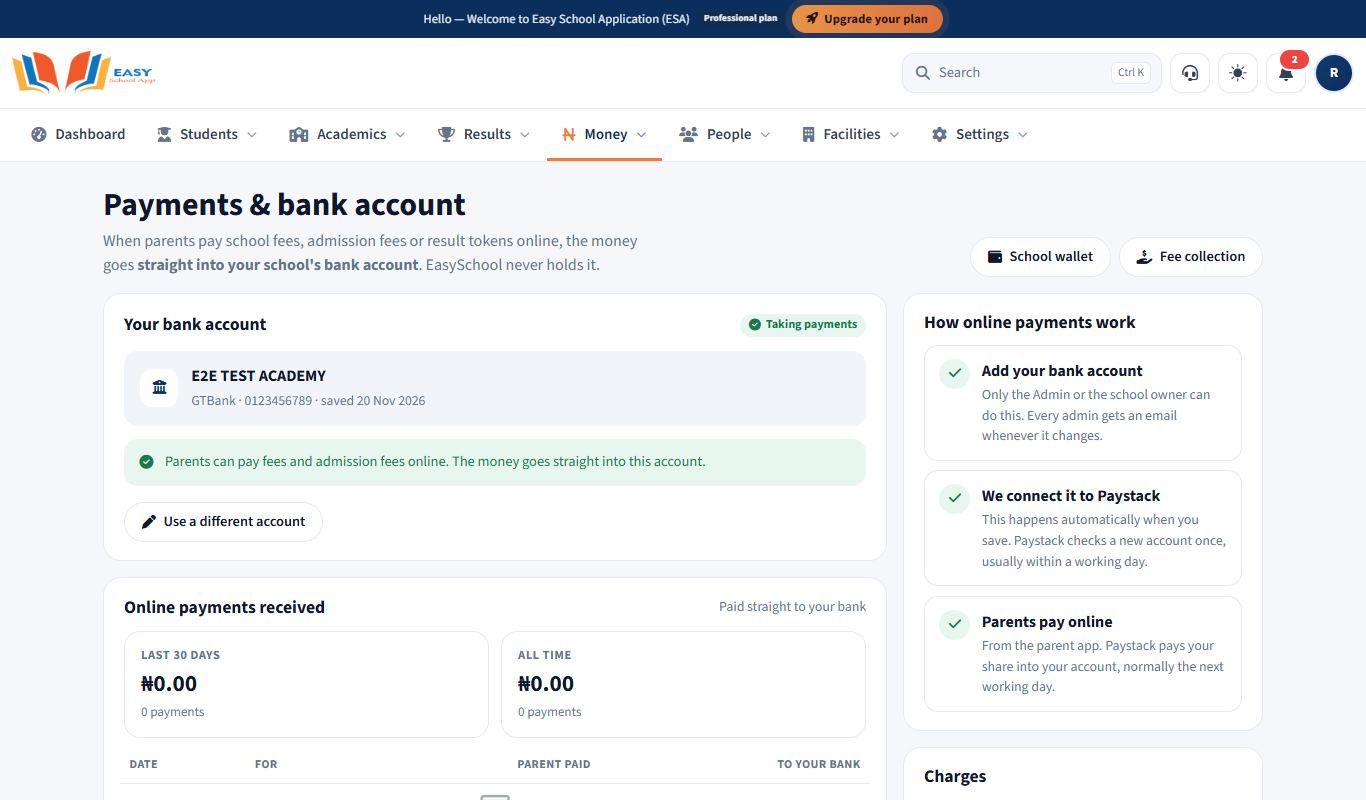
Purpose: Connect the school's bank account so that school fees, admission fees and result tokens that parents pay online go straight into it. EasySchoolApp never holds your fee money.
Who can use it: School Admin and the school owner can change the bank account. The Bursar can see it.
Where: Money › Payments & bank account
Steps
- Open Money › Payments & bank account.
- Under Your bank account, choose the Bank and type the 10-digit Account number.
- Click Check account. The account name appears. Make sure it is the school's account.
- Click Yes, use this account. The account is connected to Paystack straight away.
- The badge at the top shows the status:
- Being checked by Paystack – Paystack checks a new account once, usually within a working day. Parents can already pay; the money reaches you once the check is done.
- Taking payments – everything is ready.
What parents pay
The school receives the full fee. On top of it the parent pays EasySchoolApp's 1% processing fee and Paystack's own charge. Paystack pays the school's share into your account, normally the next working day. Online payments received on the same page lists every payment and what reached your bank.
Common errors and fixes
| Problem | Fix |
|---|---|
| "We couldn't find that account." | Check the 10-digit number and the bank, then click Check account again. |
| Not connected shows under the account | Click Try again. If it keeps failing, raise a support ticket. |
| The Bursar can't change the account | Only the School Admin or the school owner can. |
Use the school wallet
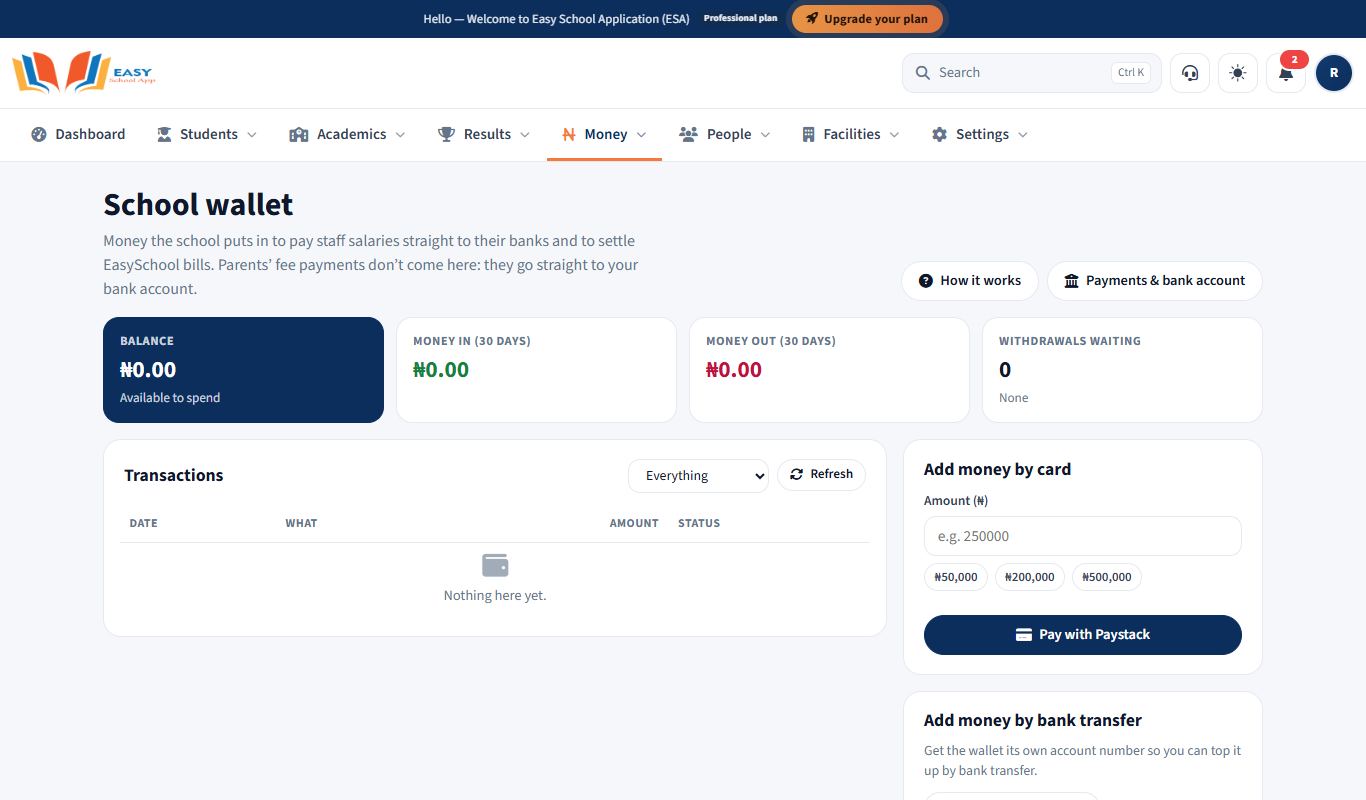
Purpose: Keep money in the app to pay staff salaries straight to their banks and to settle EasySchoolApp bills, and take money out to the school's bank account. Parents' fee payments don't come here: they go straight to your bank (see Choose how online payments reach the school).
Who can use it: School Admin, Bursar. Only the School Admin or the school owner can take money out.
Where: Money › School wallet
Steps – see the balance
- Open Money › School wallet. The top shows the Balance, Money in and Money out for the last 30 days, and Withdrawals waiting.
- Transactions lists every entry in plain words (Money in, Paid out, EasySchool term bill). Use the drop-down to show one kind only, and Refresh to update.
Steps – add money
- By card: under Add money by card, type the Amount (₦) or tap a quick amount. The box below shows exactly what you will pay, including Paystack's fee. Click Pay with Paystack.
- By bank transfer: click Get an account number once. After that, any transfer to the wallet's own account number is added automatically.
Steps – take money out
- Under Take money out, check the school's bank account shown.
- Type the Amount (₦) and click Ask for a withdrawal. Paystack's transfer fee is taken from the wallet too.
- The request shows as Waiting for approval, then Sending, until the money is sent.
Common errors and fixes
| Problem | Fix |
|---|---|
| "Add the school's bank account first." | Add it on Money › Payments & bank account. |
| A bank transfer has not appeared | Click Refresh. If it is still missing after some time, raise a support ticket with the transfer reference. |
| The Bursar can't ask for a withdrawal | Only the School Admin or the school owner can take money out. |
Print finance reports and student statements
Purpose: See where fee collection stands, what has been paid and owed, income and expenses, and one student's full payment statement.
Who can use it: School Admin, Bursar.
Where: Money › Fee analytics, Money › Finance reports and Money › Student statements
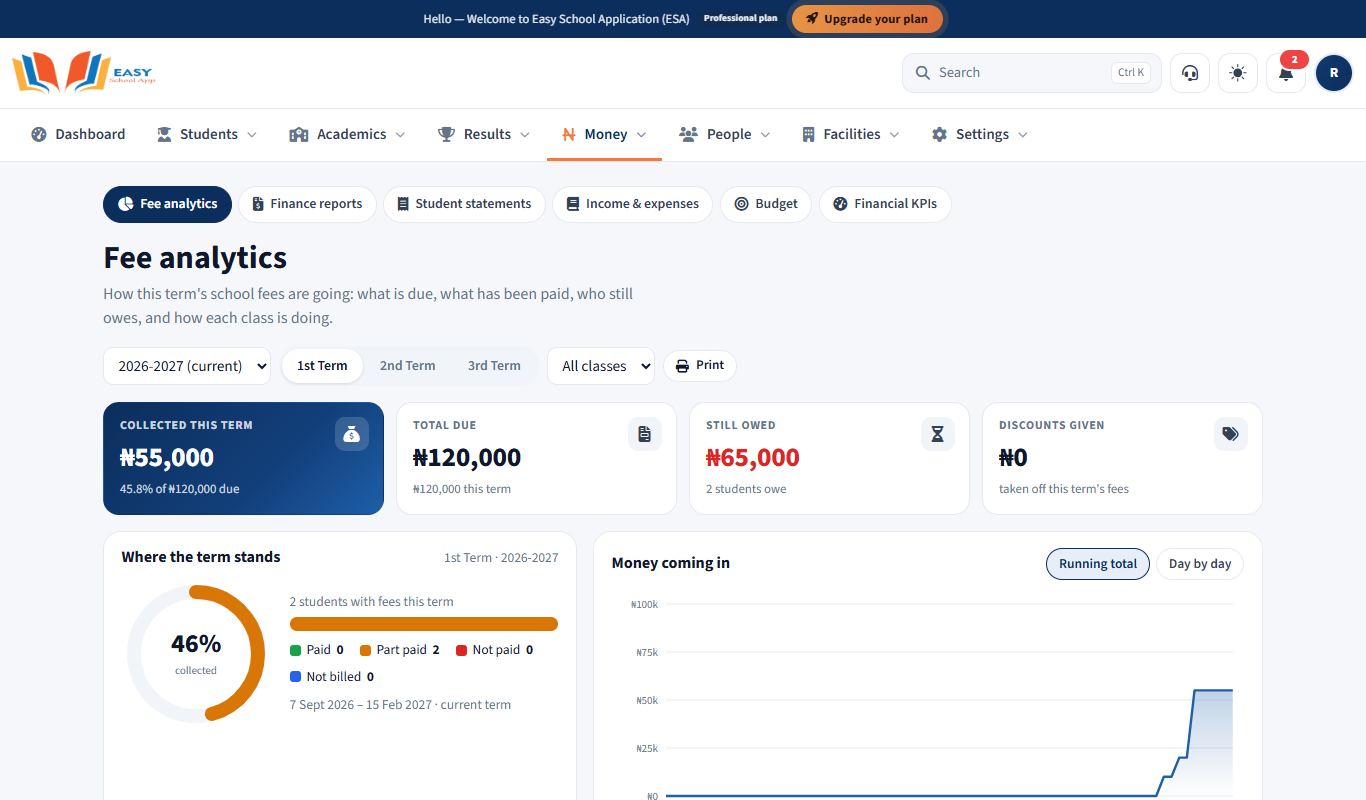
Steps – Fee analytics
- Open Money › Fee analytics.
- Where the term stands shows what is due, paid and owed for the term. Money coming in shows the running total and each day.
- Classes shows every class's progress. Owing the most lists the students with the biggest balances. How parents paid splits the money by payment mode, and What stands out points out anything unusual.
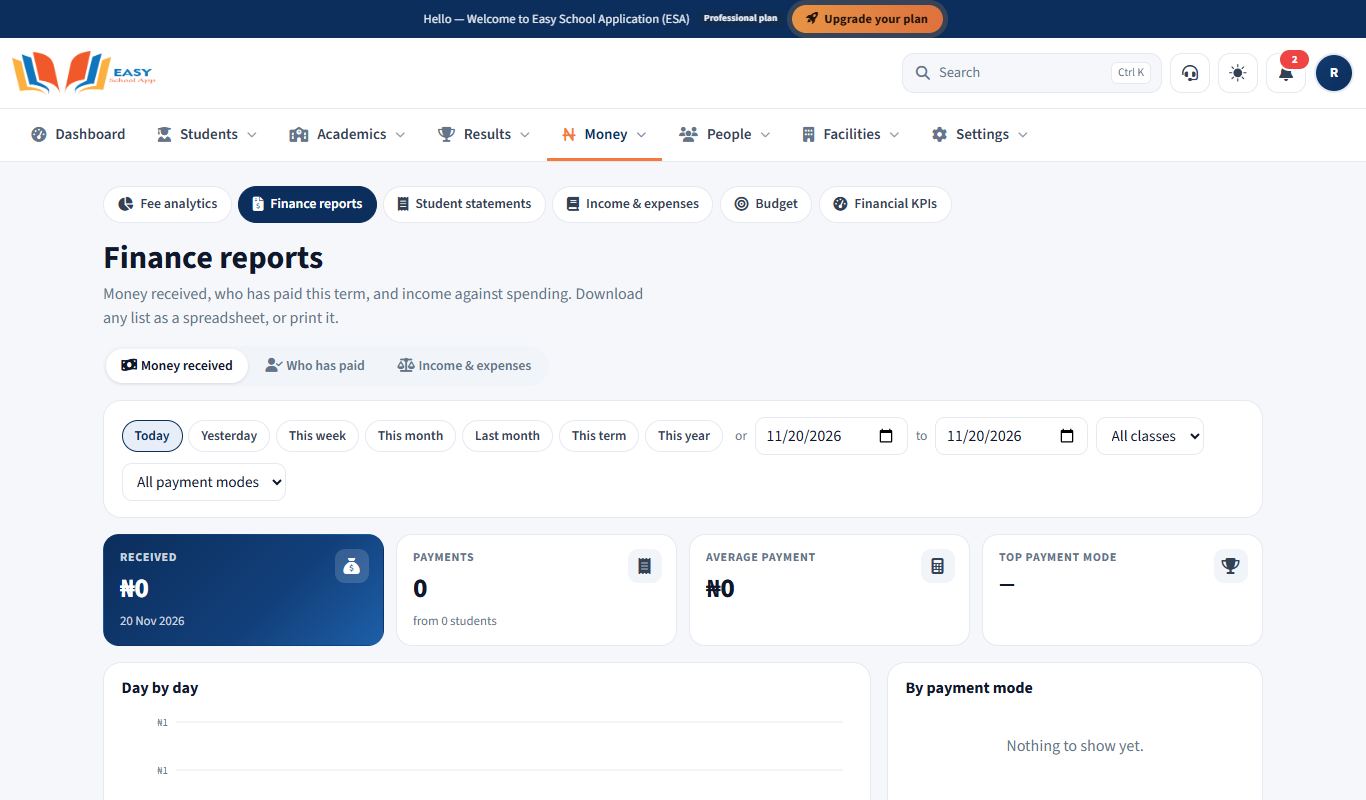
Steps – Finance reports
- Open Money › Finance reports.
- Choose a tab:
- Money received – every payment, with the balance after it. Also By payment mode.
- Who has paid – each student's term fees, anything carried over, what was paid and the balance.
- Income & expenses – month by month, where money came from and where it went.
- Choose the period (and class, where offered).
- Click Spreadsheet to download it, or Print.
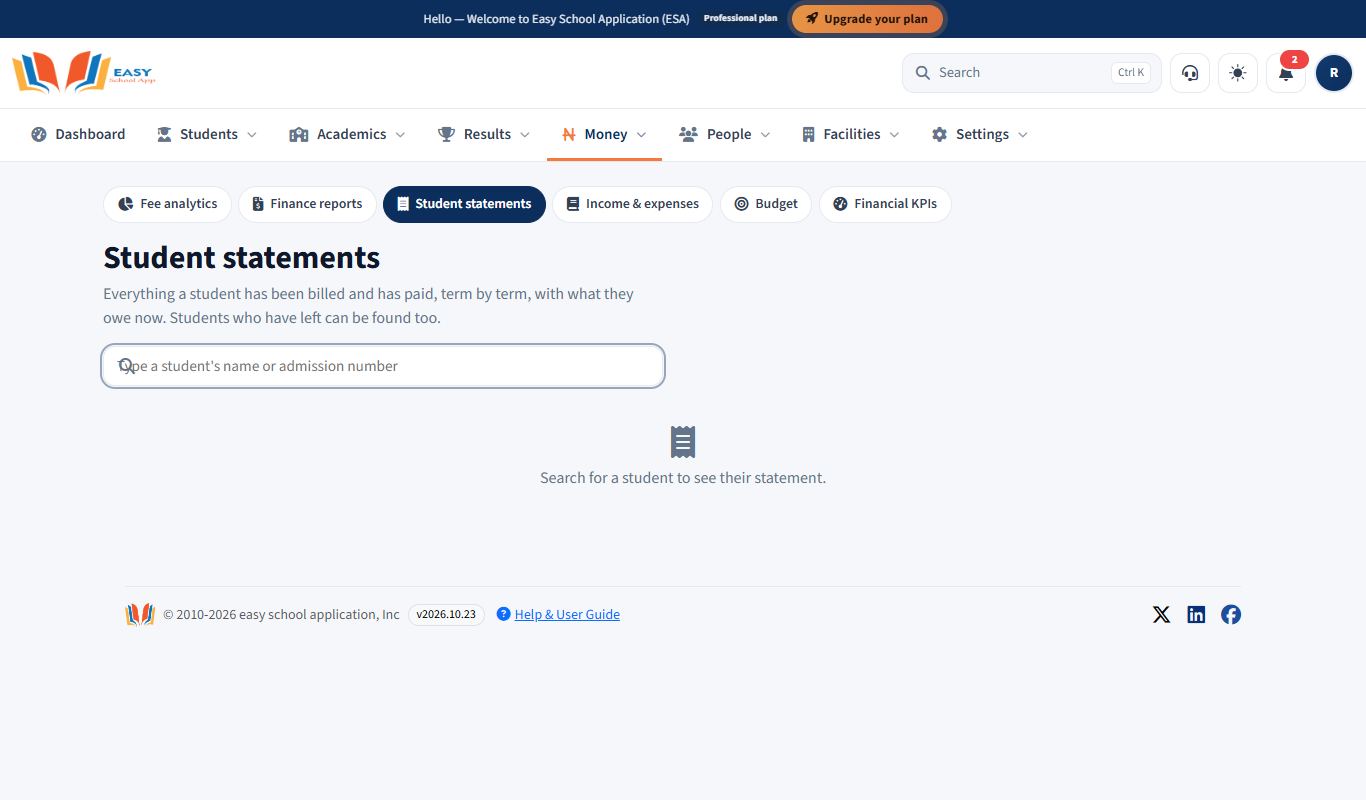
Steps – one student's statement
- Open Money › Student statements.
- Search for the student. Their payments, term by term, are listed with the balance.
- Click Print statement. Collect a payment takes you straight to recording a new one.
Read financial KPIs and profit & loss
Purpose: See how the school is doing financially: income, expenses, profit and loss, money owed, and expected income.
Who can use it: School Admin, Bursar. (Principals can also open the page by its link.)
Where: Money › Financial KPIs & P&L
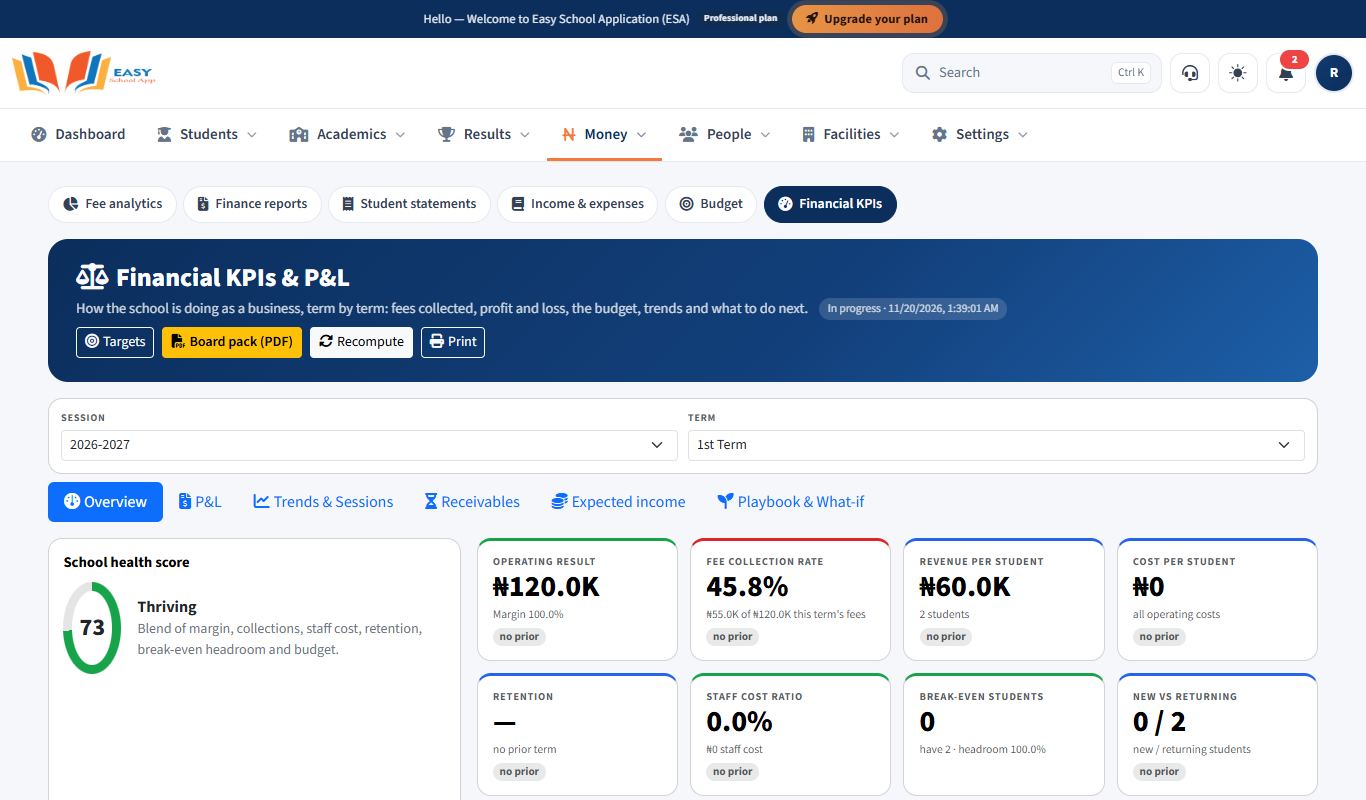
Steps
- Open Money › Financial KPIs & P&L.
- Choose the Session and Term.
- Read the tabs:
- Overview – the key numbers at a glance.
- P&L – profit and loss.
- Trends & Sessions – how this term compares with earlier ones.
- Receivables – fees still owed.
- Expected income – what the school should collect.
- Playbook & What-if – suggestions, and what happens if fees or costs change.
- Click Targets to set your school's financial targets. Use Use recommended for suggested targets, then Save targets.
- Click Board pack (PDF) for a report for the board or proprietor, or Print. Click Recompute after recording new transactions.
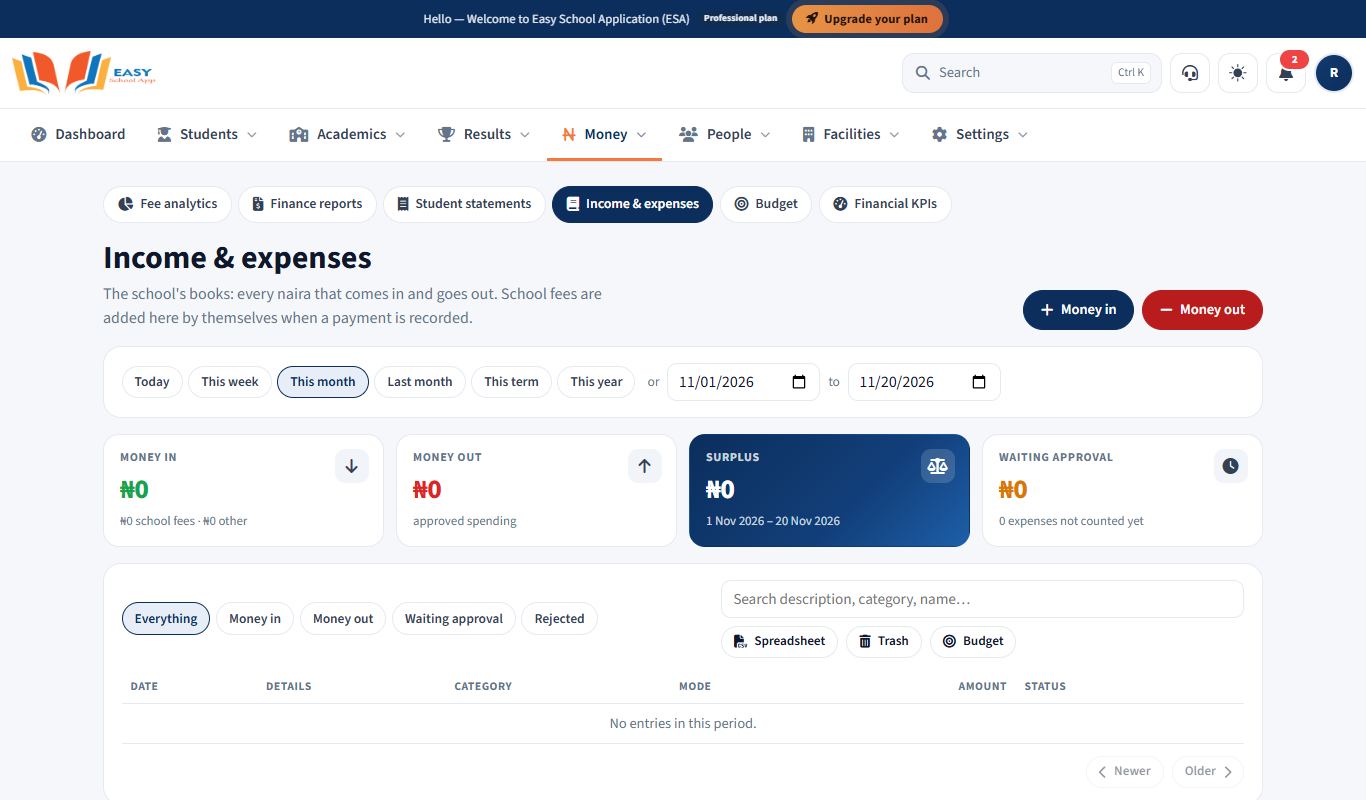
Record income and expenses
Purpose: Keep a record of money coming in (other than school fees) and going out, such as salaries, diesel, repairs and donations.
Who can use it: School Admin, Bursar. Approving expenses: School Admin.
Where: Money › Income & expenses
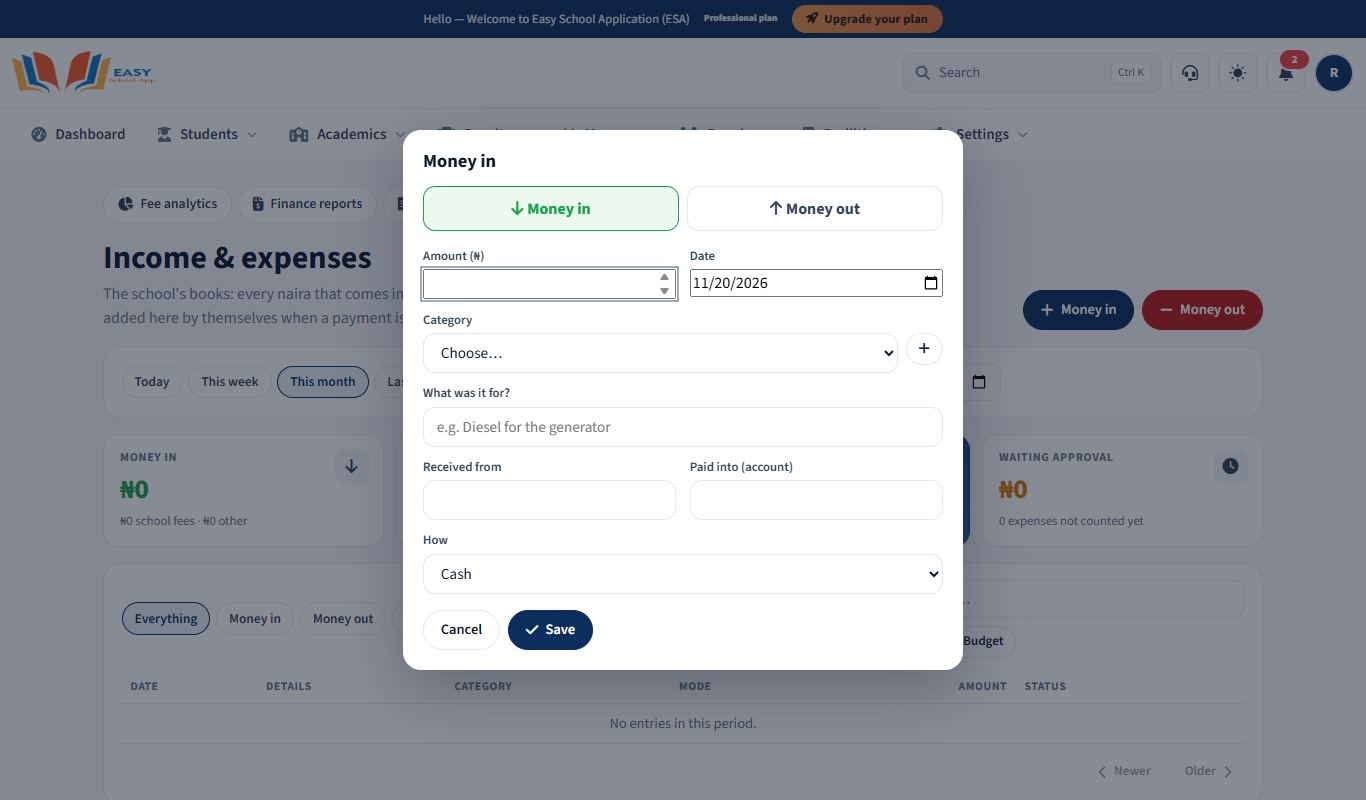
Steps
- Open Money › Income & expenses. The top shows Money in and Money out for the period.
- Click Money in or Money out to add an entry.
- Type the Amount (₦) and the date, choose the Category (or add a new one), and write What was it for?.
- Fill in Received from or Paid into, choose How it was paid, and click Save.
Plan a budget
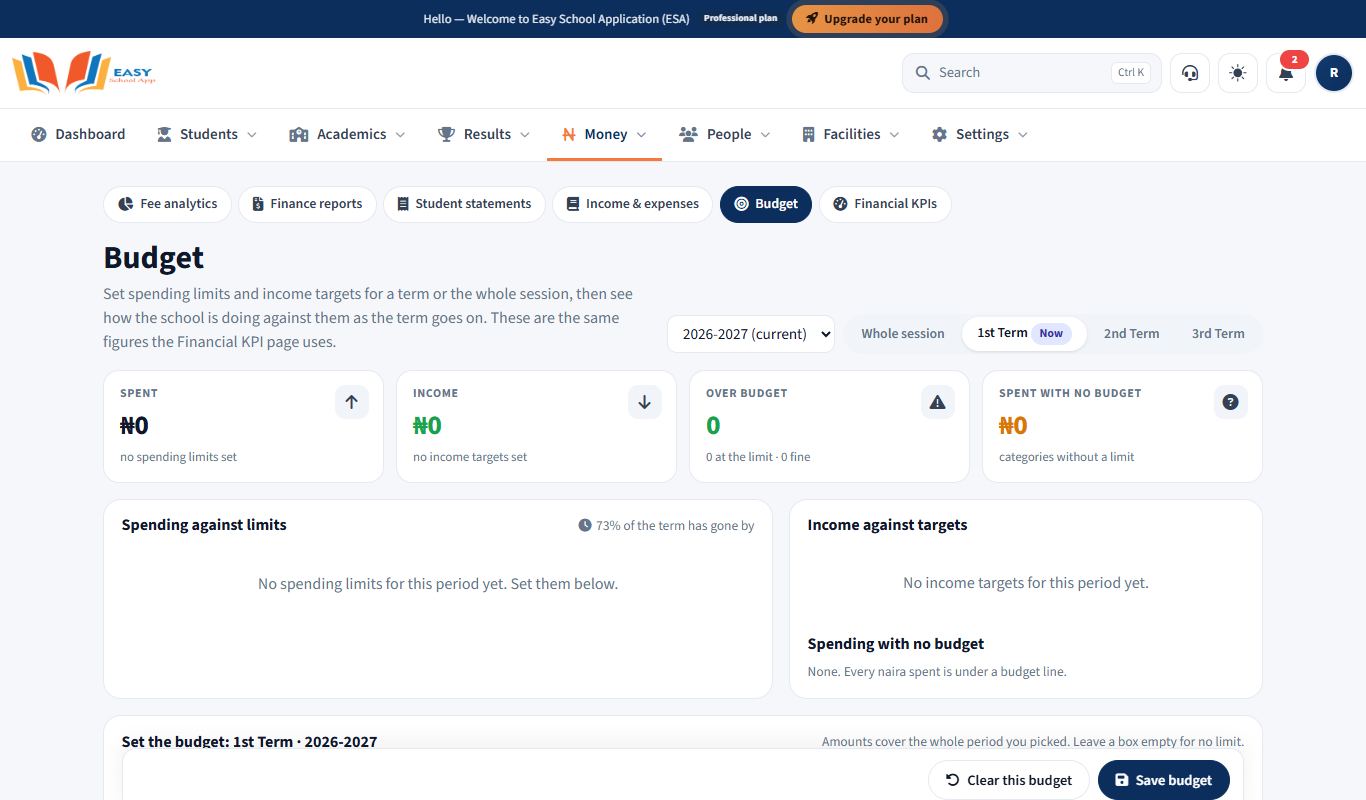
Purpose: Set spending limits and income targets for a session or term, and compare them with what really happened.
Who can use it: School Admin.
Where: Money › Budget
Steps
- Open Money › Budget and choose the session (and a term, if you want).
- The top shows Spending against limits, Income against targets and Spending with no budget, worked out from your real income and expenses.
- Under Set the budget, type a Limit (₦) for each spending category and a Target (₦) for each income line, with a Note if needed. Save.
- For a quick start, click Suggest from history. Adjust the assumptions (new admissions, fee increase, salary increase, price rises, fee collection target, contingency reserve) and click Recalculate. Choose Prudent, Expected or Stretch, tick the lines you want and click Apply ticked lines to the form.
Messaging
Buy SMS units
Purpose: Top up the SMS credit used for messages to parents and staff (admission numbers, results, fee reminders, messages you send).
Who can use it: School Admin, Principal, Bursar.
Where: People › SMS credit
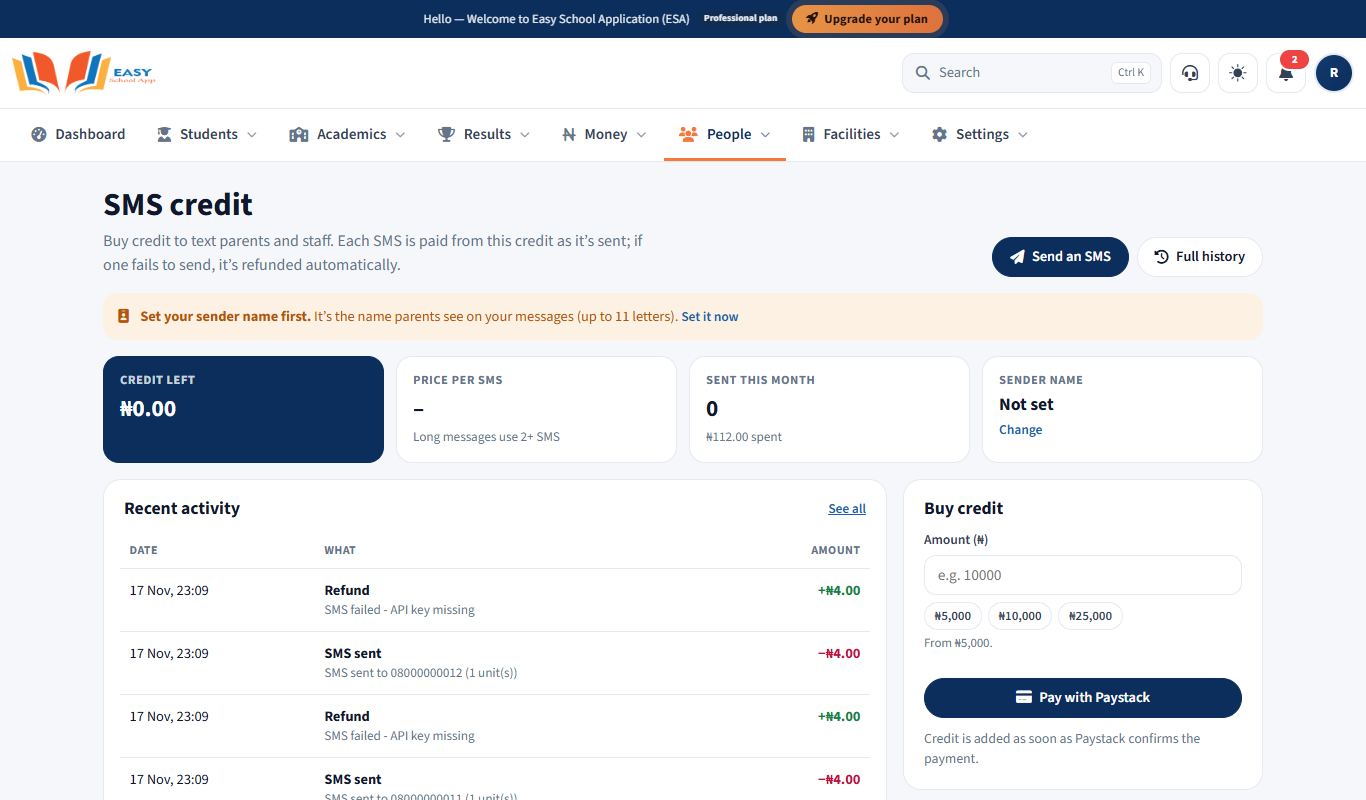
Steps
- Open People › SMS credit. The top shows your Credit left (and about how many SMS that is), the Price per SMS, how many SMS were Sent this month, and your Sender name.
- Under Buy credit, type the Amount (₦) (from ₦5,000) or tap a quick amount. The box shows the Paystack fee and what you will pay.
- Click Pay with Paystack and pay with your card or bank.
- When Paystack confirms the payment, the credit is added and shows under Recent activity.
See where the credit went
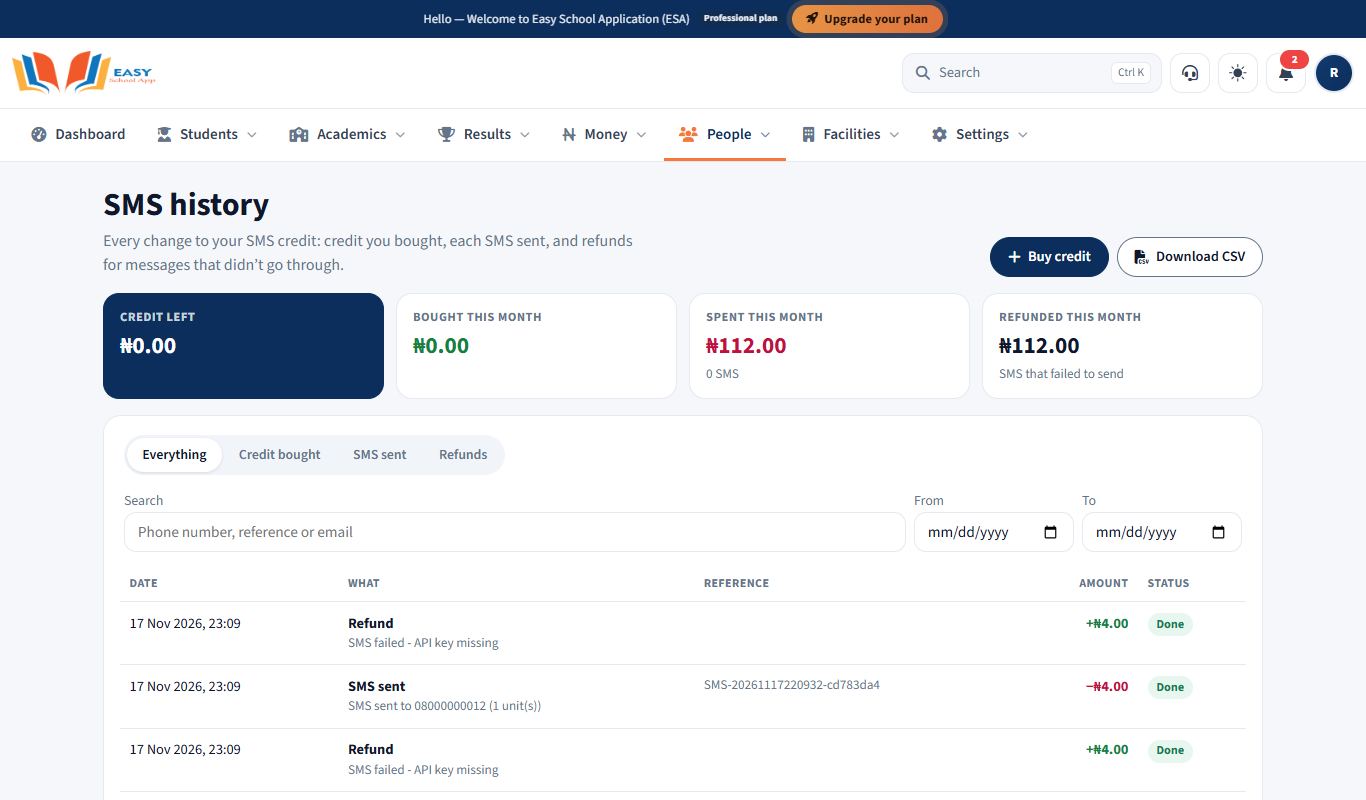
Open People › SMS history. It is one statement of every change to your credit: Credit bought, each SMS sent (with the phone number) and Refunds for messages that failed to send. Use the tabs and the search box (phone number, reference or email), pick dates, and click Download CSV for a spreadsheet.
Common errors and fixes
| Problem | Fix |
|---|---|
| "Enter an amount between ₦5,000 and ₦5,000,000." | The smallest purchase is ₦5,000. |
| You paid but the credit hasn't appeared | Wait a minute and refresh. It is added as soon as Paystack confirms the payment. If not, raise a support ticket with the reference from SMS history. |
Register your SMS sender name
Purpose: Make text messages show your school's name (for example BRIGHTHZN) instead of a phone number.
Who can use it: School Admin, Principal, Bursar.
Where: People › SMS sender name
Steps
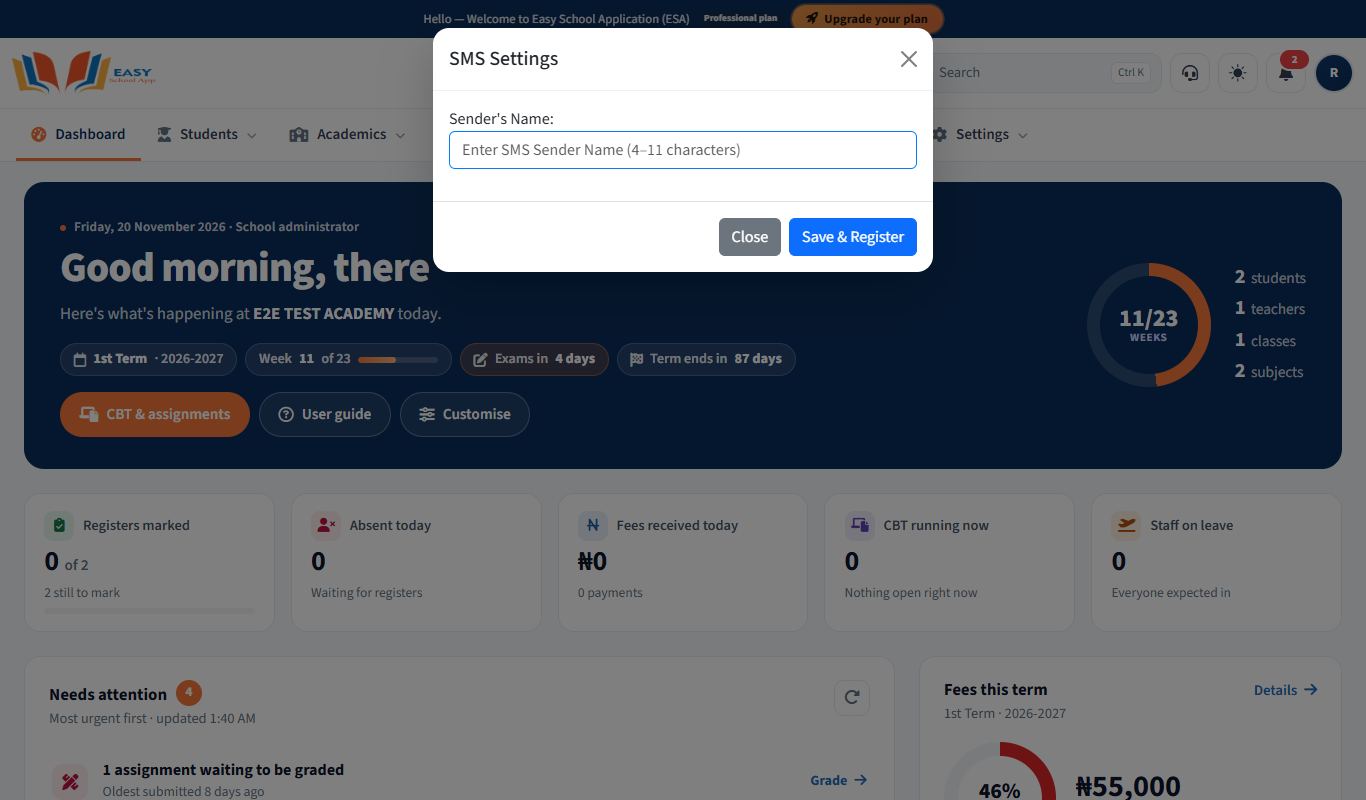
- Open People › SMS sender name. The SMS Settings box opens.
- Type the Sender's Name (up to 11 letters or numbers, no spaces is safest).
- Click Save & Register.
- Sendchamp Registration Status shows whether the name is approved. Approval is done by the network and EasySchoolApp, and can take a few days.
Send a bulk SMS to parents
Purpose: Send one message to parents, staff or a list of numbers, for example a PTA meeting, a closing date or a staff memo.
Who can use it: School Admin, Principal, Bursar.
Where: People › Send SMS & staff memos
Steps
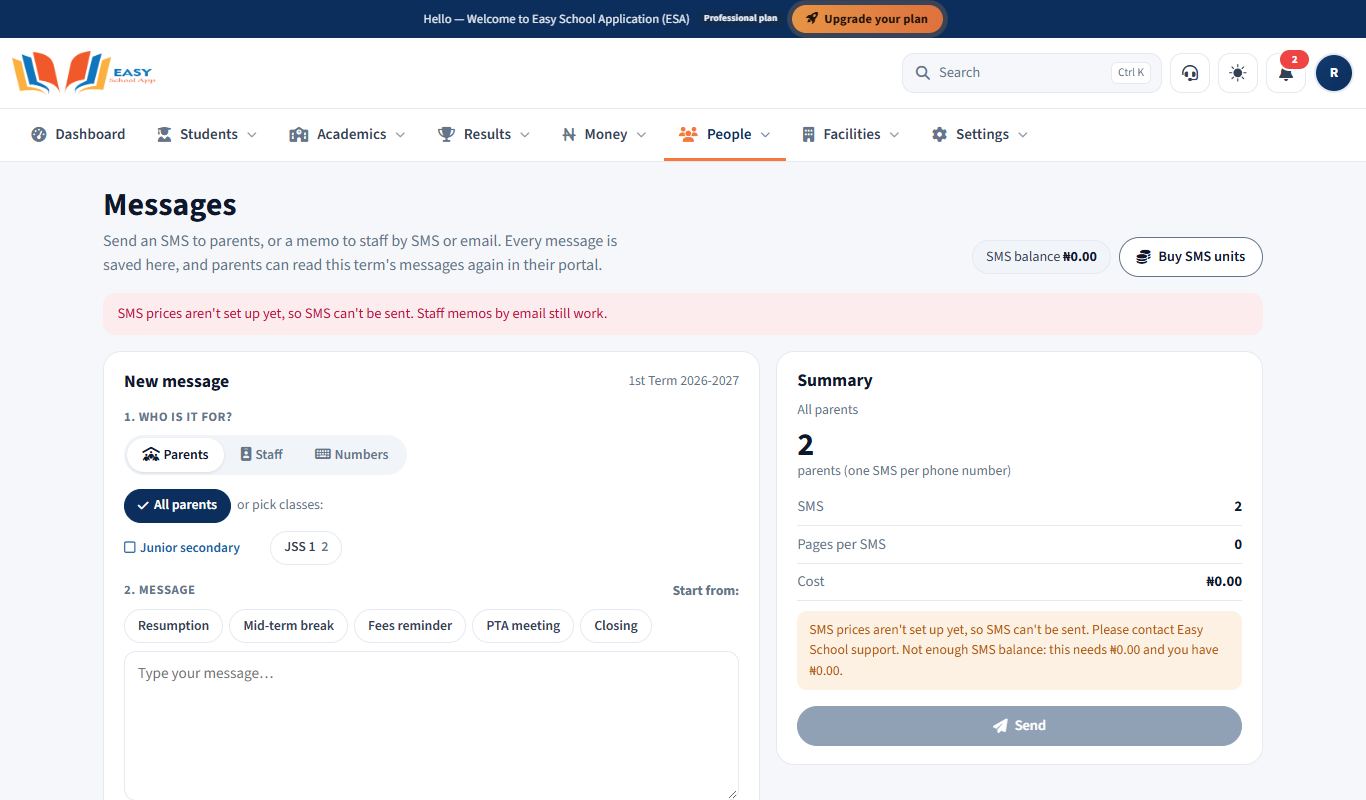
- Open People › Send SMS & staff memos.
- Choose who gets it:
- Parents – all, or tick classes and levels.
- Staff – all, or tick people. Staff memos can go by SMS, by email (free), or both, with a heading.
- Numbers – paste phone numbers.
- Type the message, or start from ready-made wording (Resumption, Mid-term break, Fees reminder, PTA meeting, Closing; Staff meeting, Results deadline, Lesson plans, Holiday notice). Replace the parts in [brackets].
- Check the summary: how many people, pages per SMS and the cost against your balance.
- Click send. Sending runs in the background, so you can leave the page.
Common errors and fixes
| Problem | Fix |
|---|---|
| Not enough credit | Top up on People › SMS credit (see Buy SMS units). |
| Some messages failed | Check the numbers on the student records, then use Send again to failed. Failed SMS are refunded automatically. |
Hostel and feeding
Manage the hostel (boarding)
Purpose: Set up hostel rooms and beds, put boarding students into beds, and collect hostel fees.
Who can use it: School Admin, Bursar.
Where: Facilities › Hostel overview
Steps – set up rooms
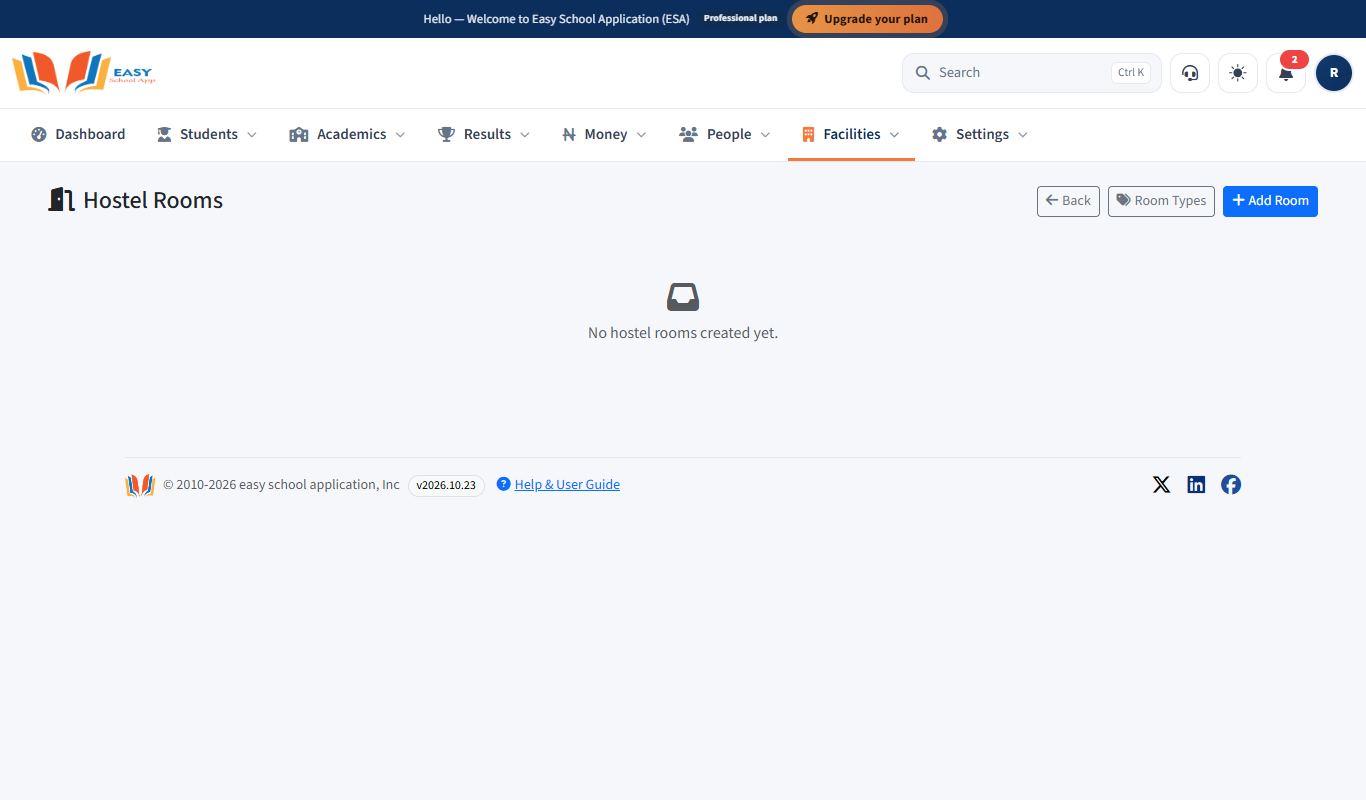
- Open Facilities › Rooms & beds.
- Click Room Types to create room types (for example "Standard 6-bed").
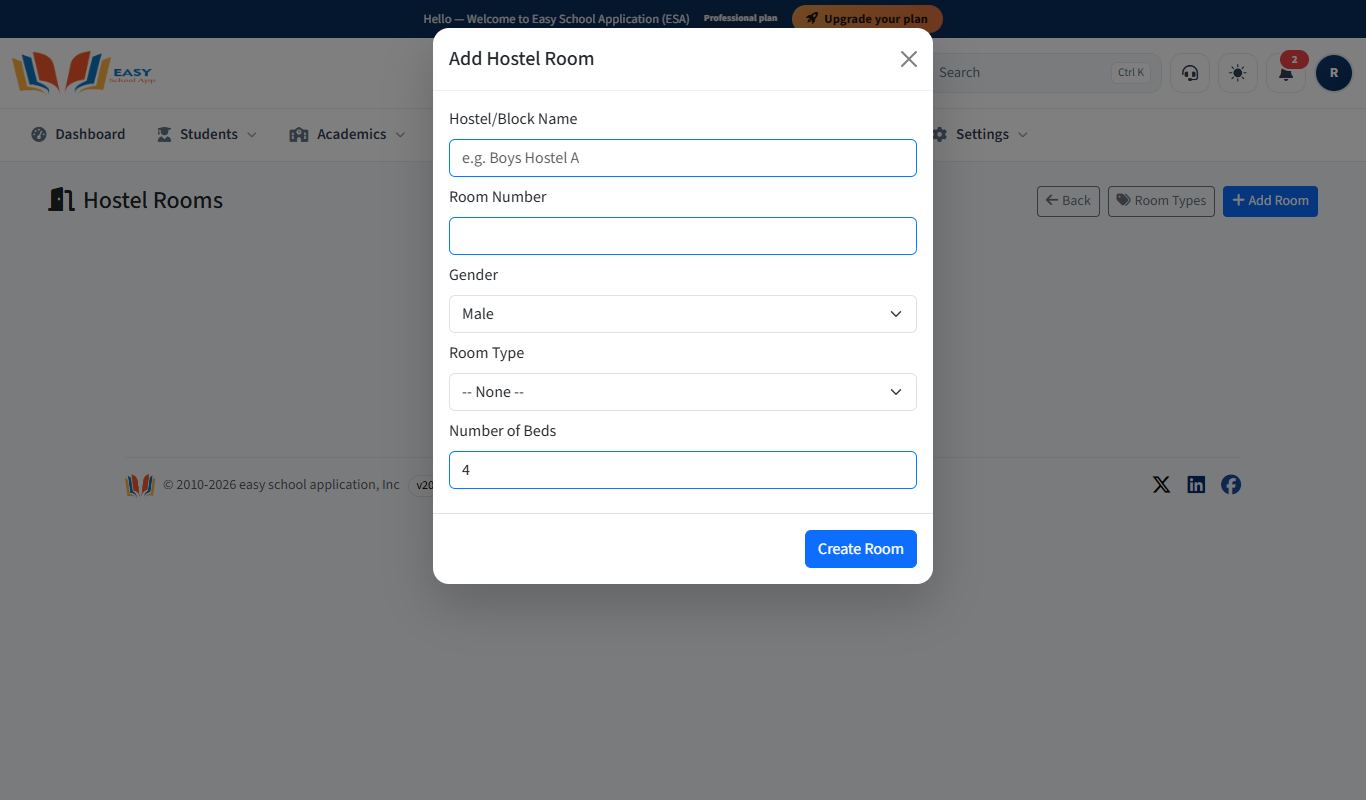
- Click Add Room. Fill in the Hostel/Block Name, Room Number, Gender, Room Type and Number of Beds. Tick Active.
- Click Create Room.
Steps – put a student in a bed
- Open Facilities › Allocate a student.
- Choose the Male or Female tab.
- Select the student and a free bed.
- Click Allocate Selected Student to Selected Bed.
- Facilities › Hostel roster lists all students in the hostel. To remove a student, use Vacate, add a Reason (optional) and click Confirm Vacate.
Steps – hostel fees
- Open Facilities › Room type fees and set the Termly Fee (₦) for each room type.
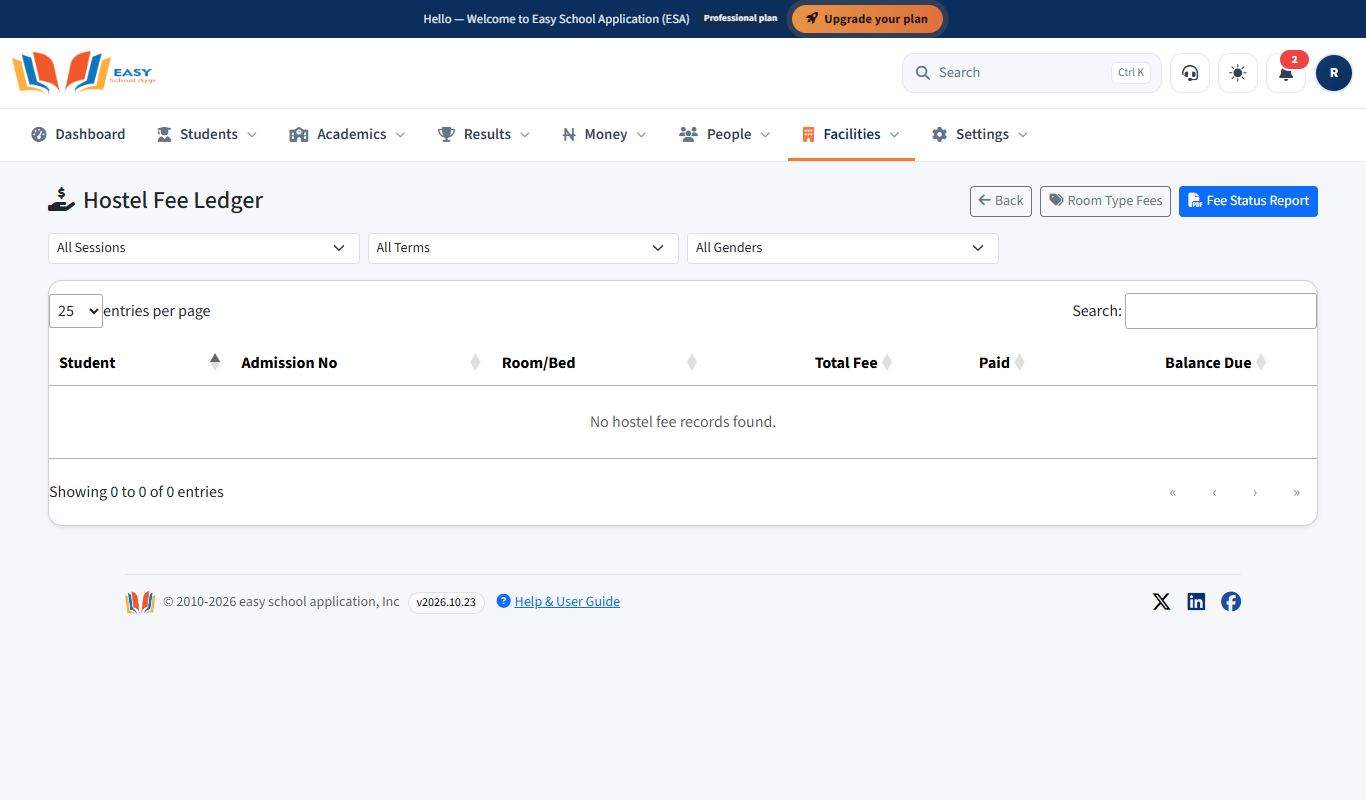
- Open Facilities › Hostel fee ledger. Each student shows the Total Fee, Paid and Balance Due.
- To record a payment, open the student and fill in Term, Amount Paid (₦), Payment Mode and Payment Details (optional). Click Record Payment.
- Click Fee Status Report to print who has paid.
Manage feeding fees and food purchases
Purpose: Charge boarding students a feeding fee and record food bought for the kitchen.
Who can use it: School Admin, Bursar.
Where: Facilities › Feeding fee ledger, Feeding Fee Setting and Food Purchases
Steps – set and collect feeding fees
- Open Feeding Fee Setting. Type the Termly Feeding Fee (₦) and click Save.
- Open Feeding Fee Ledger. Each student shows the Total Fee, Paid and Balance Due.
- To record a payment, fill in Term, Amount Paid (₦), Payment Mode and Payment Details (optional), then click Record Payment.
Steps – log a food purchase
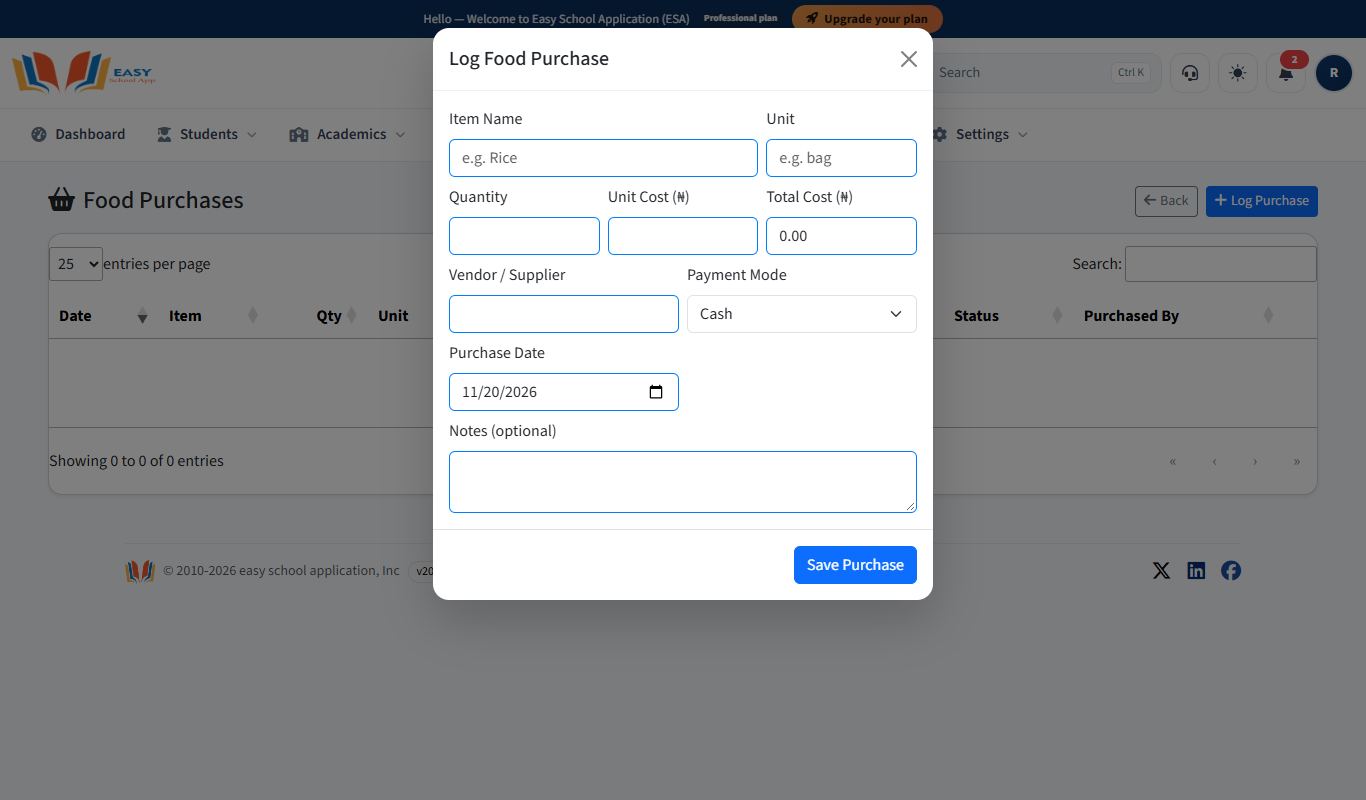
- Open Food Purchases and click Log Purchase.
- Fill in Item Name, Unit, Quantity, Unit Cost (₦) (the Total Cost is worked out), Vendor / Supplier, Payment Mode and Purchase Date. Add Notes (optional).
- Click Save Purchase.
School bus
Set up school buses and routes
Purpose: Record your buses and routes, and assign students to a route and stop. Parents can then follow the bus and are told when it reaches their stop.
Who can use it: School Admin, Bursar.
Where: Facilities › Bus overview
Steps – add a vehicle
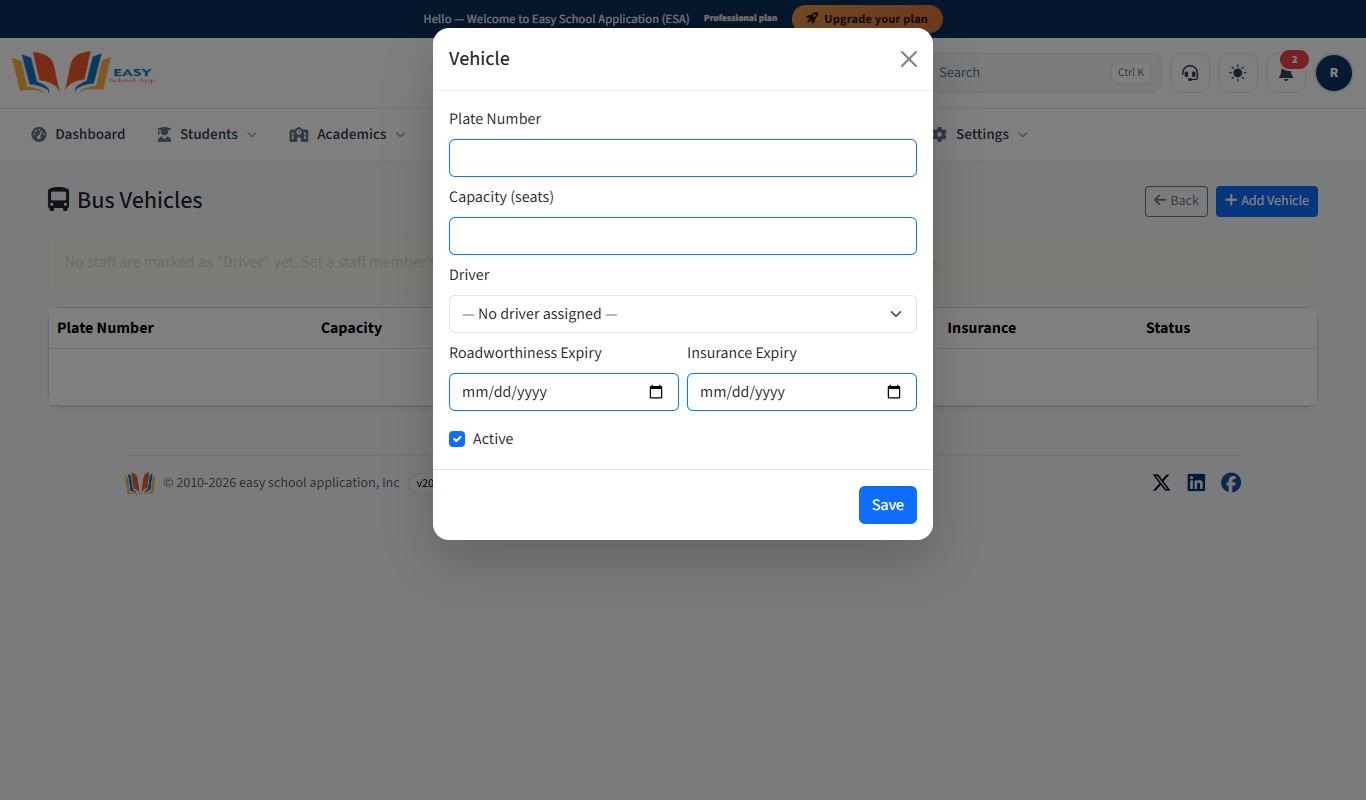
- Open Facilities › Vehicles and click Add Vehicle.
- Fill in the Plate Number, Capacity (seats), Driver, Roadworthiness Expiry and Insurance Expiry. Tick Active.
- Click Save.
Steps – add a route and stops
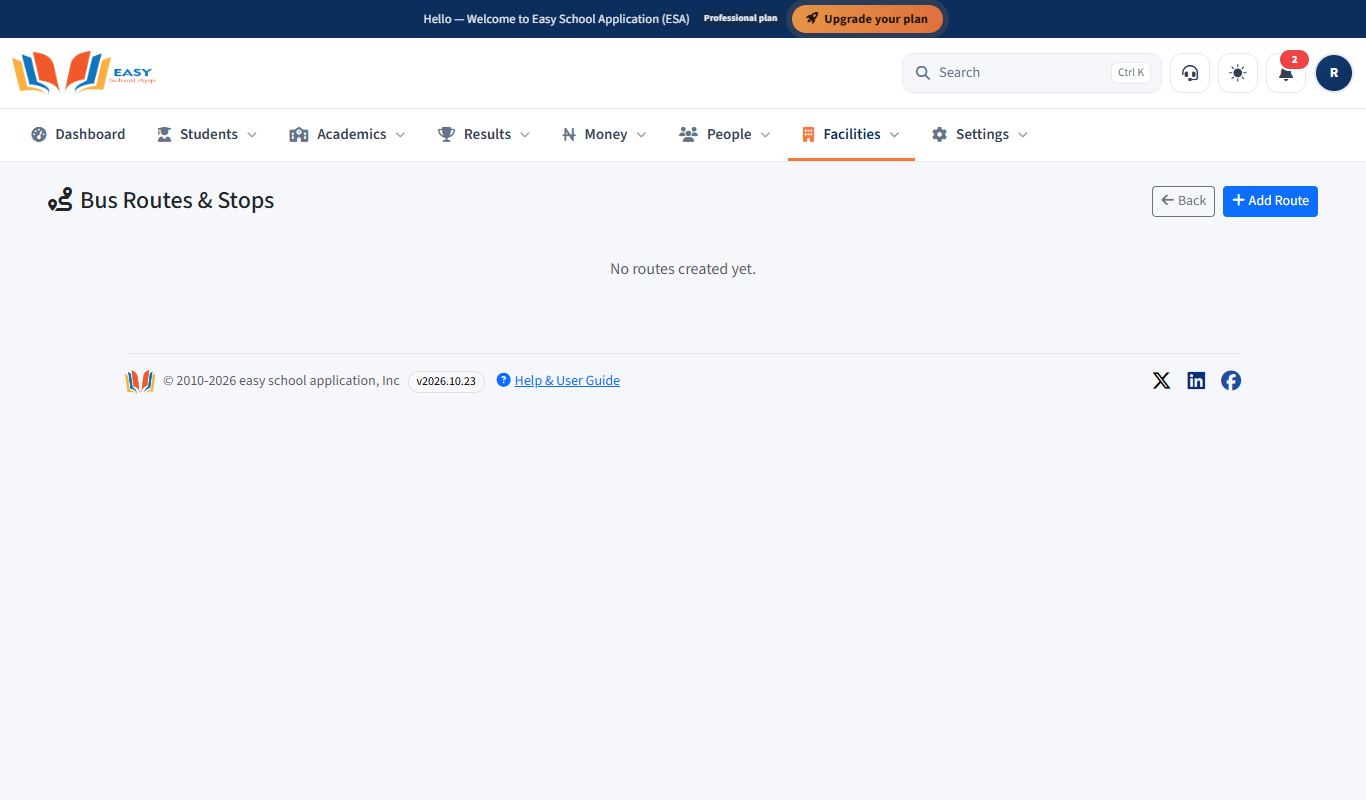
- Open Facilities › Routes & stops and click Add Route.
- Fill in the Route Name, Description and Termly Fee (₦). Tick Active. Click Save.
- On the route, click Add Stop. Type the Stop Name (for example "Junction Market Gate"), then click the map at the stop's location. The Latitude and Longitude fill in by themselves. Click Save Stop. Add stops in the order the bus reaches them.
Steps – assign students
- Open Facilities › Assign students.
- Choose the Session, Route and Stop, then select the student.
- Click Assign Selected Student.
- If the student is picked up away from the normal stops, click Set a Custom Pickup Point. Type the Pickup Point Name, Latitude and Longitude (or click Look Up This Student's Home Address), then Save & Assign.
- Facilities › Bus roster lists all students on each route and stop.
Collect bus fees and log bus expenses
Purpose: Record bus fee payments and running costs such as fuel and repairs.
Who can use it: School Admin, Bursar.
Where: Facilities › Bus fee ledger and Facilities › Bus expenses
Steps – bus fees
- Open Facilities › Bus fee ledger. Each student shows the Route / Stop, Total Fee, Paid and Balance Due.
- Open the student. Fill in Term, Amount Paid (₦), Payment Mode and Payment Details (optional).
- Click Record Payment.
Steps – bus expenses
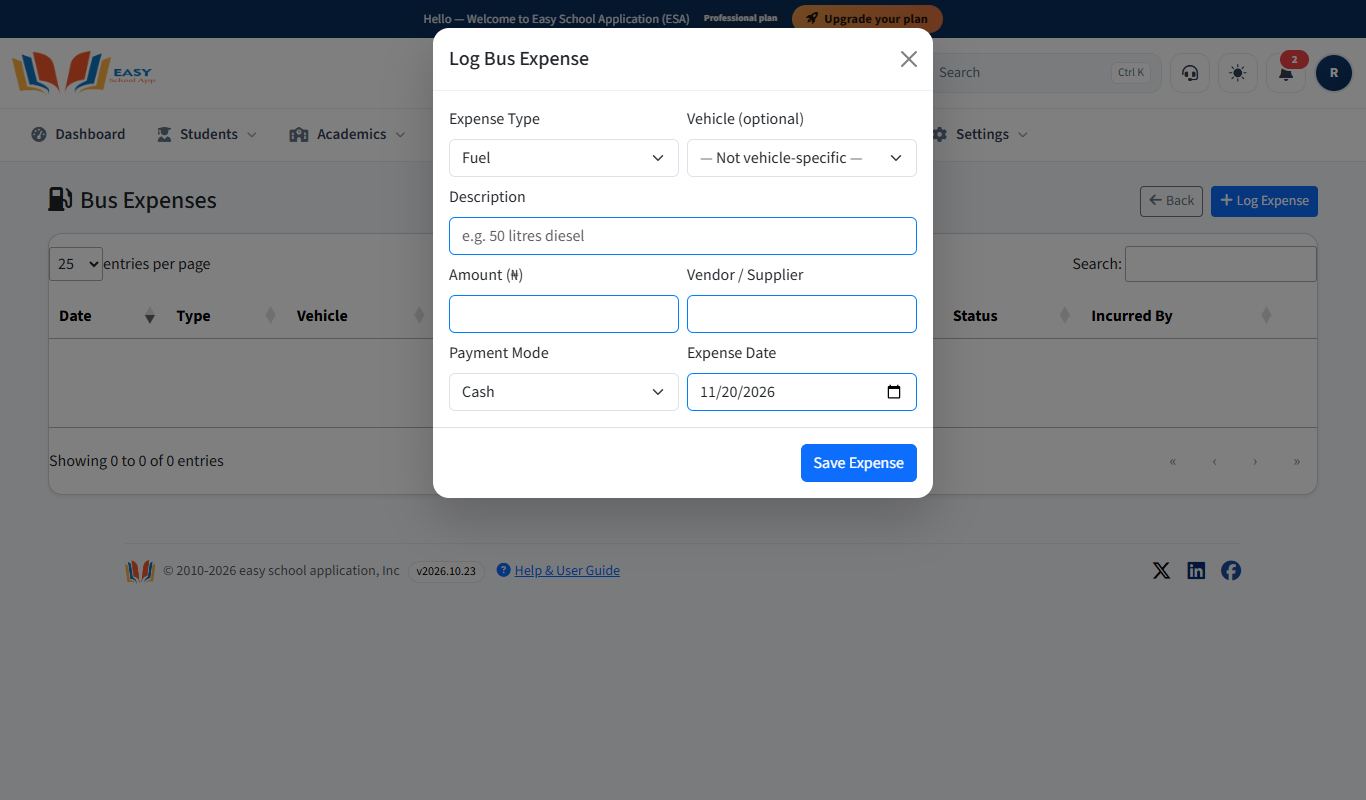
- Open Facilities › Bus expenses and click Log Expense.
- Choose the Expense Type and Vehicle (optional). Fill in the Description, Amount (₦), Vendor / Supplier, Payment Mode and Expense Date.
- Click Save Expense.
Watch buses live and check stop history
Purpose: See where each school bus is right now, and check when buses reached each stop.
Who can use it: Chief Security, School Admin, Principal.
Where: Facilities › Live tracking and Facilities › Stop history
Steps – live tracking
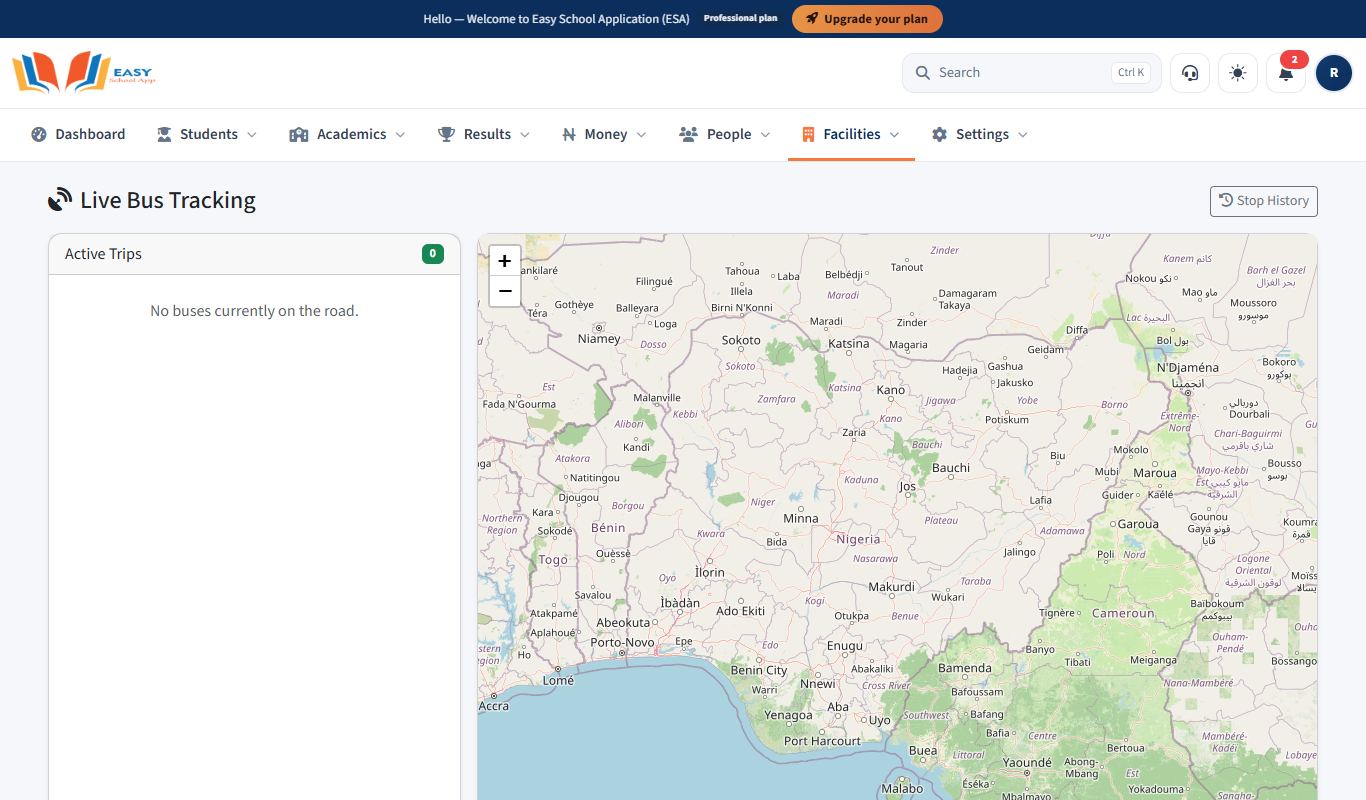
- Open Facilities › Live tracking. The Live Bus Tracking map shows each bus on a trip.
- Click a bus to see its route, driver and last update.
Steps – stop history
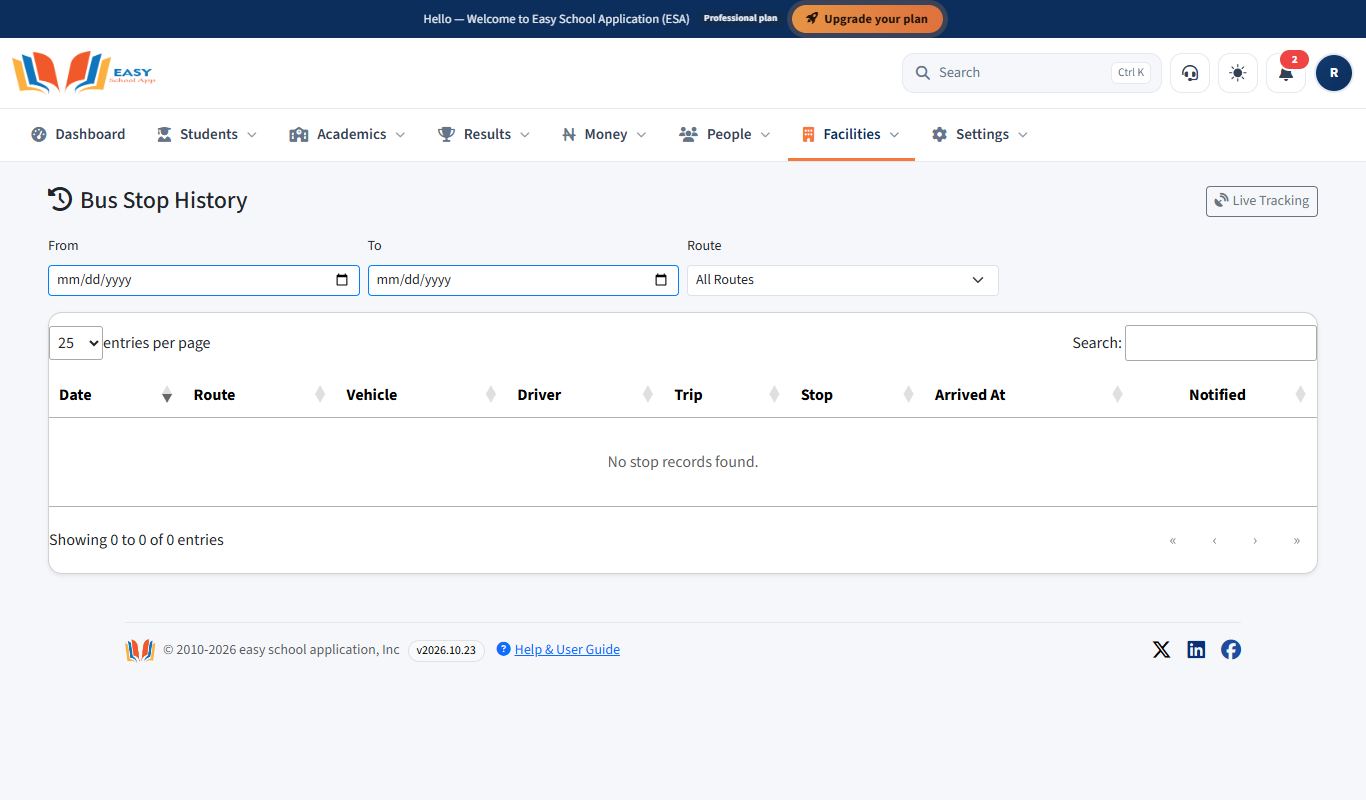
- Open Facilities › Stop history (or click Stop History on the live page).
- Choose From, To and Route.
- The table shows each Date, Route, Vehicle, Driver, Trip, Stop, Arrived At time, and whether parents were Notified.
Your account with EasySchoolApp
Manage your plan, branches and web address
Purpose: Upgrade your subscription, open new branches of your school, and use your own web address.
Who can use it: School Admin.
Where: Settings › Plans & upgrade, Settings › Request a new branch, Settings › My branches, Settings › Custom domain
Steps – upgrade your plan
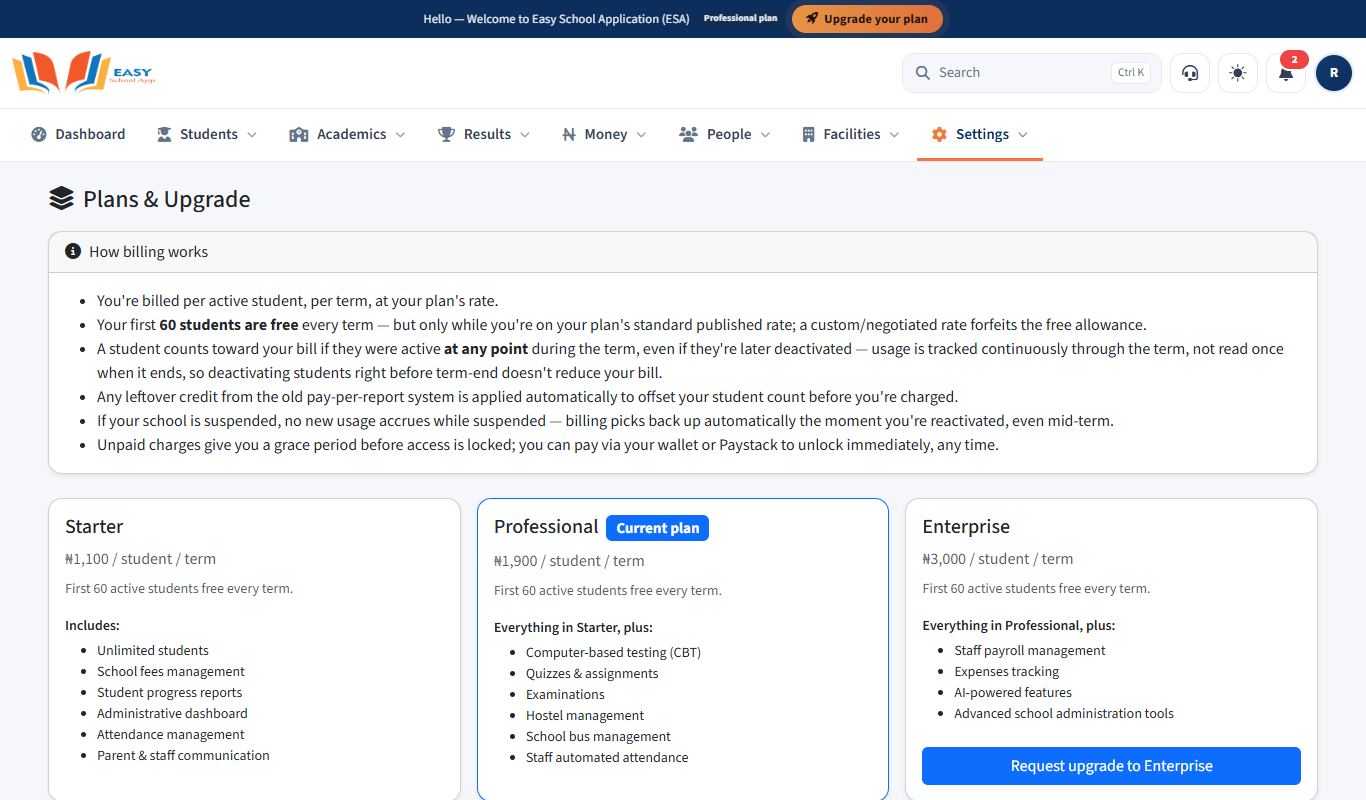
- Open Settings › Plans & upgrade (or the upgrade button at the top of the page).
- Compare Starter, Professional and Enterprise. Your plan shows Current plan.
- Choose a plan and follow the steps to request the upgrade. Past payments are listed below.
Steps – request a new branch
- Open Settings › Request a new branch.
- Fill in Branch name, Address, City, State, Country, Branch contact email and Branch contact phone.
- Click Submit request. The table shows the Status of each request. EasySchoolApp approves it.
- When approved, Settings › My branches lists each branch with its Pincode. Use Switch to to work in a branch.
Steps – custom domain
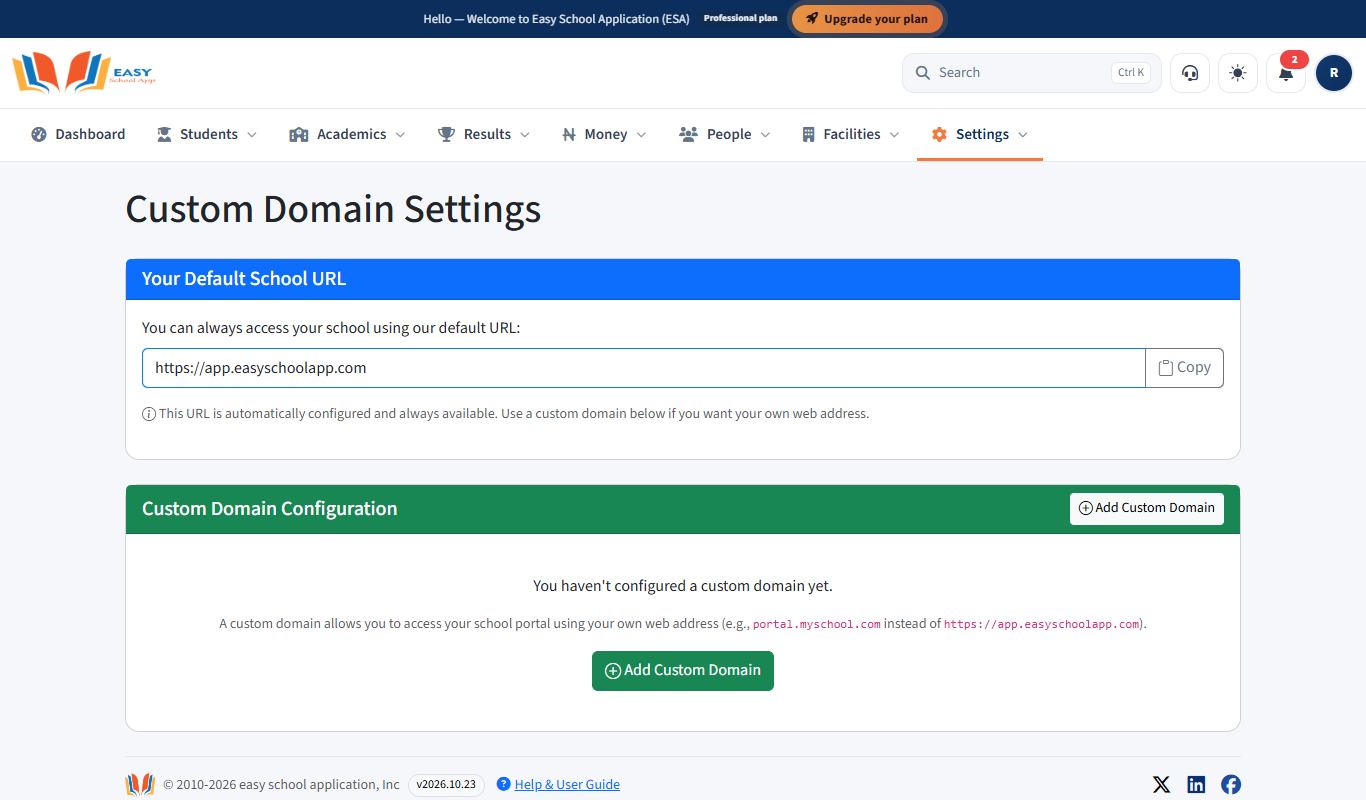
- Open Settings › Custom domain. Your Default School URL is shown; click Copy to share it.
- To use your own address (for example
portal.myschool.com), click Add Custom Domain and follow the instructions.
Ask EasySchoolApp for help (Support Tickets)
Purpose: Report a problem or ask a question to the EasySchoolApp support team, and follow their reply.
Who can use it: School Admin, Principal, Bursar.
Steps
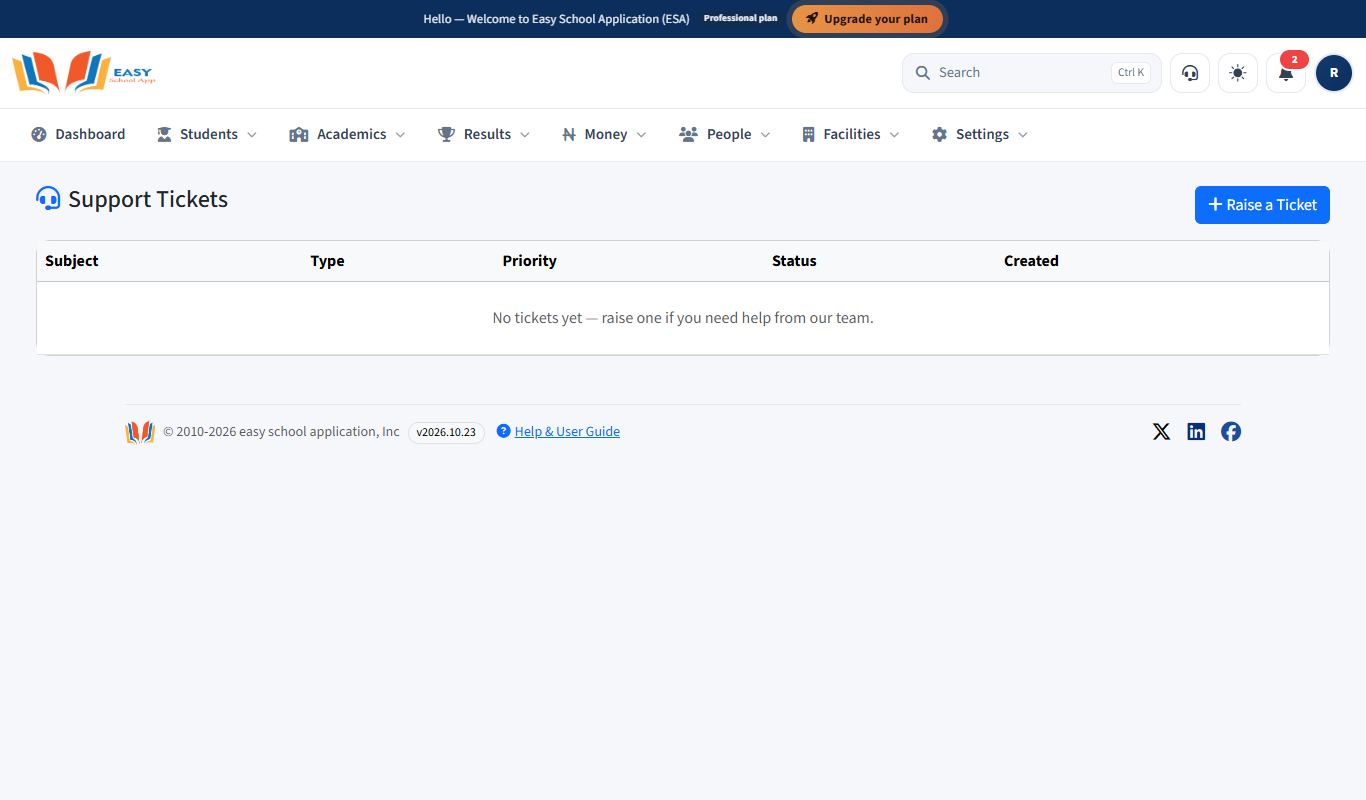
- Click the Support (headset) icon at the top right. The Support Tickets page opens.
- Click Raise a Ticket.
- Write a short Subject, choose the Type and Priority, and describe the problem. Say which page you were on and what you clicked.
- Attach a screenshot if you can.
- Send the ticket. It appears in the list with its Status.
- Open the ticket later to read replies and answer them.